
:max_bytes(150000):strip_icc():format(webp)/edit-tweet-after-publish-3476767-34af9aa3b62b4bf4b11891460076916b.png)
2024 Approved Precision in Perception Techniques for Correcting Warped Audio Cuts
Precision in Perception: Techniques for Correcting Warped Audio Cuts
Create High-Quality Video - Wondershare Filmora
An easy and powerful YouTube video editor
Numerous video and audio effects to choose from
Detailed tutorials are provided by the official channel
So you’re all set: you’ve sat down, grabbed your microphone, fired up your recording software, and started pouring out the content of your mind. Once finished, you listen back to the recording, thinking you’re about to hear the silky-smooth undertones of your voice resonating through your ears, but something odd occurs — it sounds terrible. Distorted audio is very unwelcoming since you want the sound to be natural. This guide will explain how to fix distorted audio using various methods.
In this article
01 What Causes Distorted Audio?
02 How To Fix Distorted Audio Using Different Methods
What Causes Distorted Audio?
Distorted audio is the main culprit in ruined audio clips. Here are some of the causes of distorted sound.
1. Recording Environment
Not recording dialogue and voice-over in a studio can cause distorted audio. However, audio quality can be out of control if you conduct an onsite interview. Getting a meaningful and cinematic shot should come first. If you do not use a studio-quality microphone that comes with directional controls, you’ll likely have distorted audio. You might want to go for a unidirectional stereo channel if you want boom movements to be undetectable.
When a cheap, low-quality microphone is moving, you’ll hear the unsteadiness in your recording, leading to distorted audio. Recording audio in an echo chamber or an overly large room can also result in distorted audio.
2. Touching the Mic While Recording
If you hand the microphone to someone who does not know how to use it, they might hold it too loosely or close. Microphones feature sensitive parts that should not be dropped, shaken, or breathed on. When you are interviewing people unfamiliar with industry standards, you should hold the microphone, not the person you are interviewing. The mic is not within the range of 6” to 12 “ away from the speaker, this could lead to distorted audio.
3. Using the Wrong Mic
A reliable mic comes with audio controls and captures room tone and timbre. It should be portable, compact, and have a wind sleeve. In outdoor situations where ADR is not an option, you might want to use a wind sleeve.
Podcast showrunners and content creators often use Blue Yeti mics connected to a soundboard. While these are cheaper options, they can cause distorted audio. Content creators who are not stationary should purchase a lavalier, and wireless is a more high-end and expensive option.
4. Positioning Your Microphones Incorrectly
You have to be careful if you’ll be mounting a mic on your DSLR. Filming events with a one-mic setup is a promise to record everything you hear again. You’ll inevitably film some moments at a distance and leave the audio compromised to distortion.
5. Faulty Equipment
Your equipment can fail in different ways. For instance, your effects processor can fail, meaning that you won’t hear any sound passing through it. It can also fail, and you end up hearing a distorted sound passing out of the processor. Essentially, this might or might not be linked to the component’s capability of handling the signal as much as the busted internals result.
How To Fix Distorted Audio Using Different Methods
You can fix distorted audio using various methods. They include:
Method 1: How To Fix Distorted Audio in Audacity
Audacity is the bread and butter for individuals who adore a crisp audio quality. Audacity helps users finetune various attributes of their recordings. It is a free and intuitive software suite suitable for newbies and individuals who don’t interact with computers. With that in mind, here is how to fix distorted audio using Audacity.
- Open the audio file by dragging and dropping it into Audacity.
- Select the distorted part and click on the Effect option. Then, select Noise Reduction.


- The Noise Reduction window will open.

- Now, click on Noise Profile, and Audacity will know what to filter out.
- Next, select the entire audio and open the Noise Reduction Window again ( Effect > Noise Reduction ). Then, set the values to suit your preferences.
- Hit preview to check the audio, then the Click OK button.
If the audio is still distorted, apply the filter again. Don’t overdo the process numerous times to ensure your audio is not degraded, making the voice sound robotic and tinny.
Now, use compression to your advantage. If compression confuses you, think of it as a tool that adjusts your audio for the listener’s benefit. Compression not only quiets the background minutiae that creeps into your recording, but it also boosts your voice and gives it a full, captivating resonance.
- To start the compression process, select your audio track, press CTRL + A, click “Effect” and then click “Compressor.”

- Adjust the values in the compressor to meet your needs and make your voice “pop” from the background.
- Once you have set the values, hit the Preview button to check the audio. Then, click on OK.
That is how to fix distorted audio using Audacity.
You May Be Interested In
How To Fix Distorted Audio in Garageband
Garageband is one of the most popular audio recording software available. Though you can use it for various purposes, it is mainly intended to be used to create music. However, many people have the problem of distorted audio files, making production difficult when trying to perfect a project. To learn how to fix distorted audio in Garageband, follow the steps below:
- Launch GarageBand, then open your audio file. Once your audio file finishes loading, select the audio file from which you want to remove distortion by clicking it.
- Click on the “i” symbol encapsulated in a blue circle positioned on the lower-right portion of your screen. This icon sits in the middle of two other icons: a set of notes and an eye.
- Select the “Real Instrument” tab located on the top right side of your screen. You’ll see two tabs: Master Tracks and Real Instrument.
- Click the Edit tab to activate it, and a list of effects will pop up.
- Select Distortion from the list, and you’ll see a drop-down menu.
- Next, select the None option to remove distortion.
If you have distorted audio due to poor recording quality, navigate to the Real Instrument”Edit menu and select AULowpass from the boxes available. Doing this will remove frequencies above a certain range, and this will fix the distorted audio.
Method 3: How To Fix Distorted Audio in Windows 10
Several actions can cause problems or distort sound on your Windows 10 application. Some of the common causes include:
- When upgrading your computer from an older version to a new one
- In case your computer gets corrupted with a virus
- If your computer or device doesn’t the right sound drivers
So how do you fix distorted audio in Windows 10? There are several ways you can fix distorted audio in Windows 10. Here is how to fix distorted audio using some of the best ways.
1. Reinstall drivers
- Right-click the start button and choose device manager.
- Navigate through sound, video, and game controllers.
- Click on the Details tab.
- Select hardware Ids from the drop-down menu.

- Copy and first the first value of drivers in your browser and search the internet.

- Open the official site and download the correct driver。
- Install and restart your PC。
2. Update drivers
- Right-click on the start button.
- Scroll to the sound, video, and game controllers option.
- Right-click on the sound device and select uninstall the device.

- Restart your PC after the uninstall process is finished.
- Open the device manager.
- Select and click on the scan for hardware changes option.

Windows will automatically install a new version of sound drivers
3. Run Windows Audio Troubleshooter
- To use this method, open Start and click the cog-like icon. This will open the Settings app.
- Select Update & security.
- Choose Troubleshoot in the left pane.
- Expand the Playing Audio by clicking it.
- Hit the Run the troubleshooter button, then follow the further instructions.

4. Take Exclusive Control of Your Device Option by Disabling Allow Applications
- Navigate to the notification area and right-click on the sound icon. Open Playback devices.
- Next, right-click on the default Playback Device, then open Properties.
- Choose the Advanced tab option.
- Navigate to the Exclusive mode section and check the box that says disable Allow applications to control your device.

When it comes to editing or performing audio editing in the video, Wondershare Filmora is a powerful video editing software that can help you with reducing the voiceover volume, mute the audio in the video, or cut, copy, paste or insert your audio files. Learn more about the audio editing features of Filmora from the below video & download Filmora to try!
For Win 7 or later (64-bit)
For macOS 10.12 or later
Conclusion
● Whether you’re an amateur audio enthusiast or produce a podcast with thousands of listeners, the quality of your audio can “make or break” your results. When your audience is listening to an audio recording, the last thing they want to notice or hear is a distortion because it is very distracting. When recording, it is almost impossible to find an environment that removes audio distortion without access to a recording studio. Luckily, you can use the above methods to fix distorted audio and make it look professional.
So you’re all set: you’ve sat down, grabbed your microphone, fired up your recording software, and started pouring out the content of your mind. Once finished, you listen back to the recording, thinking you’re about to hear the silky-smooth undertones of your voice resonating through your ears, but something odd occurs — it sounds terrible. Distorted audio is very unwelcoming since you want the sound to be natural. This guide will explain how to fix distorted audio using various methods.
In this article
01 What Causes Distorted Audio?
02 How To Fix Distorted Audio Using Different Methods
What Causes Distorted Audio?
Distorted audio is the main culprit in ruined audio clips. Here are some of the causes of distorted sound.
1. Recording Environment
Not recording dialogue and voice-over in a studio can cause distorted audio. However, audio quality can be out of control if you conduct an onsite interview. Getting a meaningful and cinematic shot should come first. If you do not use a studio-quality microphone that comes with directional controls, you’ll likely have distorted audio. You might want to go for a unidirectional stereo channel if you want boom movements to be undetectable.
When a cheap, low-quality microphone is moving, you’ll hear the unsteadiness in your recording, leading to distorted audio. Recording audio in an echo chamber or an overly large room can also result in distorted audio.
2. Touching the Mic While Recording
If you hand the microphone to someone who does not know how to use it, they might hold it too loosely or close. Microphones feature sensitive parts that should not be dropped, shaken, or breathed on. When you are interviewing people unfamiliar with industry standards, you should hold the microphone, not the person you are interviewing. The mic is not within the range of 6” to 12 “ away from the speaker, this could lead to distorted audio.
3. Using the Wrong Mic
A reliable mic comes with audio controls and captures room tone and timbre. It should be portable, compact, and have a wind sleeve. In outdoor situations where ADR is not an option, you might want to use a wind sleeve.
Podcast showrunners and content creators often use Blue Yeti mics connected to a soundboard. While these are cheaper options, they can cause distorted audio. Content creators who are not stationary should purchase a lavalier, and wireless is a more high-end and expensive option.
4. Positioning Your Microphones Incorrectly
You have to be careful if you’ll be mounting a mic on your DSLR. Filming events with a one-mic setup is a promise to record everything you hear again. You’ll inevitably film some moments at a distance and leave the audio compromised to distortion.
5. Faulty Equipment
Your equipment can fail in different ways. For instance, your effects processor can fail, meaning that you won’t hear any sound passing through it. It can also fail, and you end up hearing a distorted sound passing out of the processor. Essentially, this might or might not be linked to the component’s capability of handling the signal as much as the busted internals result.
How To Fix Distorted Audio Using Different Methods
You can fix distorted audio using various methods. They include:
Method 1: How To Fix Distorted Audio in Audacity
Audacity is the bread and butter for individuals who adore a crisp audio quality. Audacity helps users finetune various attributes of their recordings. It is a free and intuitive software suite suitable for newbies and individuals who don’t interact with computers. With that in mind, here is how to fix distorted audio using Audacity.
- Open the audio file by dragging and dropping it into Audacity.
- Select the distorted part and click on the Effect option. Then, select Noise Reduction.
- The Noise Reduction window will open.
- Now, click on Noise Profile, and Audacity will know what to filter out.
- Next, select the entire audio and open the Noise Reduction Window again ( Effect > Noise Reduction ). Then, set the values to suit your preferences.
- Hit preview to check the audio, then the Click OK button.
If the audio is still distorted, apply the filter again. Don’t overdo the process numerous times to ensure your audio is not degraded, making the voice sound robotic and tinny.
Now, use compression to your advantage. If compression confuses you, think of it as a tool that adjusts your audio for the listener’s benefit. Compression not only quiets the background minutiae that creeps into your recording, but it also boosts your voice and gives it a full, captivating resonance.
- To start the compression process, select your audio track, press CTRL + A, click “Effect” and then click “Compressor.”
- Adjust the values in the compressor to meet your needs and make your voice “pop” from the background.
- Once you have set the values, hit the Preview button to check the audio. Then, click on OK.
That is how to fix distorted audio using Audacity.
You May Be Interested In
How To Fix Distorted Audio in Garageband
Garageband is one of the most popular audio recording software available. Though you can use it for various purposes, it is mainly intended to be used to create music. However, many people have the problem of distorted audio files, making production difficult when trying to perfect a project. To learn how to fix distorted audio in Garageband, follow the steps below:
- Launch GarageBand, then open your audio file. Once your audio file finishes loading, select the audio file from which you want to remove distortion by clicking it.
- Click on the “i” symbol encapsulated in a blue circle positioned on the lower-right portion of your screen. This icon sits in the middle of two other icons: a set of notes and an eye.
- Select the “Real Instrument” tab located on the top right side of your screen. You’ll see two tabs: Master Tracks and Real Instrument.
- Click the Edit tab to activate it, and a list of effects will pop up.
- Select Distortion from the list, and you’ll see a drop-down menu.
- Next, select the None option to remove distortion.
If you have distorted audio due to poor recording quality, navigate to the Real Instrument”Edit menu and select AULowpass from the boxes available. Doing this will remove frequencies above a certain range, and this will fix the distorted audio.
Method 3: How To Fix Distorted Audio in Windows 10
Several actions can cause problems or distort sound on your Windows 10 application. Some of the common causes include:
- When upgrading your computer from an older version to a new one
- In case your computer gets corrupted with a virus
- If your computer or device doesn’t the right sound drivers
So how do you fix distorted audio in Windows 10? There are several ways you can fix distorted audio in Windows 10. Here is how to fix distorted audio using some of the best ways.
1. Reinstall drivers
- Right-click the start button and choose device manager.
- Navigate through sound, video, and game controllers.
- Click on the Details tab.
- Select hardware Ids from the drop-down menu.
- Copy and first the first value of drivers in your browser and search the internet.
- Open the official site and download the correct driver。
- Install and restart your PC。
2. Update drivers
- Right-click on the start button.
- Scroll to the sound, video, and game controllers option.
- Right-click on the sound device and select uninstall the device.
- Restart your PC after the uninstall process is finished.
- Open the device manager.
- Select and click on the scan for hardware changes option.
Windows will automatically install a new version of sound drivers
3. Run Windows Audio Troubleshooter
- To use this method, open Start and click the cog-like icon. This will open the Settings app.
- Select Update & security.
- Choose Troubleshoot in the left pane.
- Expand the Playing Audio by clicking it.
- Hit the Run the troubleshooter button, then follow the further instructions.
4. Take Exclusive Control of Your Device Option by Disabling Allow Applications
- Navigate to the notification area and right-click on the sound icon. Open Playback devices.
- Next, right-click on the default Playback Device, then open Properties.
- Choose the Advanced tab option.
- Navigate to the Exclusive mode section and check the box that says disable Allow applications to control your device.
When it comes to editing or performing audio editing in the video, Wondershare Filmora is a powerful video editing software that can help you with reducing the voiceover volume, mute the audio in the video, or cut, copy, paste or insert your audio files. Learn more about the audio editing features of Filmora from the below video & download Filmora to try!
For Win 7 or later (64-bit)
For macOS 10.12 or later
Conclusion
● Whether you’re an amateur audio enthusiast or produce a podcast with thousands of listeners, the quality of your audio can “make or break” your results. When your audience is listening to an audio recording, the last thing they want to notice or hear is a distortion because it is very distracting. When recording, it is almost impossible to find an environment that removes audio distortion without access to a recording studio. Luckily, you can use the above methods to fix distorted audio and make it look professional.
The Expert’s Choice: Identifying the Top 11 High-Quality, Fee-Free Speech Alteration Tools for iPhone & Android Users
Best Voice Changer Apps for iPhone and Android

Benjamin Arango
Mar 27, 2024• Proven solutions
Have you ever wondered what your voice would sound like if you were a cartoon character, a robot, or an older version of yourself? Changing how your voice sounds has never been easier, regardless of the Smartphone model you have, since voice changer apps can be used on both iPhone and Android devices.
Even though there is nothing wrong with modulating your voice to have fun with your friends, using voice changer apps to pull malicious pranks or bully strangers online is far from acceptable. Read on if you would like to find out more about the best voice changer apps for iPhone and Android devices and discover the one you enjoy using the most.
Best Voice Changer Apps for iPhone and Android
Creating a new ringtone, making a voice recording, or having fun with your friends are only a few reasons why so many people choose to try out voice changer apps. The vast majority of these apps feature well-equipped audio effects libraries that enable users to have fun with their friends and hear how they would sound if they were drunk or after inhaling helium. So, let’s take a look at some of the best voice changer apps on the market.


Changing video voice on Windows and Mac with Wondershare Filmora
Do you want to change the voice in video on Windows and Mac and don’t know which software can meet this requirement? Try Filmra video editor , which provides several ways to change voice over, such as changing the voice speed or changing the pitch. Download the trial version below and find out more possibility in video creation with Filmora.
1. Celebrity Voice Changer – Face
Price: Free, but offers in-app purchases
Compatibility: iOS 9.0 or later
User Rating: 4.0
In case you would like to sound like your favorite movie star of TV host, then Celebrity Voice Changer is one of the best choices you can make. Besides the standard set of options, the app also lets you request new voices since its machine learning technology can mimic virtually anyone’s voice. However, Celebrity Voice Changer is currently only available in English and it cannot modulate speech in other languages. In addition, you must make an in-app purchase in order to gain access to all of the app’s features or unlock the unlimited usage of the app.
Pros
- Automatic voice modulation
- Huge selection of voice filters
- The app generates video files that are better adjusted to the audience on social media than audio files
- Excellent impressions of celebrities
Cons
- Unreasonably expensive
- The app’s Deep Learning technology still has a lot of room for improvement
2. Snapchat
Price: Free, but offers in-app purchases
Compatibility: iOS 10.0 or later, Android 4.4 or up
User Rating: 3.8
With more than 203 million daily users, Snapchat is one of the largest messaging platforms on the market. Previously, we’ve shared how to change gender on Snapchat , beside that, the app lets its users capture short moments or the so-called Snaps and share them with friends. In addition to hundreds of video filters , Snapchat also features a broad spectrum of voice changing effects that make Snaps more entertaining. Even so, the audio recording options Snapchat offers are far from ideal, because the app doesn’t allow you to edit the files you create with it. Using Snapchat will drain your battery quickly, which is why you must pay attention to how frequently you use this app.
Pros
- The easy voice modulation process
- Excellent messaging options
- Grants you access to a large community of likeminded people
- Lenses and filters are updated on a daily basis
Cons
- Editing voice changes after you create a Snap is not possible
- Snapchat is not primarily a voice changer app
Check the detailed information about How to Change Voice on Snapchat with 2 Easy Methods >>
3. Voice Changer
Price: Free
Compatibility: Android 4.1 and up
User Rating: 4.3

Changing your voice with this app won’t take more than a few moments of your time. You just have to launch the app and hit the microphone button to record a message or a joke you would like to modulate. Once you’re happy with the audio recording you made, you can proceed to choose from more than twenty voice effects that will make you sound like a dwarf, a robot, or an alien. The app’s file-sharing capabilities enable you to post your audio recordings to any social media platform of your choosing or store your files and use them as many times as you want.
Pros
- Entertaining and easy to use
- The simple three-step voice modulation process
- Good selection of voice filters
- Excellent file sharing options
Cons
- The app displays ads
- No audio editing tools
4. Voicy: Celebrity Voice Changer
**Price:**Free, but offers in-app purchases
Compatibility: iOS 10 or later
User Rating: 4.3

Impersonating your favorite celebrity can be a fun way to prank your friends on social media. Voicy features a broad selection of celebrity voice impersonations you can use to make you sound like a famous actress or TV personality. The app utilizes a machine learning technology that can generate more than forty avatars and allows the users to experiment with different voice effects. The free version of the app offers only limited capabilities, so if you want to gain access to all of the Voicy’s features, you must choose a weekly, monthly or an annual subscription.
Pros
- Equipped with a powerful machine learning technology
- Offers a vast selection of voice avatars
- The quick voice modification process
- A great choice if you want to make a parody
Cons
- More expensive than the competition
- Support only the English language
5. Video Voice Changer – Fun Editor
Price: Free, but offers in-app purchases
Compatibility: iOS 8.0 or later
User Rating: 4.4

Changing the voices in the videos you record with your iPhones or iPads is a straightforward process that takes a minimum amount of effort. You can either use this iOS-based app to capture videos you’re going to dub or import them from the albums in which they are stored. The Video Voice Changer app is a great option if you want to dub videos directly from your phone because it enables you to change the voices in your videos and make them sound like mice, bears or ghosts. There are over thirty voice effects to choose from, so you can easily pick the one that best fits the video you’re editing.
Pros
- Equipped with video recording tools
- Excellent dubbing features
- A rich selection of voice effects
- Allows users to share their creations on Facebook, Instagram, and other social media platforms
Cons
- You must make an in-app purchase to unlock all of the app’s features
- No audio mixing options
6. Video Voice Changer FX
**Price:**Free, but offers in-app purchases
Compatibility: Android 4.1 and up
User Rating: 4.1

This is a simple app, anyone can use to change the voices in a video. Simply upload a video file from an SD card in your phone and choose an audio effect you want to apply. The app’s collection of funny voices includes options like echo, squirrel, space ship or chipmunk. As soon as you select the voice effect you want to add to a video, the app will start generating a new video that will be saved to your phone. Sharing the videos you edit with Video Voice Changer FX to social media directly from the app is not an option.
Pros
- Fun and easy to use
- Great price to performance ratio
- Changing a voice requires just a few taps
- Allows users to switch between effects while the video is playing
Cons
- No audio or video recording capability
- Doesn’t support social media sharing
7. Squeak Voice Changer
**Price:**Free, but offers in-app purchases
Compatibility: Android 4.3 and up
User Rating: 3.9

Every joke you want to share with your online friends is going to be a little funnier if you record it with Squeak Voice Changer. You just have to tap on the Record button and choose one of the available effects. Each voice changing effect this app offers is represented by a character so you should select Jamie the Jolly if you want to make your voice sound like you’re at a party or Bruce the Sentimental Bot if you want your voice to sound artificial. All the recordings you make with Squeak Voice Changer can be easily shared on social media.
Pros
- Equipped with audio recording options
- Cute and memorable characters that represent voice effects
- Inexpensive and fun to use
- Functional app design
Cons
- Poor selection of voice effects
- The AI only recognizes the English language
8. Voice Changer with Effects
**Price:**Free
Compatibility: Android 4.1 and up
User Rating: 4.5
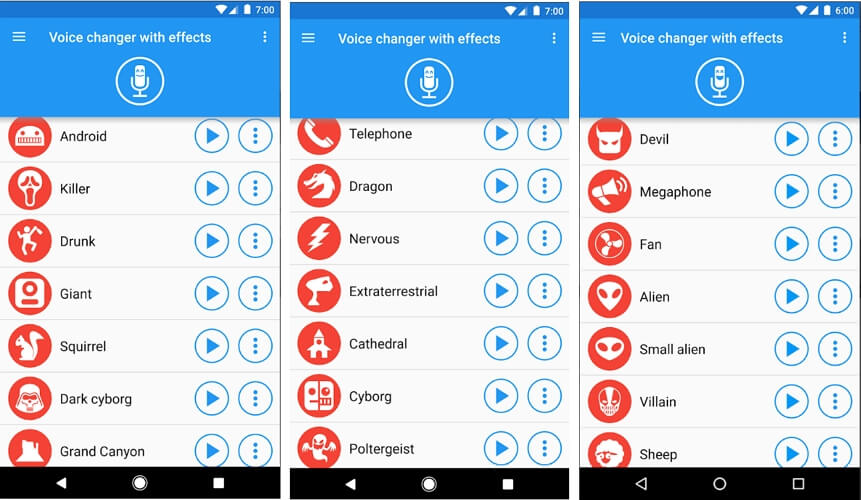
This Android-based app is designed to make fun and easy since voice modulation features enable you to play voice recording backward or change your voice to sound robotic or even alien. Besides recording your voice, the app also lets you modulate pre-recorded sounds and save them to your phone or use them as ringtones or notification sounds. Furthermore, the app lets you add sounds to images and share them to Facebook. The Voice Changer with Effects enables you to share all audio files you process with it to any of the most popular social media platforms.
Pros
- The app has over 50,000,000 installs
- Equipped with a text to voice feature
- Setting a new ringtone with this app is easy
- Supports editing of pre-recorded audio files
Cons
- Contains ads
- No audio or video editing options
9. Voice Changer
**Price:**Free
Compatibility: Android 4.1 and up
User Rating: 4.4

If you are looking for an Android app that lets you modulate your voice quickly and effortlessly, then Voice Changer may be one of the best options you can find on the market. You can record your voice by simply tapping on the microphone and speaking into your phone’s speaker and then apply one of the audio effects this app offers. Optionally, you can import an audio file you already recorded into the app and then apply Martian, Foreigner, Giant or Child effects to your voice recording. The best part is that you can apply each effect to the audio files you’re editing as many times as you want.
Pros
- Loads of funny effects
- Simple audio recording setup
- Intuitive and modernly designed interface
- Enables users to share audio files via Bluetooth or social media platforms
Cons
- No video editing tools
- The quality of output audio files can vary
10. Voice FX
**Price:**Free, but offers in-app purchases
Compatibility: Android 4.0.3 and up
User Rating: 3.8

Modulating voices in all types of audio files is a straightforward and fun process that can be completed in just a few taps. During the audio recording session, you can apply all voice effects to the sound you are recording and stream it live to your web browsers or media players you’re using. Voice FX changes your voice in real time, which enables you to preview your results before deciding if you want to save them. All files you export from this app will be saved in the MP3 format so you can use them as ringtones on your Android device.
Pros
- Allows users to modulate pre-recorded audio files
- Voice effects are applied in real time
- Offers live streaming features
- Exports files in the MP3 format
Cons
- Prone to glitches
- A limited selection of voice effects
11. Voice Changer Plus
**Price:**Free, but offers in-app purchases
Compatibility: iOS 8.0 or later
User Rating: 4.8
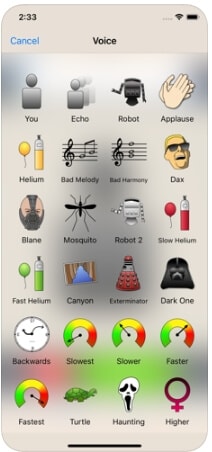
iPhone and iPad owners in need of a voice changer app that grants them complete creative freedom over the modulation of the voices they record, should consider using the Voice Changer Plus. The app features more than fifty voice effects and it provides support for voiceover recordings. Moreover, you can edit all your audio files even after you saved them, enabling you to find new ways to improve your recordings over time. Voice Changer Plus is also equipped with trim controls, so you can remove all parts of your audio files you don’t want to share with your friends on social media.
Pros
- Offers more voice effects than most of its competitors
- Provides voiceover recording options
- Users can trim their audio files
- All audio recordings can be edited after the voice modulation
Cons
- In-app purchase is required in order to unlock all of the app’s features
- Modulating audio in video files is not an option
Below is a quick comparison table among these voice changer apps, hope it will be helpful.
| App | Supported OS | User Rating | Voice Templates |
|---|---|---|---|
| Celebrity Voice Changer - Face | iOS 9.0 or later | 4.0 | Yes |
| Snapchat | iOS 10.0 or later, Android 4.4 or up | 3.8 | No |
| Voice Changer by e3games | Android 4.1 and up | 4.3 | Yes |
| Voicy: Celebrity Voice Changer | iOS 10 or later | 4.3 | Yes |
| Video Voice Changer – Fun Editor | iOS 8.0 or later | 4.4 | Yes |
| Video Voice Changer FX | Android 4.1 and up | 4.1 | Yes |
| Squeak Voice Changer | Android 4.3 and up | 3.9 | Yes |
| Voice Changer with Effects | Android 4.1 and up | 4.5 | Yes |
| Voice Changer | Android 4.1 and up | 4.4 | Yes |
| Voice FX | Android 4.0.3 and up | 3.8 | Yes |
| Voice Changer Plus | iOS 8.0 or later | 4.8 | Yes |
Conclusion
Everybody enjoys a good joke, and the apps we featured in this article enable you to have a lot of fun while experimenting with different voice modulation options. All of the voice effects these apps offer can change a voice automatically, but if you would like to alter the voices in your videos you must choose an app that supports this option. Which of the best voice changer apps for iPhone and Android devices are you going to choose? Leave a comment, and share your opinions with us.
Benjamin Arango
Benjamin Arango is a writer and a lover of all things video.
Follow @Benjamin Arango
Benjamin Arango
Mar 27, 2024• Proven solutions
Have you ever wondered what your voice would sound like if you were a cartoon character, a robot, or an older version of yourself? Changing how your voice sounds has never been easier, regardless of the Smartphone model you have, since voice changer apps can be used on both iPhone and Android devices.
Even though there is nothing wrong with modulating your voice to have fun with your friends, using voice changer apps to pull malicious pranks or bully strangers online is far from acceptable. Read on if you would like to find out more about the best voice changer apps for iPhone and Android devices and discover the one you enjoy using the most.
Best Voice Changer Apps for iPhone and Android
Creating a new ringtone, making a voice recording, or having fun with your friends are only a few reasons why so many people choose to try out voice changer apps. The vast majority of these apps feature well-equipped audio effects libraries that enable users to have fun with their friends and hear how they would sound if they were drunk or after inhaling helium. So, let’s take a look at some of the best voice changer apps on the market.
Changing video voice on Windows and Mac with Wondershare Filmora
Do you want to change the voice in video on Windows and Mac and don’t know which software can meet this requirement? Try Filmra video editor , which provides several ways to change voice over, such as changing the voice speed or changing the pitch. Download the trial version below and find out more possibility in video creation with Filmora.
1. Celebrity Voice Changer – Face
Price: Free, but offers in-app purchases
Compatibility: iOS 9.0 or later
User Rating: 4.0
In case you would like to sound like your favorite movie star of TV host, then Celebrity Voice Changer is one of the best choices you can make. Besides the standard set of options, the app also lets you request new voices since its machine learning technology can mimic virtually anyone’s voice. However, Celebrity Voice Changer is currently only available in English and it cannot modulate speech in other languages. In addition, you must make an in-app purchase in order to gain access to all of the app’s features or unlock the unlimited usage of the app.
Pros
- Automatic voice modulation
- Huge selection of voice filters
- The app generates video files that are better adjusted to the audience on social media than audio files
- Excellent impressions of celebrities
Cons
- Unreasonably expensive
- The app’s Deep Learning technology still has a lot of room for improvement
2. Snapchat
Price: Free, but offers in-app purchases
Compatibility: iOS 10.0 or later, Android 4.4 or up
User Rating: 3.8
With more than 203 million daily users, Snapchat is one of the largest messaging platforms on the market. Previously, we’ve shared how to change gender on Snapchat , beside that, the app lets its users capture short moments or the so-called Snaps and share them with friends. In addition to hundreds of video filters , Snapchat also features a broad spectrum of voice changing effects that make Snaps more entertaining. Even so, the audio recording options Snapchat offers are far from ideal, because the app doesn’t allow you to edit the files you create with it. Using Snapchat will drain your battery quickly, which is why you must pay attention to how frequently you use this app.
Pros
- The easy voice modulation process
- Excellent messaging options
- Grants you access to a large community of likeminded people
- Lenses and filters are updated on a daily basis
Cons
- Editing voice changes after you create a Snap is not possible
- Snapchat is not primarily a voice changer app
Check the detailed information about How to Change Voice on Snapchat with 2 Easy Methods >>
3. Voice Changer
Price: Free
Compatibility: Android 4.1 and up
User Rating: 4.3
Changing your voice with this app won’t take more than a few moments of your time. You just have to launch the app and hit the microphone button to record a message or a joke you would like to modulate. Once you’re happy with the audio recording you made, you can proceed to choose from more than twenty voice effects that will make you sound like a dwarf, a robot, or an alien. The app’s file-sharing capabilities enable you to post your audio recordings to any social media platform of your choosing or store your files and use them as many times as you want.
Pros
- Entertaining and easy to use
- The simple three-step voice modulation process
- Good selection of voice filters
- Excellent file sharing options
Cons
- The app displays ads
- No audio editing tools
4. Voicy: Celebrity Voice Changer
**Price:**Free, but offers in-app purchases
Compatibility: iOS 10 or later
User Rating: 4.3
Impersonating your favorite celebrity can be a fun way to prank your friends on social media. Voicy features a broad selection of celebrity voice impersonations you can use to make you sound like a famous actress or TV personality. The app utilizes a machine learning technology that can generate more than forty avatars and allows the users to experiment with different voice effects. The free version of the app offers only limited capabilities, so if you want to gain access to all of the Voicy’s features, you must choose a weekly, monthly or an annual subscription.
Pros
- Equipped with a powerful machine learning technology
- Offers a vast selection of voice avatars
- The quick voice modification process
- A great choice if you want to make a parody
Cons
- More expensive than the competition
- Support only the English language
5. Video Voice Changer – Fun Editor
Price: Free, but offers in-app purchases
Compatibility: iOS 8.0 or later
User Rating: 4.4
Changing the voices in the videos you record with your iPhones or iPads is a straightforward process that takes a minimum amount of effort. You can either use this iOS-based app to capture videos you’re going to dub or import them from the albums in which they are stored. The Video Voice Changer app is a great option if you want to dub videos directly from your phone because it enables you to change the voices in your videos and make them sound like mice, bears or ghosts. There are over thirty voice effects to choose from, so you can easily pick the one that best fits the video you’re editing.
Pros
- Equipped with video recording tools
- Excellent dubbing features
- A rich selection of voice effects
- Allows users to share their creations on Facebook, Instagram, and other social media platforms
Cons
- You must make an in-app purchase to unlock all of the app’s features
- No audio mixing options
6. Video Voice Changer FX
**Price:**Free, but offers in-app purchases
Compatibility: Android 4.1 and up
User Rating: 4.1
This is a simple app, anyone can use to change the voices in a video. Simply upload a video file from an SD card in your phone and choose an audio effect you want to apply. The app’s collection of funny voices includes options like echo, squirrel, space ship or chipmunk. As soon as you select the voice effect you want to add to a video, the app will start generating a new video that will be saved to your phone. Sharing the videos you edit with Video Voice Changer FX to social media directly from the app is not an option.
Pros
- Fun and easy to use
- Great price to performance ratio
- Changing a voice requires just a few taps
- Allows users to switch between effects while the video is playing
Cons
- No audio or video recording capability
- Doesn’t support social media sharing
7. Squeak Voice Changer
**Price:**Free, but offers in-app purchases
Compatibility: Android 4.3 and up
User Rating: 3.9
Every joke you want to share with your online friends is going to be a little funnier if you record it with Squeak Voice Changer. You just have to tap on the Record button and choose one of the available effects. Each voice changing effect this app offers is represented by a character so you should select Jamie the Jolly if you want to make your voice sound like you’re at a party or Bruce the Sentimental Bot if you want your voice to sound artificial. All the recordings you make with Squeak Voice Changer can be easily shared on social media.
Pros
- Equipped with audio recording options
- Cute and memorable characters that represent voice effects
- Inexpensive and fun to use
- Functional app design
Cons
- Poor selection of voice effects
- The AI only recognizes the English language
8. Voice Changer with Effects
**Price:**Free
Compatibility: Android 4.1 and up
User Rating: 4.5
This Android-based app is designed to make fun and easy since voice modulation features enable you to play voice recording backward or change your voice to sound robotic or even alien. Besides recording your voice, the app also lets you modulate pre-recorded sounds and save them to your phone or use them as ringtones or notification sounds. Furthermore, the app lets you add sounds to images and share them to Facebook. The Voice Changer with Effects enables you to share all audio files you process with it to any of the most popular social media platforms.
Pros
- The app has over 50,000,000 installs
- Equipped with a text to voice feature
- Setting a new ringtone with this app is easy
- Supports editing of pre-recorded audio files
Cons
- Contains ads
- No audio or video editing options
9. Voice Changer
**Price:**Free
Compatibility: Android 4.1 and up
User Rating: 4.4
If you are looking for an Android app that lets you modulate your voice quickly and effortlessly, then Voice Changer may be one of the best options you can find on the market. You can record your voice by simply tapping on the microphone and speaking into your phone’s speaker and then apply one of the audio effects this app offers. Optionally, you can import an audio file you already recorded into the app and then apply Martian, Foreigner, Giant or Child effects to your voice recording. The best part is that you can apply each effect to the audio files you’re editing as many times as you want.
Pros
- Loads of funny effects
- Simple audio recording setup
- Intuitive and modernly designed interface
- Enables users to share audio files via Bluetooth or social media platforms
Cons
- No video editing tools
- The quality of output audio files can vary
10. Voice FX
**Price:**Free, but offers in-app purchases
Compatibility: Android 4.0.3 and up
User Rating: 3.8
Modulating voices in all types of audio files is a straightforward and fun process that can be completed in just a few taps. During the audio recording session, you can apply all voice effects to the sound you are recording and stream it live to your web browsers or media players you’re using. Voice FX changes your voice in real time, which enables you to preview your results before deciding if you want to save them. All files you export from this app will be saved in the MP3 format so you can use them as ringtones on your Android device.
Pros
- Allows users to modulate pre-recorded audio files
- Voice effects are applied in real time
- Offers live streaming features
- Exports files in the MP3 format
Cons
- Prone to glitches
- A limited selection of voice effects
11. Voice Changer Plus
**Price:**Free, but offers in-app purchases
Compatibility: iOS 8.0 or later
User Rating: 4.8
iPhone and iPad owners in need of a voice changer app that grants them complete creative freedom over the modulation of the voices they record, should consider using the Voice Changer Plus. The app features more than fifty voice effects and it provides support for voiceover recordings. Moreover, you can edit all your audio files even after you saved them, enabling you to find new ways to improve your recordings over time. Voice Changer Plus is also equipped with trim controls, so you can remove all parts of your audio files you don’t want to share with your friends on social media.
Pros
- Offers more voice effects than most of its competitors
- Provides voiceover recording options
- Users can trim their audio files
- All audio recordings can be edited after the voice modulation
Cons
- In-app purchase is required in order to unlock all of the app’s features
- Modulating audio in video files is not an option
Below is a quick comparison table among these voice changer apps, hope it will be helpful.
| App | Supported OS | User Rating | Voice Templates |
|---|---|---|---|
| Celebrity Voice Changer - Face | iOS 9.0 or later | 4.0 | Yes |
| Snapchat | iOS 10.0 or later, Android 4.4 or up | 3.8 | No |
| Voice Changer by e3games | Android 4.1 and up | 4.3 | Yes |
| Voicy: Celebrity Voice Changer | iOS 10 or later | 4.3 | Yes |
| Video Voice Changer – Fun Editor | iOS 8.0 or later | 4.4 | Yes |
| Video Voice Changer FX | Android 4.1 and up | 4.1 | Yes |
| Squeak Voice Changer | Android 4.3 and up | 3.9 | Yes |
| Voice Changer with Effects | Android 4.1 and up | 4.5 | Yes |
| Voice Changer | Android 4.1 and up | 4.4 | Yes |
| Voice FX | Android 4.0.3 and up | 3.8 | Yes |
| Voice Changer Plus | iOS 8.0 or later | 4.8 | Yes |
Conclusion
Everybody enjoys a good joke, and the apps we featured in this article enable you to have a lot of fun while experimenting with different voice modulation options. All of the voice effects these apps offer can change a voice automatically, but if you would like to alter the voices in your videos you must choose an app that supports this option. Which of the best voice changer apps for iPhone and Android devices are you going to choose? Leave a comment, and share your opinions with us.
Benjamin Arango
Benjamin Arango is a writer and a lover of all things video.
Follow @Benjamin Arango
Enhance Your Recordings: Noise Reduction Mastery with Adobe Audition
With the invention of advanced editing software, the demands of content creation increased. Content creators outrun many challenges to create captivating content. One of these challenges is the maintenance of audio quality. Sometimes, singing a microphone is not enough, so post-creation methods do the trick. One of the ways of doing this is through Adobe Audition noise reduction.
There are multiple things to consider during audio editing at a professional level. For instance, microphone noise, humming, wind, hiss removal, and others. Adobe Audition removes background noises and nuisances that decline audio quality. In this article, you can read about Adobe Audition remove noise methods. In addition, some other tools are discussed for users’ ease and accessibility.
AI Noise Reduction A cross-platform for facilitating your video editing process by offering valuable benefits!
Free Download Free Download Learn More

Part 1: What Do You Know About Background Noise?
Background noise is anything that disturbs the pace of the video and diverts the viewer’s attention. It is the unwanted and unintended sound that takes up your audio. This may include someone chatting in the background, wind noise, and other noises. These factors decline and disrupt the clarity of audio. However, these elements can be managed through various tools and techniques to help creators.
Part 2: How to Remove Noise from Adobe Audition: A Comprehensive Review
Adobe Audition is a tool tailored to assist in audio editing tasks with precision. Users can create, merge, and mix different sound effects and be creative with them. It also has seamless support of Adobe After Effects and Adobe Stock for this purpose. Noise reduction Audition is one of its features that helps in cleaning and enhancing audio. It clears out any unnecessary background noises from any project.
In addition, the tool allows you to manage the audio levels for denoising. Along with manual settings, you can also add denoise effects to reduce background effects. You can manage high and low frequencies in Adobe Audition to remove noise. Upon editing this software, you can review the results afterward.
Different Methods of Audio Reduction in Adobe Audition
As a content creator, you must often manage dialogues and music within a video. Combining both can sometimes get the focus off actual dialogues. This can be due to many reasons; however, the solution is noise reduction in Audition. In this section, you can explore different methods to reduce noise:
1. Noise Reduction Effect
In this section, we are doing a noise reduction Audition manually. The process is straightforward, and here is a step-by-step guide to it:
Step 1: Upon importing your audio in Adobe Audition, navigate towards the top toolbar. Select the “Effects” tab and choose “Noise Reduction/Restoration” from the dropdown menu. As the menu expands further, select “Noise Reduction.”

Step 2: This will feature a Noise Reduction window on your screen. In this window, select the “Capture Noise Print” tab and adjust the Noise Reduction slider. Afterwards, press the play button on this window to listen to the audio and select “Apply.”

2. DeNoise Effect
This is the second method of Adobe Audition to remove noise. Accessing this option is almost the same, but settings may vary. Here is an instruction manual on how you can denoise in Audition:
Step 1: Once you have imported media into the timeline, reach the upper toolbar. Look for the “Effects” tab and proceed to the “Noise Reduction/Restoration” settings. From the expansion panel, choose the “DeNoise” option.

Step 2: After accessing the DeNoise window appearing on the screen, direct towards it. Then, change the position of the “Amount” slider and play your audio. Further, select the “Apply” button to add this effect to your audio.

3. Dynamic Effect
Another audio effect that you can apply and adjust in the same manner is the dynamic effect. Follow the steps given below to achieve this effect:
Step 1: After selecting the “Audio” tab, choose “Amplitude and Compression” from the dropdown menu. Expand this option and select “Dynamics” from the expansion menu.

Step 2: From the Dynamics window, expand the “Preset” option and set it to “Default.” Further, activate the “AutoGate” option and change the “Threshold” value. Then, click “Apply” to save and apply these settings.

Part 3: Other Solutions That Can Be Tried to Remove Noise from Videos
Since Adobe Audition remove noise has a professional interface, it might trouble some of you. The settings can be challenging to apply, so this section is all about alternatives. In this section, you can find the online solutions for noise reduction below:
1. Flixier
With this online Adobe Audition remove noise alternative, you can remove background noise. Users simply need to upload a video and activate the enhanced audio option. The audio enhancer eliminates unnecessary sound, giving it a name and description. It is compatible with popular and worldwide media formats like WAV, MP3, etc. Moreover, you can share the video straight to social platforms.

Key Features
- Offers an Improve Quality feature to clear up and enhance speech.
- Users can edit audio after denoising, and you can access its audio library to apply effects.
- Users can detach audio from the clip or fade in and out the audio effects to align with the video.
2. MyEdit
Are you looking for an online AI alternative to Adobe Audition noise reduction? This is a versatile platform for removing unwanted audio from up to 100 MB file size. It can denoise a 10 minutes file of formats like MP3, MP4, WAV, and FLAC. It enhances quality through audio denoise, wind remover, and speech enhancement. It uses AI technology to auto-remove background noise and enables a preview.

Key Features
- Users can employ its Vocal Remover to create clear and high-quality voiceovers.
- The user interface is a simple upload-to-convert process and doesn’t take up any storage.
- The AI helps accelerate the denoise process and retains audio quality.
3. KwiCut
Utilize this web-based Adobe Audition remove noise alternative to eliminate background noises. It can remove anything that declines an audio quality, like hums, hisses, and more. It removes any distractions in the background that decline communication. The AI assists in enhancing speech to maintain the professional element in the continent.

Key Features
- The tool supports a range of audio and video formats like MP3, MOV, WAV, and more.
- It supports text-based audio editing to edit audio or remove secondary noises.
- To create effective voiceovers for videos, use KwiCut’s voice cloning feature.
Part 4: Wondershare Filmora: A Unique Solution to Reducing Noise in Video and Audio Content
In contrast to all these Adobe Audition noise reduction alternatives, here is another. Wondershare Filmora is a wide platform for video, audio, and visual editing. The tool allows users to use manual and AI features to enhance content. In addition, Filmora introduced its V13 upgrade with new AI features. Amongst them is the AI Vocal Remover tool that separates vocals from background noise.
Using this tool can help you embed vocals in video tutorials or vlogs. In addition, Filmora also offers an Audio Denoise feature to remove distracting noises and voices. Users can enhance speech by removing wind noise, humming, and hissing. In addition, you can take Filmora’s Denoise AI’s assistance to do this.
Steps for Filmora AI Audio Denoise
If you wish to employ Filmora’s denoise feature, you are at the right place. This tool enables AI Speech Enhancement and Wind Removal with a denoise option. In addition, it has DeReverb, Hum Removal, and Hiss Removal. Users can manually adjust the value of this slider to set audio preferences. By following this step-by-step guide, users can remove background noises from video:
Free Download For Win 7 or later(64-bit)
Free Download For macOS 10.14 or later
Step 1: Initiate Filmora and Import Media to Timeline
First, download this AI software on your device and launch it. After logging in, locate and hit the “New Project” option and enter its editing interface. Afterward, click the “Ctrl + I” keys and choose files from your device. Once the files are imported, drag and place them in the timeline.

Step 2: Activate Audio Denoise
Once the media is in the timeline, select it and navigate towards the right-side panel. Under the “Audio” tab, locate and expand the “Denoise” option. In this section, enable the “Normal Denoise” button, which will auto-denoise audio. You can also use the “Denoise Level” slider to adjust the intensity of denoise.

Step 3: Export the Edited File
Once you have made all the changes, click the “Export” button at the top right corner. Further, adjust export settings in the appeared window and click the “Export” button.

Bonus Tip: Remove Vocals from Audio with Dedicated AI Vocal Remover in Filmora
Other than denoising, you can use Vocal Remover to extract speech from the background. It separates both vocals and background noise. We have crafted the step-by-step procedure to use vocal remover:
Step 1: Start Filmora and Import Video
Begin by installing and launching Wondershare Filmora on your device. Log in and select the “New Project” tab to access Filmora’s editing interface. Next, use the “Import” option to import files from your device. Once imported, simply drag and drop them onto the timeline.

Step 2: Access the AI Vocal Remover
Next, direct towards the timeline panel and right-click on the video in the timeline. From the options menu, select the “AI Vocal Remover” option. The AI will start separating vocals from background audio.

Step 3: Download the AI Processed Video
Once both vocals and background noise are separate, delete the background audio. Then, click the “Export” button to download this file on your device.

Free Download For Win 7 or later(64-bit)
Free Download For macOS 10.14 or later
Conclusion
After reading this article, users have knowledge of noise reduction in Audition. The article discussed different methods of removing noises in this professional software. Users can employ the web-based Adobe Audition noise reduction alternatives.
If you want a next-level tool for creative editing, then download Wondershare Filmora. The article discussed two methods for enhancing audio content. The software is compatible across multiple platforms to assist all types of users.
Free Download Free Download Learn More
Part 1: What Do You Know About Background Noise?
Background noise is anything that disturbs the pace of the video and diverts the viewer’s attention. It is the unwanted and unintended sound that takes up your audio. This may include someone chatting in the background, wind noise, and other noises. These factors decline and disrupt the clarity of audio. However, these elements can be managed through various tools and techniques to help creators.
Part 2: How to Remove Noise from Adobe Audition: A Comprehensive Review
Adobe Audition is a tool tailored to assist in audio editing tasks with precision. Users can create, merge, and mix different sound effects and be creative with them. It also has seamless support of Adobe After Effects and Adobe Stock for this purpose. Noise reduction Audition is one of its features that helps in cleaning and enhancing audio. It clears out any unnecessary background noises from any project.
In addition, the tool allows you to manage the audio levels for denoising. Along with manual settings, you can also add denoise effects to reduce background effects. You can manage high and low frequencies in Adobe Audition to remove noise. Upon editing this software, you can review the results afterward.
Different Methods of Audio Reduction in Adobe Audition
As a content creator, you must often manage dialogues and music within a video. Combining both can sometimes get the focus off actual dialogues. This can be due to many reasons; however, the solution is noise reduction in Audition. In this section, you can explore different methods to reduce noise:
1. Noise Reduction Effect
In this section, we are doing a noise reduction Audition manually. The process is straightforward, and here is a step-by-step guide to it:
Step 1: Upon importing your audio in Adobe Audition, navigate towards the top toolbar. Select the “Effects” tab and choose “Noise Reduction/Restoration” from the dropdown menu. As the menu expands further, select “Noise Reduction.”
Step 2: This will feature a Noise Reduction window on your screen. In this window, select the “Capture Noise Print” tab and adjust the Noise Reduction slider. Afterwards, press the play button on this window to listen to the audio and select “Apply.”
2. DeNoise Effect
This is the second method of Adobe Audition to remove noise. Accessing this option is almost the same, but settings may vary. Here is an instruction manual on how you can denoise in Audition:
Step 1: Once you have imported media into the timeline, reach the upper toolbar. Look for the “Effects” tab and proceed to the “Noise Reduction/Restoration” settings. From the expansion panel, choose the “DeNoise” option.
Step 2: After accessing the DeNoise window appearing on the screen, direct towards it. Then, change the position of the “Amount” slider and play your audio. Further, select the “Apply” button to add this effect to your audio.
3. Dynamic Effect
Another audio effect that you can apply and adjust in the same manner is the dynamic effect. Follow the steps given below to achieve this effect:
Step 1: After selecting the “Audio” tab, choose “Amplitude and Compression” from the dropdown menu. Expand this option and select “Dynamics” from the expansion menu.
Step 2: From the Dynamics window, expand the “Preset” option and set it to “Default.” Further, activate the “AutoGate” option and change the “Threshold” value. Then, click “Apply” to save and apply these settings.
Part 3: Other Solutions That Can Be Tried to Remove Noise from Videos
Since Adobe Audition remove noise has a professional interface, it might trouble some of you. The settings can be challenging to apply, so this section is all about alternatives. In this section, you can find the online solutions for noise reduction below:
1. Flixier
With this online Adobe Audition remove noise alternative, you can remove background noise. Users simply need to upload a video and activate the enhanced audio option. The audio enhancer eliminates unnecessary sound, giving it a name and description. It is compatible with popular and worldwide media formats like WAV, MP3, etc. Moreover, you can share the video straight to social platforms.
Key Features
- Offers an Improve Quality feature to clear up and enhance speech.
- Users can edit audio after denoising, and you can access its audio library to apply effects.
- Users can detach audio from the clip or fade in and out the audio effects to align with the video.
2. MyEdit
Are you looking for an online AI alternative to Adobe Audition noise reduction? This is a versatile platform for removing unwanted audio from up to 100 MB file size. It can denoise a 10 minutes file of formats like MP3, MP4, WAV, and FLAC. It enhances quality through audio denoise, wind remover, and speech enhancement. It uses AI technology to auto-remove background noise and enables a preview.
Key Features
- Users can employ its Vocal Remover to create clear and high-quality voiceovers.
- The user interface is a simple upload-to-convert process and doesn’t take up any storage.
- The AI helps accelerate the denoise process and retains audio quality.
3. KwiCut
Utilize this web-based Adobe Audition remove noise alternative to eliminate background noises. It can remove anything that declines an audio quality, like hums, hisses, and more. It removes any distractions in the background that decline communication. The AI assists in enhancing speech to maintain the professional element in the continent.
Key Features
- The tool supports a range of audio and video formats like MP3, MOV, WAV, and more.
- It supports text-based audio editing to edit audio or remove secondary noises.
- To create effective voiceovers for videos, use KwiCut’s voice cloning feature.
Part 4: Wondershare Filmora: A Unique Solution to Reducing Noise in Video and Audio Content
In contrast to all these Adobe Audition noise reduction alternatives, here is another. Wondershare Filmora is a wide platform for video, audio, and visual editing. The tool allows users to use manual and AI features to enhance content. In addition, Filmora introduced its V13 upgrade with new AI features. Amongst them is the AI Vocal Remover tool that separates vocals from background noise.
Using this tool can help you embed vocals in video tutorials or vlogs. In addition, Filmora also offers an Audio Denoise feature to remove distracting noises and voices. Users can enhance speech by removing wind noise, humming, and hissing. In addition, you can take Filmora’s Denoise AI’s assistance to do this.
Steps for Filmora AI Audio Denoise
If you wish to employ Filmora’s denoise feature, you are at the right place. This tool enables AI Speech Enhancement and Wind Removal with a denoise option. In addition, it has DeReverb, Hum Removal, and Hiss Removal. Users can manually adjust the value of this slider to set audio preferences. By following this step-by-step guide, users can remove background noises from video:
Free Download For Win 7 or later(64-bit)
Free Download For macOS 10.14 or later
Step 1: Initiate Filmora and Import Media to Timeline
First, download this AI software on your device and launch it. After logging in, locate and hit the “New Project” option and enter its editing interface. Afterward, click the “Ctrl + I” keys and choose files from your device. Once the files are imported, drag and place them in the timeline.
Step 2: Activate Audio Denoise
Once the media is in the timeline, select it and navigate towards the right-side panel. Under the “Audio” tab, locate and expand the “Denoise” option. In this section, enable the “Normal Denoise” button, which will auto-denoise audio. You can also use the “Denoise Level” slider to adjust the intensity of denoise.
Step 3: Export the Edited File
Once you have made all the changes, click the “Export” button at the top right corner. Further, adjust export settings in the appeared window and click the “Export” button.
Bonus Tip: Remove Vocals from Audio with Dedicated AI Vocal Remover in Filmora
Other than denoising, you can use Vocal Remover to extract speech from the background. It separates both vocals and background noise. We have crafted the step-by-step procedure to use vocal remover:
Step 1: Start Filmora and Import Video
Begin by installing and launching Wondershare Filmora on your device. Log in and select the “New Project” tab to access Filmora’s editing interface. Next, use the “Import” option to import files from your device. Once imported, simply drag and drop them onto the timeline.
Step 2: Access the AI Vocal Remover
Next, direct towards the timeline panel and right-click on the video in the timeline. From the options menu, select the “AI Vocal Remover” option. The AI will start separating vocals from background audio.
Step 3: Download the AI Processed Video
Once both vocals and background noise are separate, delete the background audio. Then, click the “Export” button to download this file on your device.
Free Download For Win 7 or later(64-bit)
Free Download For macOS 10.14 or later
Conclusion
After reading this article, users have knowledge of noise reduction in Audition. The article discussed different methods of removing noises in this professional software. Users can employ the web-based Adobe Audition noise reduction alternatives.
If you want a next-level tool for creative editing, then download Wondershare Filmora. The article discussed two methods for enhancing audio content. The software is compatible across multiple platforms to assist all types of users.
Also read:
- Elevate Your Online Communication The Best Skype Voice Changing Technologies for 2024
- New Guided Vocal Transformation Systems Insights Into Features and Other Options for 2024
- 2024 Approved Audio Integration in Motion Picture Editing A Step-by-Step Approach
- 2024 Approved Comprehensive Guidance Transforming Your Discord Chat with Voxal Sound Modification Techniques
- New Auditory Accents for Your GIFs A Comprehensive Guide for Apple Computers
- New Transforming Lyrics Into Visual Masterpieces Using Adobe AE
- New In 2024, Deciphering Cricket Sound Signatures in Nature
- Streamlining Audiobook Creation The Ultimate Guide to Authorship in the Digital Age
- New The Art of Synchronizing Video to Music Techniques for 2024
- New The Quiet Revolution Cutting-Edge Approaches to Taming Sibilance in Audio Editing for 2024
- New Step-by-Step Guide to Muting Background Audio Elements in Premiere Pro for 2024
- Where Can I Find Dog Sound Effects for 2024
- Updated In 2024, Methods of Decelerating a Melody Without Key Modification
- In 2024, Unlock Your Creative Potential Best Free Software to Produce Music on PC & Mac, 2023 Edition
- In 2024, Tactics for Excising Background Melodies From Visual Media
- Updated Digital Music Vault - YouTube Edition
- New Premium Selection The Most Exceptional 11 Voice Alteration Apps Available at No Charge for Mobile Devices for 2024
- Updated 2024 Approved Earning Beats for Your Ears The Art of Accessing FREE Audio Music Legally
- Unlocking Full Potential of Your Windows Speakers – Three Free Volume Booster Tactics for 2024
- The Pinnacle of Sound in Film - Our Curated List of the Top 8 Sounds From 2023 for 2024
- Updated In 2024, Top-Rated Speech-to-Text Applications for Mobile Devices
- New In 2024, The Pillars of Jazz Music Essential Information Every Enthusiast Should Learn
- 2024 Approved Final Cut Pro Wizardry Incorporating Lifelike Audio Waveforms and Animation Into Your Video Edits
- The Ultimate Fix for Flawed Frequencies Steps to Remove Distortion in Multimedia Projects
- Updated The Complete Guide to iMovie Syncing and Mixing Audio for Professionals for 2024
- New The Audio Artists Toolkit for Podcast Production 11 Pioneering Soundscape Retreats for 2024
- 2024 Approved A Guide to Premium Auditory Dog Phenomena in Sound Archives
- 2024 Approved Exploring Exceptional Voice Alterations in Popular Anime Characters
- Updated The Sound Engineers Toolkit In-Depth Strategies for Effective MP3 Manipulation
- New From Noise to Music Mastering Sound with Adobe Audition – An Updated Guide & Review for 2024
- 2024 Approved Exploring the Capabilities of Adobe Audition for Professional Audio Editing
- In 2024, Transform Your Skype Speech Patterns with These 5 Must-Have Voice Change Tools
- New 2024 Approved Cinemas Resonating Reign A Compilation of High-Quality, Royalty-Free Piano Melodies for Video Enhancement
- Updated In 2024, Incorporating Audio Into New and Enhanced MKV Files
- Symphony in Reverse A Guide to State-of-the-Art Audio Reversal Applications for 2024
- Updated Techniques for Embedding Audio Into Newly Updated AVI Video Files
- Updated The Ultimate List of iPhone and iPad Audio Cutting Software
- Updated 10 Best Software to Detach Audio From Video for 2024
- Updated In 2024, The Elite Sound & Vision Mixer Compendium
- New Audiovisual Beat Engineering Taking Audio Separates for Creative Endeavors for 2024
- New In 2024, Advanced Methods for Reducing Storage Space Needed for Media Files
- New Advanced Audio Editing How to Achieve Seamless Volume Automation Using Final Cut Pro X Ducking Tools for 2024
- Updated 2024 Approved Unearth Brushstroke Sonic Imprints
- Updated Premiere Voice Mimicry Programs - Compilation of the Best for 2024
- Updated 2024 Approved How to Add Video and Audio Transition Between Scenes/Clips
- Updated 2023S Most Trusted Free Audio Collections for Visual Storytelling
- Updated The Fundamentals of Podcast Production An Introduction to Basic Editing Techniques for 2024
- New The Ultimate Guide to Enhancing Logic Pro X - 8 Top-Ranked Free & Premium Plugins
- How to Perform Hard Reset on Oppo Reno 9A? | Dr.fone
- How to Come up With the Best Pokemon Team On Apple iPhone XS? | Dr.fone
- In 2024, How Can I Unlock My Apple iPhone 13 Pro Max After Forgetting my PIN Code?
- In 2024, 4 Feasible Ways to Fake Location on Facebook For your Samsung Galaxy A15 4G | Dr.fone
- In 2024, Pokemon Go No GPS Signal? Heres Every Possible Solution On Apple iPhone 6 | Dr.fone
- In 2024, How to Reset your Nokia C12 Lock Screen Password
- Get Started with Video Editing on Mac OS X Yosemite A Quick Start Guide
- In 2024, Does Samsung Galaxy S23 Have Find My Friends? | Dr.fone
- How to Fake Snapchat Location without Jailbreak On Vivo Y36 | Dr.fone
- How to Intercept Text Messages on Honor 90 Lite | Dr.fone
- How to Restore Audio in Avidemux A Comprehensive Solution
- Fix Vivo S18 Pro Android System Webview Crash 2024 Issue | Dr.fone
- How To Restore a Bricked Oppo Find X7 Back to Operation | Dr.fone
- In 2024, The Ultimate Guide to Unlocking Your Apple iPhone 11 Pro on MetroPCS
- How Can I Use a Fake GPS Without Mock Location On Infinix Smart 8 Pro? | Dr.fone
- 10 Fake GPS Location Apps on Android Of your Poco M6 Pro 5G | Dr.fone
- How To Unlock A Found iPhone 11 Pro? | Dr.fone
- Title: 2024 Approved Precision in Perception Techniques for Correcting Warped Audio Cuts
- Author: Ella
- Created at : 2024-05-19 06:26:25
- Updated at : 2024-05-20 06:26:25
- Link: https://sound-optimizing.techidaily.com/2024-approved-precision-in-perception-techniques-for-correcting-warped-audio-cuts/
- License: This work is licensed under CC BY-NC-SA 4.0.
