:max_bytes(150000):strip_icc():format(webp)/kids-ipad-580f65635f9b58564cc0fc91-5c5cbb6ac9e77c0001d92aa4.jpg)
How to Record Voice on iPhone? Step by Step Guide for 2024

How to Record Voice on iPhone? Step by Step Guide
We use audio recording at all most every stage of life. Sometimes we are in class, and we record any lecture. Sometimes, something is explained in detail to you. Now are days, people share audio recordings even in an office and professional environment.
Things are always different for iPhone users. If you want to record audio on iPhone, then this article will discuss the built-in audio recorder as well as, 5 best audio recording apps for iPhone will also be shared with you.
In this article
01 How to Record Voice on iPhone?
02 5 Best Voice Recorder App for iPhone
Part 1. How to Record Voice on iPhone?
As mentioned earlier, things are a little different for iPhone users compared to Android phones. In the same way, the audio recording process is slightly different. iPhone has a built-in audio recorder, Voice Memo , that could be used to record sound on iPhone. Voice Memo is a great voice recorder. A few of its attractive features are.
- You can choose between compressed and uncompressed on Voice Memo for audio formats.
- With the search feature of this recorder, you can easily find your recordings.
- You can mark your recordings with the same name so that they can be accessed easily.
You might have a question in your mind about how to make a voice recording on iPhone? The answer to this question is shared below.
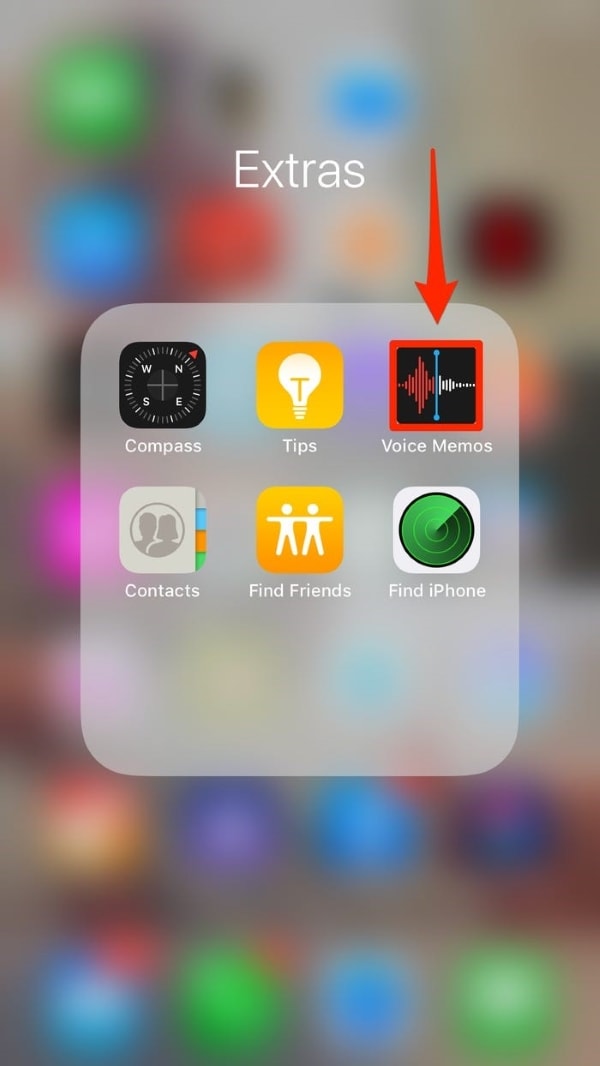
Step 1: First of all, you should locate the ‘Voice Memo’ application on your iPhone.
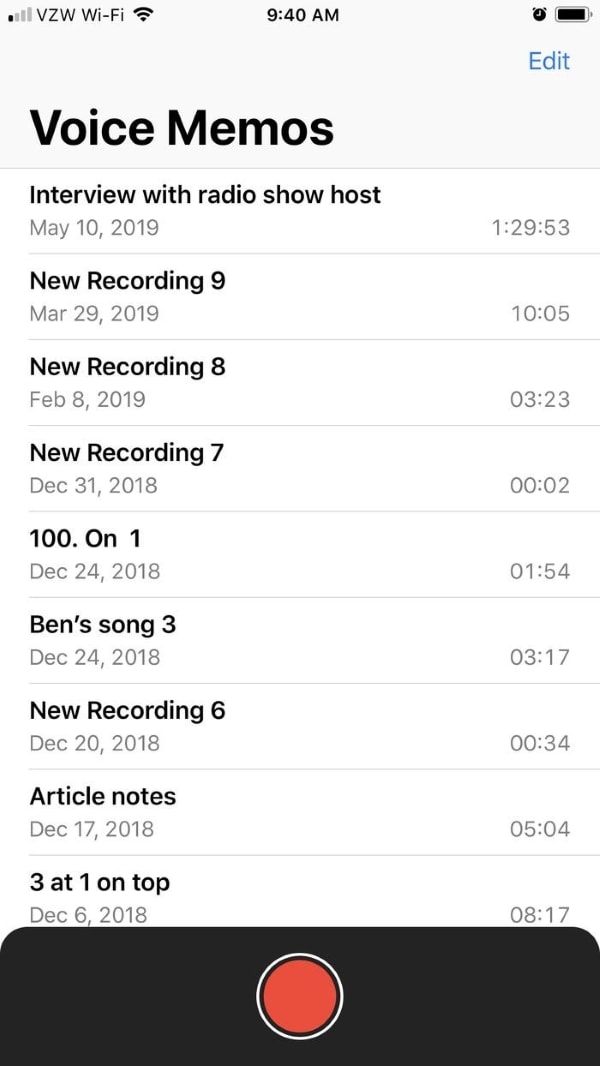
Step 2: Now, you should launch the application. You will see a big ‘Red’ button at the bottom of the screen. Simply hit that button to start the recording.
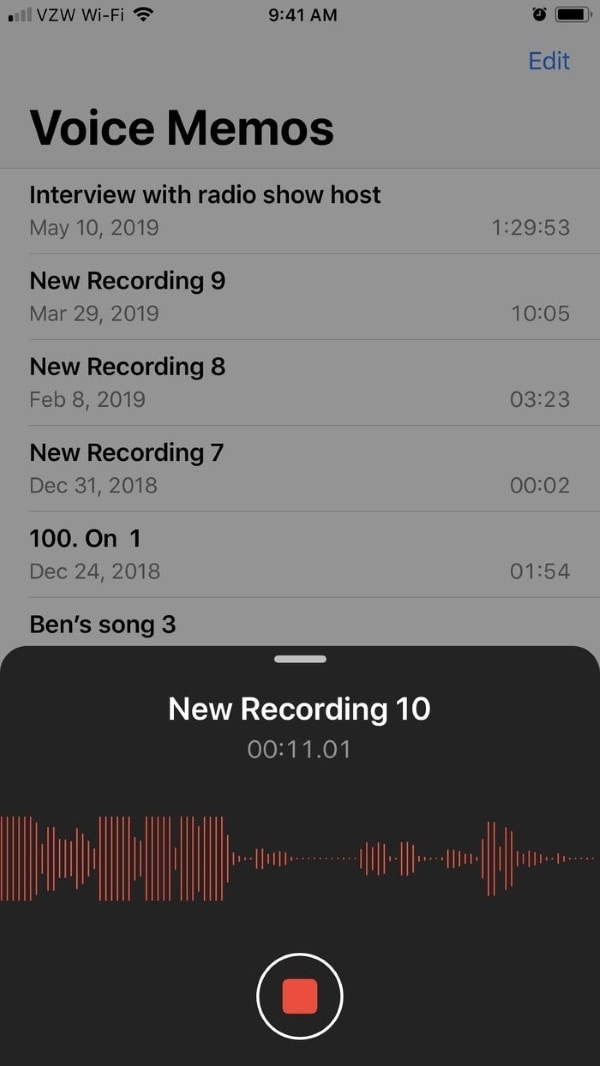
Step 3: After you are satisfied with the recording, you have to tap again on the big ‘Red’ square button to stop the audio recording.
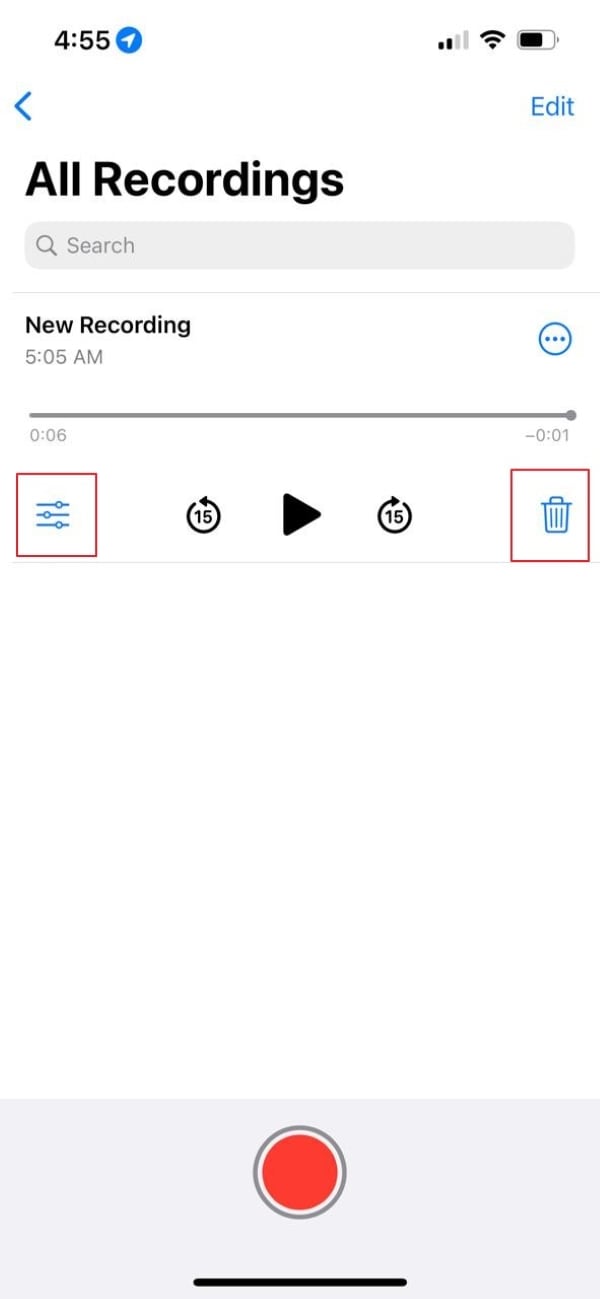
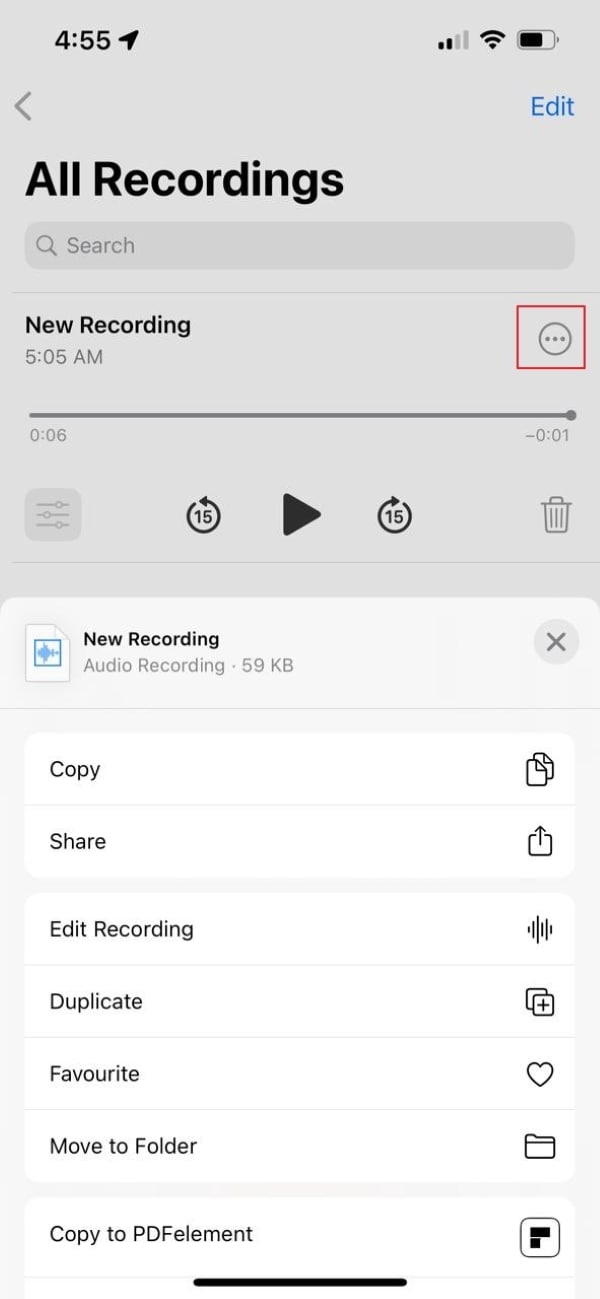
Step 4: Now, beneath the recording, you will see a ‘Delete’ option and the other option on the left side is to ‘Edit’ the recording. You can set the playback speed, skip silence and also Enhance Recording option.
Step 5: Lastly, by clicking on the 3 vertical dots, you can copy and share your recording. The dialog box also allows you to edit, duplicate, etc.
Part 2. 5 Best Voice Recorder App for iPhone
Although iPhone has a built-in voice recorder, that has been discussed in the above section. We use different voice recording applications now and then. Here, a question arises: What could be the best audio recording app for iPhone? What could be done if you don’don’tt to use it?
There are alternative options for almost everything. In the same way, there are alternative applications that could be used to record sound on iPhone. The following section will shed light on the 5 best voice recorder iPhone applications.
1. Rev Voice Recorder & Memos
The first application to record audio on iPhone is Rev Voice Recorder. The voice recorder is customer-oriented with a very easy-to-understand interface. Rev has a very strong customer service team that deals immediately with problems if any problem is reported. Rev Voice Recorder is a free voice recorder for iPhone.
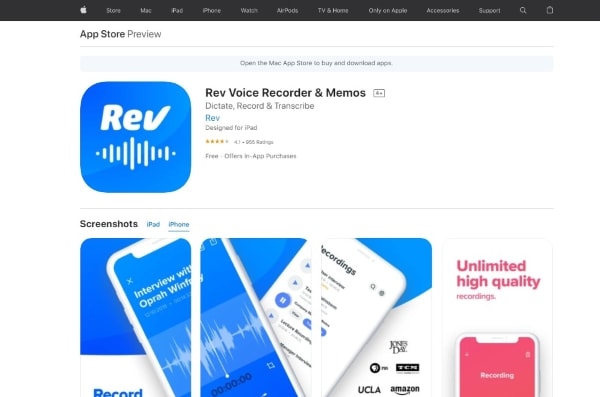
With Rev recorder, you don’don’te to struggle much as you can easily search for the recordings by name. It lets you view and then share your recordings. There are many more features of this voice recorder; let’let’sk about them.
- The most amazing thing about the Rev Voice Recorder is that it spontaneously pauses the recording for any incoming call or any other interruption.
- You can edit and trim the recording to remove any unwanted parts.
- The recorder is synced with Dropbox to backup your recordings.
- It offers high-quality voice recordings and playback.
2. Awesome Voice Recorder
The next recorder that comes in line that could be used as an alternative voice recorder iPhone is ‘Awe’ome Voice Recorder.’ Th’s recorder is great as it offers various voice recording tools. The interface is simple and basic. With Awesome Voice Recorder, you can pause your recording and then start again from where you left.
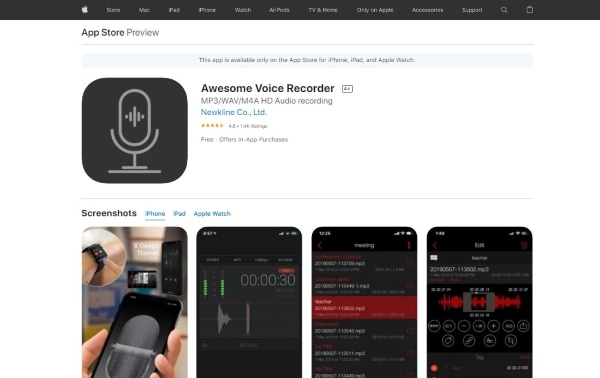
Like this, AVR has many crazy features that attract its users and facilitate them brilliantly at the same time. Let us share some of its features with you.
- The coolest thing about this recorder is that it stops in case there is any storage space problem or even a low battery.
- Awesome Voice Recorder supports Bluetooth.
- The fascinating factor of using AVR is its unlimited recording time.
- The recordings of this tool are playable in various media.
3. HT Professional Recorder
HT Professional Recorder is another awesome option to record audio on iPhone. The recorder is well known for its features and exceptional recording quality. HT Professional Recorder has this mind-blowing quality that it can record the audio even if the people talking are sitting several feet away from the iPhone.
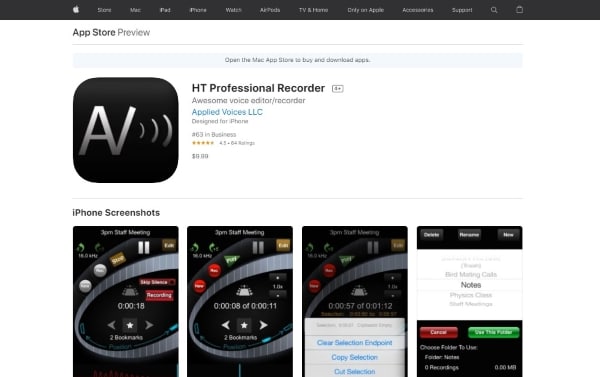
Like this, HT Professional Recorder is full of surprises. The recorder has a lot to offer. Allow us to highlight its features.
- An auto-record option automatically starts the recording as soon as the application is launched.
- This reorder offers a unique feature that you can bookmark important moments.
- The recorder spontaneously skips any silence between the recording.
- You can also transfer files to other computers via a Wi-Fi connection.
4. AudioNote 2 – Voice Recorder
Another alternate option for the audio recording app iPhone is AudioNote 2. The application is unmatchable as it uses Amplified audio recording, where the tool will adapt according to the volume level as well as the size of the room.
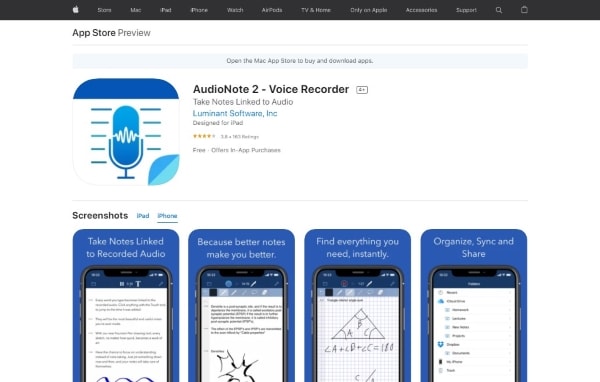
With AudioNote 2, you can pause or restart the recording any time you want to. You will learn more about this recorder after going through its features.
- The recorder lets you import any pre-recorded audio of yours, and then you can add notes to it.
- AudioNote 2 has a brilliant feature of ‘Noi’e Reduction Filter.’ Wi’h this filter, you can eliminate any extra and unwanted sound from the background.
- The recording application automatically syncs the devices with either Dropbox or iCloud.
- With this recorder, you can adjust the playback speed with pitch correction when it comes to playback.
5. Voice Recorder – Audio Record
Lastly, another best audio recording app for iPhone is Voice Recorder. The recording tool does auto-upload within seconds. You can also share your recordings on the cloud or Dropbox. Voice Recorder Audio Record has various features, few of its features are.
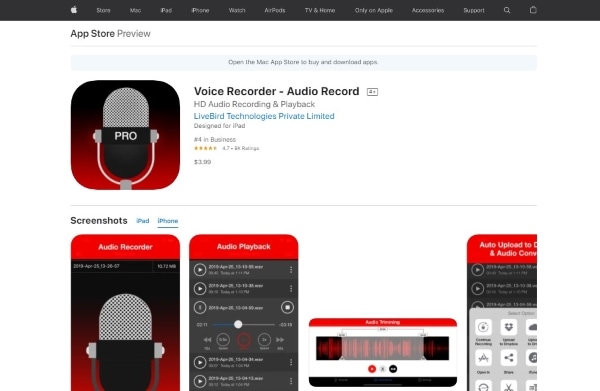
- You can easily edit and amend your recordings. It lets you trim the final version of your recording to remove any unwanted sound.
- The application is a quick audio player with multiple playback controls.
- You can easily share your recording via Dropbox or iCloud.
- The recording tool supports WAV, M4A, and CAF.
Ending Thoughts
The article is a detailed guide about the audio recording app iPhone. The audio recording for iPhone has been discussed from every possible aspect. The article also shared the steps to use the built-in voice recorder of the iPhone, and 5 amazing recording tools were also discussed.
After you have recorded the audio, there might be some problems with it. For such problems, we have Wondershare Filmora – Audio Editing. You can polish and edit your roughly recorded audio and make it smooth and flawless with Filmora.
For Win 7 or later (64-bit)
For macOS 10.12 or later
Filmora Audio Editor has multiple features. Among those, one feature is to Add Background Music to your recorded audio. Adding background music helps to maintain interest. Another feature of Audio Editing by Filmora is Split Audio. The feature is where you can split the original audio and use it like you want to. You can also Adjust Audio with Filmora Audio Editing.
Versatile Video Editor - Wondershare Filmora
An easy yet powerful editor
Numerous effects to choose from
Detailed tutorials provided by the official channel
02 5 Best Voice Recorder App for iPhone
Part 1. How to Record Voice on iPhone?
As mentioned earlier, things are a little different for iPhone users compared to Android phones. In the same way, the audio recording process is slightly different. iPhone has a built-in audio recorder, Voice Memo , that could be used to record sound on iPhone. Voice Memo is a great voice recorder. A few of its attractive features are.
- You can choose between compressed and uncompressed on Voice Memo for audio formats.
- With the search feature of this recorder, you can easily find your recordings.
- You can mark your recordings with the same name so that they can be accessed easily.
You might have a question in your mind about how to make a voice recording on iPhone? The answer to this question is shared below.
Step 1: First of all, you should locate the ‘Voice Memo’ application on your iPhone.

Step 2: Now, you should launch the application. You will see a big ‘Red’ button at the bottom of the screen. Simply hit that button to start the recording.

Step 3: After you are satisfied with the recording, you have to tap again on the big ‘Red’ square button to stop the audio recording.

Step 4: Now, beneath the recording, you will see a ‘Delete’ option and the other option on the left side is to ‘Edit’ the recording. You can set the playback speed, skip silence and also Enhance Recording option.

Step 5: Lastly, by clicking on the 3 vertical dots, you can copy and share your recording. The dialog box also allows you to edit, duplicate, etc.

Part 2. 5 Best Voice Recorder App for iPhone
Although iPhone has a built-in voice recorder, that has been discussed in the above section. We use different voice recording applications now and then. Here, a question arises: What could be the best audio recording app for iPhone? What could be done if you don’don’tt to use it?
There are alternative options for almost everything. In the same way, there are alternative applications that could be used to record sound on iPhone. The following section will shed light on the 5 best voice recorder iPhone applications.
1. Rev Voice Recorder & Memos
The first application to record audio on iPhone is Rev Voice Recorder. The voice recorder is customer-oriented with a very easy-to-understand interface. Rev has a very strong customer service team that deals immediately with problems if any problem is reported. Rev Voice Recorder is a free voice recorder for iPhone.

With Rev recorder, you don’don’te to struggle much as you can easily search for the recordings by name. It lets you view and then share your recordings. There are many more features of this voice recorder; let’let’sk about them.
- The most amazing thing about the Rev Voice Recorder is that it spontaneously pauses the recording for any incoming call or any other interruption.
- You can edit and trim the recording to remove any unwanted parts.
- The recorder is synced with Dropbox to backup your recordings.
- It offers high-quality voice recordings and playback.
2. Awesome Voice Recorder
The next recorder that comes in line that could be used as an alternative voice recorder iPhone is ‘Awe’ome Voice Recorder.’ Th’s recorder is great as it offers various voice recording tools. The interface is simple and basic. With Awesome Voice Recorder, you can pause your recording and then start again from where you left.

Like this, AVR has many crazy features that attract its users and facilitate them brilliantly at the same time. Let us share some of its features with you.
- The coolest thing about this recorder is that it stops in case there is any storage space problem or even a low battery.
- Awesome Voice Recorder supports Bluetooth.
- The fascinating factor of using AVR is its unlimited recording time.
- The recordings of this tool are playable in various media.
3. HT Professional Recorder
HT Professional Recorder is another awesome option to record audio on iPhone. The recorder is well known for its features and exceptional recording quality. HT Professional Recorder has this mind-blowing quality that it can record the audio even if the people talking are sitting several feet away from the iPhone.

Like this, HT Professional Recorder is full of surprises. The recorder has a lot to offer. Allow us to highlight its features.
- An auto-record option automatically starts the recording as soon as the application is launched.
- This reorder offers a unique feature that you can bookmark important moments.
- The recorder spontaneously skips any silence between the recording.
- You can also transfer files to other computers via a Wi-Fi connection.
4. AudioNote 2 – Voice Recorder
Another alternate option for the audio recording app iPhone is AudioNote 2. The application is unmatchable as it uses Amplified audio recording, where the tool will adapt according to the volume level as well as the size of the room.

With AudioNote 2, you can pause or restart the recording any time you want to. You will learn more about this recorder after going through its features.
- The recorder lets you import any pre-recorded audio of yours, and then you can add notes to it.
- AudioNote 2 has a brilliant feature of ‘Noi’e Reduction Filter.’ Wi’h this filter, you can eliminate any extra and unwanted sound from the background.
- The recording application automatically syncs the devices with either Dropbox or iCloud.
- With this recorder, you can adjust the playback speed with pitch correction when it comes to playback.
5. Voice Recorder – Audio Record
Lastly, another best audio recording app for iPhone is Voice Recorder. The recording tool does auto-upload within seconds. You can also share your recordings on the cloud or Dropbox. Voice Recorder Audio Record has various features, few of its features are.

- You can easily edit and amend your recordings. It lets you trim the final version of your recording to remove any unwanted sound.
- The application is a quick audio player with multiple playback controls.
- You can easily share your recording via Dropbox or iCloud.
- The recording tool supports WAV, M4A, and CAF.
Ending Thoughts
The article is a detailed guide about the audio recording app iPhone. The audio recording for iPhone has been discussed from every possible aspect. The article also shared the steps to use the built-in voice recorder of the iPhone, and 5 amazing recording tools were also discussed.
After you have recorded the audio, there might be some problems with it. For such problems, we have Wondershare Filmora – Audio Editing. You can polish and edit your roughly recorded audio and make it smooth and flawless with Filmora.
For Win 7 or later (64-bit)
For macOS 10.12 or later
Filmora Audio Editor has multiple features. Among those, one feature is to Add Background Music to your recorded audio. Adding background music helps to maintain interest. Another feature of Audio Editing by Filmora is Split Audio. The feature is where you can split the original audio and use it like you want to. You can also Adjust Audio with Filmora Audio Editing.
Versatile Video Editor - Wondershare Filmora
An easy yet powerful editor
Numerous effects to choose from
Detailed tutorials provided by the official channel
02 5 Best Voice Recorder App for iPhone
Part 1. How to Record Voice on iPhone?
As mentioned earlier, things are a little different for iPhone users compared to Android phones. In the same way, the audio recording process is slightly different. iPhone has a built-in audio recorder, Voice Memo , that could be used to record sound on iPhone. Voice Memo is a great voice recorder. A few of its attractive features are.
- You can choose between compressed and uncompressed on Voice Memo for audio formats.
- With the search feature of this recorder, you can easily find your recordings.
- You can mark your recordings with the same name so that they can be accessed easily.
You might have a question in your mind about how to make a voice recording on iPhone? The answer to this question is shared below.
Step 1: First of all, you should locate the ‘Voice Memo’ application on your iPhone.

Step 2: Now, you should launch the application. You will see a big ‘Red’ button at the bottom of the screen. Simply hit that button to start the recording.

Step 3: After you are satisfied with the recording, you have to tap again on the big ‘Red’ square button to stop the audio recording.

Step 4: Now, beneath the recording, you will see a ‘Delete’ option and the other option on the left side is to ‘Edit’ the recording. You can set the playback speed, skip silence and also Enhance Recording option.

Step 5: Lastly, by clicking on the 3 vertical dots, you can copy and share your recording. The dialog box also allows you to edit, duplicate, etc.

Part 2. 5 Best Voice Recorder App for iPhone
Although iPhone has a built-in voice recorder, that has been discussed in the above section. We use different voice recording applications now and then. Here, a question arises: What could be the best audio recording app for iPhone? What could be done if you don’don’tt to use it?
There are alternative options for almost everything. In the same way, there are alternative applications that could be used to record sound on iPhone. The following section will shed light on the 5 best voice recorder iPhone applications.
1. Rev Voice Recorder & Memos
The first application to record audio on iPhone is Rev Voice Recorder. The voice recorder is customer-oriented with a very easy-to-understand interface. Rev has a very strong customer service team that deals immediately with problems if any problem is reported. Rev Voice Recorder is a free voice recorder for iPhone.

With Rev recorder, you don’don’te to struggle much as you can easily search for the recordings by name. It lets you view and then share your recordings. There are many more features of this voice recorder; let’let’sk about them.
- The most amazing thing about the Rev Voice Recorder is that it spontaneously pauses the recording for any incoming call or any other interruption.
- You can edit and trim the recording to remove any unwanted parts.
- The recorder is synced with Dropbox to backup your recordings.
- It offers high-quality voice recordings and playback.
2. Awesome Voice Recorder
The next recorder that comes in line that could be used as an alternative voice recorder iPhone is ‘Awe’ome Voice Recorder.’ Th’s recorder is great as it offers various voice recording tools. The interface is simple and basic. With Awesome Voice Recorder, you can pause your recording and then start again from where you left.

Like this, AVR has many crazy features that attract its users and facilitate them brilliantly at the same time. Let us share some of its features with you.
- The coolest thing about this recorder is that it stops in case there is any storage space problem or even a low battery.
- Awesome Voice Recorder supports Bluetooth.
- The fascinating factor of using AVR is its unlimited recording time.
- The recordings of this tool are playable in various media.
3. HT Professional Recorder
HT Professional Recorder is another awesome option to record audio on iPhone. The recorder is well known for its features and exceptional recording quality. HT Professional Recorder has this mind-blowing quality that it can record the audio even if the people talking are sitting several feet away from the iPhone.

Like this, HT Professional Recorder is full of surprises. The recorder has a lot to offer. Allow us to highlight its features.
- An auto-record option automatically starts the recording as soon as the application is launched.
- This reorder offers a unique feature that you can bookmark important moments.
- The recorder spontaneously skips any silence between the recording.
- You can also transfer files to other computers via a Wi-Fi connection.
4. AudioNote 2 – Voice Recorder
Another alternate option for the audio recording app iPhone is AudioNote 2. The application is unmatchable as it uses Amplified audio recording, where the tool will adapt according to the volume level as well as the size of the room.

With AudioNote 2, you can pause or restart the recording any time you want to. You will learn more about this recorder after going through its features.
- The recorder lets you import any pre-recorded audio of yours, and then you can add notes to it.
- AudioNote 2 has a brilliant feature of ‘Noi’e Reduction Filter.’ Wi’h this filter, you can eliminate any extra and unwanted sound from the background.
- The recording application automatically syncs the devices with either Dropbox or iCloud.
- With this recorder, you can adjust the playback speed with pitch correction when it comes to playback.
5. Voice Recorder – Audio Record
Lastly, another best audio recording app for iPhone is Voice Recorder. The recording tool does auto-upload within seconds. You can also share your recordings on the cloud or Dropbox. Voice Recorder Audio Record has various features, few of its features are.

- You can easily edit and amend your recordings. It lets you trim the final version of your recording to remove any unwanted sound.
- The application is a quick audio player with multiple playback controls.
- You can easily share your recording via Dropbox or iCloud.
- The recording tool supports WAV, M4A, and CAF.
Ending Thoughts
The article is a detailed guide about the audio recording app iPhone. The audio recording for iPhone has been discussed from every possible aspect. The article also shared the steps to use the built-in voice recorder of the iPhone, and 5 amazing recording tools were also discussed.
After you have recorded the audio, there might be some problems with it. For such problems, we have Wondershare Filmora – Audio Editing. You can polish and edit your roughly recorded audio and make it smooth and flawless with Filmora.
For Win 7 or later (64-bit)
For macOS 10.12 or later
Filmora Audio Editor has multiple features. Among those, one feature is to Add Background Music to your recorded audio. Adding background music helps to maintain interest. Another feature of Audio Editing by Filmora is Split Audio. The feature is where you can split the original audio and use it like you want to. You can also Adjust Audio with Filmora Audio Editing.
Versatile Video Editor - Wondershare Filmora
An easy yet powerful editor
Numerous effects to choose from
Detailed tutorials provided by the official channel
02 5 Best Voice Recorder App for iPhone
Part 1. How to Record Voice on iPhone?
As mentioned earlier, things are a little different for iPhone users compared to Android phones. In the same way, the audio recording process is slightly different. iPhone has a built-in audio recorder, Voice Memo , that could be used to record sound on iPhone. Voice Memo is a great voice recorder. A few of its attractive features are.
- You can choose between compressed and uncompressed on Voice Memo for audio formats.
- With the search feature of this recorder, you can easily find your recordings.
- You can mark your recordings with the same name so that they can be accessed easily.
You might have a question in your mind about how to make a voice recording on iPhone? The answer to this question is shared below.
Step 1: First of all, you should locate the ‘Voice Memo’ application on your iPhone.

Step 2: Now, you should launch the application. You will see a big ‘Red’ button at the bottom of the screen. Simply hit that button to start the recording.

Step 3: After you are satisfied with the recording, you have to tap again on the big ‘Red’ square button to stop the audio recording.

Step 4: Now, beneath the recording, you will see a ‘Delete’ option and the other option on the left side is to ‘Edit’ the recording. You can set the playback speed, skip silence and also Enhance Recording option.

Step 5: Lastly, by clicking on the 3 vertical dots, you can copy and share your recording. The dialog box also allows you to edit, duplicate, etc.

Part 2. 5 Best Voice Recorder App for iPhone
Although iPhone has a built-in voice recorder, that has been discussed in the above section. We use different voice recording applications now and then. Here, a question arises: What could be the best audio recording app for iPhone? What could be done if you don’don’tt to use it?
There are alternative options for almost everything. In the same way, there are alternative applications that could be used to record sound on iPhone. The following section will shed light on the 5 best voice recorder iPhone applications.
1. Rev Voice Recorder & Memos
The first application to record audio on iPhone is Rev Voice Recorder. The voice recorder is customer-oriented with a very easy-to-understand interface. Rev has a very strong customer service team that deals immediately with problems if any problem is reported. Rev Voice Recorder is a free voice recorder for iPhone.

With Rev recorder, you don’don’te to struggle much as you can easily search for the recordings by name. It lets you view and then share your recordings. There are many more features of this voice recorder; let’let’sk about them.
- The most amazing thing about the Rev Voice Recorder is that it spontaneously pauses the recording for any incoming call or any other interruption.
- You can edit and trim the recording to remove any unwanted parts.
- The recorder is synced with Dropbox to backup your recordings.
- It offers high-quality voice recordings and playback.
2. Awesome Voice Recorder
The next recorder that comes in line that could be used as an alternative voice recorder iPhone is ‘Awe’ome Voice Recorder.’ Th’s recorder is great as it offers various voice recording tools. The interface is simple and basic. With Awesome Voice Recorder, you can pause your recording and then start again from where you left.

Like this, AVR has many crazy features that attract its users and facilitate them brilliantly at the same time. Let us share some of its features with you.
- The coolest thing about this recorder is that it stops in case there is any storage space problem or even a low battery.
- Awesome Voice Recorder supports Bluetooth.
- The fascinating factor of using AVR is its unlimited recording time.
- The recordings of this tool are playable in various media.
3. HT Professional Recorder
HT Professional Recorder is another awesome option to record audio on iPhone. The recorder is well known for its features and exceptional recording quality. HT Professional Recorder has this mind-blowing quality that it can record the audio even if the people talking are sitting several feet away from the iPhone.

Like this, HT Professional Recorder is full of surprises. The recorder has a lot to offer. Allow us to highlight its features.
- An auto-record option automatically starts the recording as soon as the application is launched.
- This reorder offers a unique feature that you can bookmark important moments.
- The recorder spontaneously skips any silence between the recording.
- You can also transfer files to other computers via a Wi-Fi connection.
4. AudioNote 2 – Voice Recorder
Another alternate option for the audio recording app iPhone is AudioNote 2. The application is unmatchable as it uses Amplified audio recording, where the tool will adapt according to the volume level as well as the size of the room.

With AudioNote 2, you can pause or restart the recording any time you want to. You will learn more about this recorder after going through its features.
- The recorder lets you import any pre-recorded audio of yours, and then you can add notes to it.
- AudioNote 2 has a brilliant feature of ‘Noi’e Reduction Filter.’ Wi’h this filter, you can eliminate any extra and unwanted sound from the background.
- The recording application automatically syncs the devices with either Dropbox or iCloud.
- With this recorder, you can adjust the playback speed with pitch correction when it comes to playback.
5. Voice Recorder – Audio Record
Lastly, another best audio recording app for iPhone is Voice Recorder. The recording tool does auto-upload within seconds. You can also share your recordings on the cloud or Dropbox. Voice Recorder Audio Record has various features, few of its features are.

- You can easily edit and amend your recordings. It lets you trim the final version of your recording to remove any unwanted sound.
- The application is a quick audio player with multiple playback controls.
- You can easily share your recording via Dropbox or iCloud.
- The recording tool supports WAV, M4A, and CAF.
Ending Thoughts
The article is a detailed guide about the audio recording app iPhone. The audio recording for iPhone has been discussed from every possible aspect. The article also shared the steps to use the built-in voice recorder of the iPhone, and 5 amazing recording tools were also discussed.
After you have recorded the audio, there might be some problems with it. For such problems, we have Wondershare Filmora – Audio Editing. You can polish and edit your roughly recorded audio and make it smooth and flawless with Filmora.
For Win 7 or later (64-bit)
For macOS 10.12 or later
Filmora Audio Editor has multiple features. Among those, one feature is to Add Background Music to your recorded audio. Adding background music helps to maintain interest. Another feature of Audio Editing by Filmora is Split Audio. The feature is where you can split the original audio and use it like you want to. You can also Adjust Audio with Filmora Audio Editing.
Versatile Video Editor - Wondershare Filmora
An easy yet powerful editor
Numerous effects to choose from
Detailed tutorials provided by the official channel
Synchronized Sonic Space: Techniques for Achieving Uniform Auditory Dynamics Across Video Content
Best Volume Normalizers: How to Normalize Audio in Videos?

Shanoon Cox
Mar 27, 2024• Proven solutions
Audio recordings are not always perfect since they can often be too loud or nearly inaudible. In case you are dealing with an audio or video file that has an unbalanced volume you can try to fix this issue by using the audio normalization features which video and audio editing apps for Mac and PC computers offer.
- Part 1: What is Audio Normalization?
- Part 2: How to Normalize Audio [Tutorial]
- Part 3: Top Sound Normalizers
- Part 4: Audio Normalization Tips
What is Audio Normalization?
There are two different types of audio normalization, peak normalization, and loudness normalization. The peak normalization changes the gain that is being applied in order to reduce the highest PCM sample value down to 0 dB, while the loudness normalization reduces the average amplitude to the chosen level. However, the majority of video and audio editing apps combine these two types of audio normalization into a single feature. So, in this article, we are going to show you how you can quickly normalize audio with different video and audio editing apps.
How to Normalize Audio?
The most common reason for using audio normalization features is to bring the audio level of several different audio clips to the same level. In addition, audio normalization can help you make inaudible narration or dialogue a bit louder. If you want to make your vocals pop over the background music, all you have to do is download a versatile software - Filmora from Wondershare . The latest version of Filmora has released a new function - audio ducking, which helps you increase your vocals while lower the background music with ease. Download it for free!
After installing Wondershare Filmora, just read this complete guide of using audio ducking in Filmora .
Step 1: Drag and drop multiple video or audio files into the timeline and select one clip you want to hear more clearly.
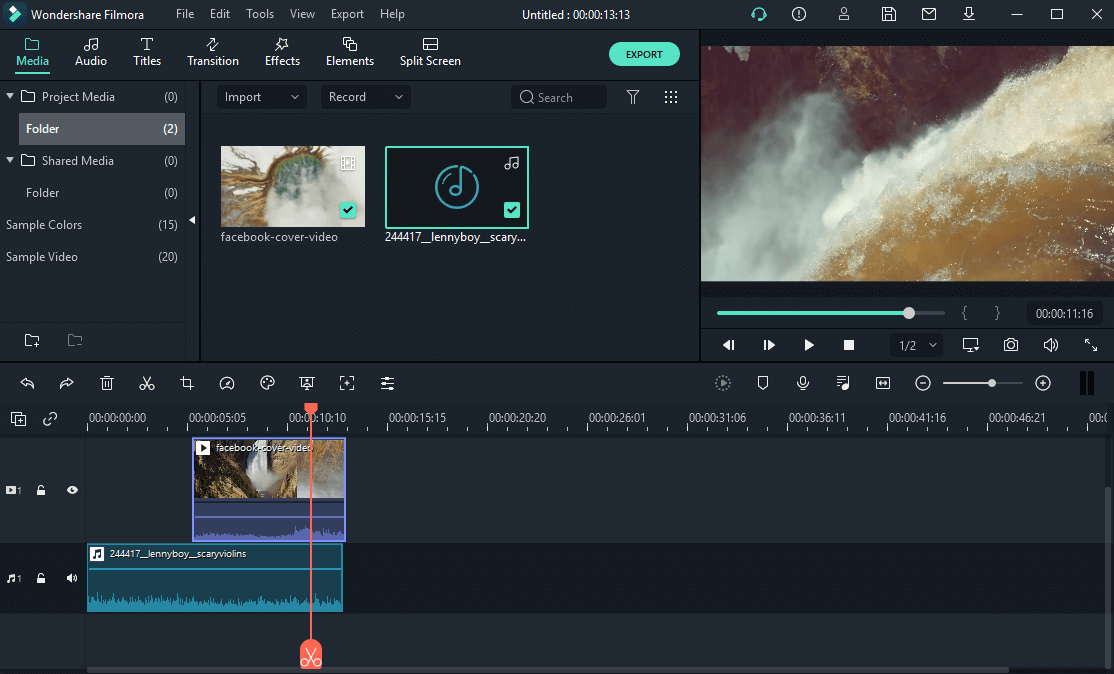
Step 2: After right-clicking the clip, you can select “Adjust Audio”.

Step 3: Click “Lower the volume of other clips” and adjust the percentage according to your need.

Best 3 Audio Normalizers
Except for Wondershare Filmora, there are other audio normalizers that you can use when you are edit videos. Moreover, we will know the steps of normalizing audios with these sound normalizers.
1. iMovie

Price: Free
Compatibility: macOS
Mac users don’t need a special introduction to this iconic video editing app that has been featured on all versions of macOS that were released since 2003. The process of normalizing audio with iMovie is rather simple as you just have to import an audio or video file that contains sound into the Project Browser and double-click on it. Once the Inspector pops up on the screen you should select the Audio option and click on the Normalize Clip Volume setting. iMovie will then normalize the audio in the selected file, so you should just wait for the process to be over and click Done afterward.
2. Movavi
Price: $79.95 for a lifetime license
Compatibility: Windows, macOS
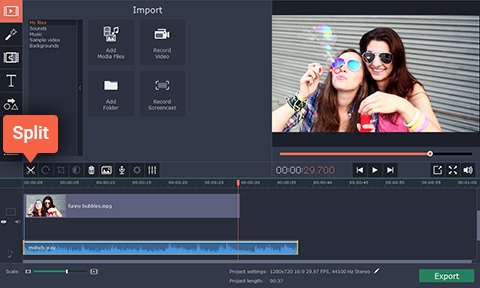
Movavi video editor offers all the tools you are going to need to finish the video editing process quickly. This video editing software for Mac and PC computers is best suited for video content creators who don’t have a lot of experience, although skilled video editing professionals can also use it to edit their footage. The audio normalization process in Movavi can be completed in just a few easy steps. After creating the project in the Full Feature Mode, you should click on the Add Media Files icon and import the files you’d like to use in that project. Place the files to the appropriate track on the timeline and then double-click on the file that is located on the audio track. Once the Tools panel appears on the screen, you just have to make sure that the Normalize tickbox is checked and Movavi will normalize the audio automatically.
3. Audacity

Price: Free
Compatibility: Linux, Windows, macOS
Audacity is a professional audio editing app that lets you record and edit sound for your videos. You can use this app to create sound effects, merge multiple audio files together, or record narration for each new video you create. Normalizing audio with Audacity is easy because you just have to add the audio clips to the timeline and make sure that the track to which you added a file is selected. The app also lets you select more than just one track, so you can place audio files to two or more tracks and files from each track are going to be adjusted to the same audio level. Once you’ve selected a track or tracks that contain audio clips you’d like to normalize, head over to the Effects menu, choose the Normalize option, and hit OK.
Tips on Audio Normalization
A single scene can contain a lot of different sounds. The sound of someone’s footsteps, ambient sounds, or the dialogue are just a few examples of sounds that are frequently used in videos and movies. The audio volume of each of these sounds shouldn’t be the same, because if the ambient sounds are as loud as the dialogue the audience may find it hard to understand what the characters in that scene are saying. That’s why you should use audio normalization only when you are absolutely sure that using the same audio volume level for two or more audio clips won’t disrupt the flow of your video.
Conclusion
Even though normalizing audio with each of the video editing software products we featured in this article is a straightforward process, this option should only be used if you have no other way to balance the audio volume of a video or an audio file. Which video editing app for Mac and PC computers do you like to use the most to normalize audio in your videos? Leave a comment and share your experiences with us.

Shanoon Cox
Shanoon Cox is a writer and a lover of all things video.
Follow @Shanoon Cox
Shanoon Cox
Mar 27, 2024• Proven solutions
Audio recordings are not always perfect since they can often be too loud or nearly inaudible. In case you are dealing with an audio or video file that has an unbalanced volume you can try to fix this issue by using the audio normalization features which video and audio editing apps for Mac and PC computers offer.

- Part 1: What is Audio Normalization?
- Part 2: How to Normalize Audio [Tutorial]
- Part 3: Top Sound Normalizers
- Part 4: Audio Normalization Tips
What is Audio Normalization?
There are two different types of audio normalization, peak normalization, and loudness normalization. The peak normalization changes the gain that is being applied in order to reduce the highest PCM sample value down to 0 dB, while the loudness normalization reduces the average amplitude to the chosen level. However, the majority of video and audio editing apps combine these two types of audio normalization into a single feature. So, in this article, we are going to show you how you can quickly normalize audio with different video and audio editing apps.
How to Normalize Audio?
The most common reason for using audio normalization features is to bring the audio level of several different audio clips to the same level. In addition, audio normalization can help you make inaudible narration or dialogue a bit louder. If you want to make your vocals pop over the background music, all you have to do is download a versatile software - Filmora from Wondershare . The latest version of Filmora has released a new function - audio ducking, which helps you increase your vocals while lower the background music with ease. Download it for free!
After installing Wondershare Filmora, just read this complete guide of using audio ducking in Filmora .
Step 1: Drag and drop multiple video or audio files into the timeline and select one clip you want to hear more clearly.

Step 2: After right-clicking the clip, you can select “Adjust Audio”.

Step 3: Click “Lower the volume of other clips” and adjust the percentage according to your need.

Best 3 Audio Normalizers
Except for Wondershare Filmora, there are other audio normalizers that you can use when you are edit videos. Moreover, we will know the steps of normalizing audios with these sound normalizers.
1. iMovie

Price: Free
Compatibility: macOS
Mac users don’t need a special introduction to this iconic video editing app that has been featured on all versions of macOS that were released since 2003. The process of normalizing audio with iMovie is rather simple as you just have to import an audio or video file that contains sound into the Project Browser and double-click on it. Once the Inspector pops up on the screen you should select the Audio option and click on the Normalize Clip Volume setting. iMovie will then normalize the audio in the selected file, so you should just wait for the process to be over and click Done afterward.
2. Movavi

Price: $79.95 for a lifetime license
Compatibility: Windows, macOS
Movavi video editor offers all the tools you are going to need to finish the video editing process quickly. This video editing software for Mac and PC computers is best suited for video content creators who don’t have a lot of experience, although skilled video editing professionals can also use it to edit their footage. The audio normalization process in Movavi can be completed in just a few easy steps. After creating the project in the Full Feature Mode, you should click on the Add Media Files icon and import the files you’d like to use in that project. Place the files to the appropriate track on the timeline and then double-click on the file that is located on the audio track. Once the Tools panel appears on the screen, you just have to make sure that the Normalize tickbox is checked and Movavi will normalize the audio automatically.
3. Audacity

Price: Free
Compatibility: Linux, Windows, macOS
Audacity is a professional audio editing app that lets you record and edit sound for your videos. You can use this app to create sound effects, merge multiple audio files together, or record narration for each new video you create. Normalizing audio with Audacity is easy because you just have to add the audio clips to the timeline and make sure that the track to which you added a file is selected. The app also lets you select more than just one track, so you can place audio files to two or more tracks and files from each track are going to be adjusted to the same audio level. Once you’ve selected a track or tracks that contain audio clips you’d like to normalize, head over to the Effects menu, choose the Normalize option, and hit OK.
Tips on Audio Normalization
A single scene can contain a lot of different sounds. The sound of someone’s footsteps, ambient sounds, or the dialogue are just a few examples of sounds that are frequently used in videos and movies. The audio volume of each of these sounds shouldn’t be the same, because if the ambient sounds are as loud as the dialogue the audience may find it hard to understand what the characters in that scene are saying. That’s why you should use audio normalization only when you are absolutely sure that using the same audio volume level for two or more audio clips won’t disrupt the flow of your video.
Conclusion
Even though normalizing audio with each of the video editing software products we featured in this article is a straightforward process, this option should only be used if you have no other way to balance the audio volume of a video or an audio file. Which video editing app for Mac and PC computers do you like to use the most to normalize audio in your videos? Leave a comment and share your experiences with us.

Shanoon Cox
Shanoon Cox is a writer and a lover of all things video.
Follow @Shanoon Cox
Shanoon Cox
Mar 27, 2024• Proven solutions
Audio recordings are not always perfect since they can often be too loud or nearly inaudible. In case you are dealing with an audio or video file that has an unbalanced volume you can try to fix this issue by using the audio normalization features which video and audio editing apps for Mac and PC computers offer.

- Part 1: What is Audio Normalization?
- Part 2: How to Normalize Audio [Tutorial]
- Part 3: Top Sound Normalizers
- Part 4: Audio Normalization Tips
What is Audio Normalization?
There are two different types of audio normalization, peak normalization, and loudness normalization. The peak normalization changes the gain that is being applied in order to reduce the highest PCM sample value down to 0 dB, while the loudness normalization reduces the average amplitude to the chosen level. However, the majority of video and audio editing apps combine these two types of audio normalization into a single feature. So, in this article, we are going to show you how you can quickly normalize audio with different video and audio editing apps.
How to Normalize Audio?
The most common reason for using audio normalization features is to bring the audio level of several different audio clips to the same level. In addition, audio normalization can help you make inaudible narration or dialogue a bit louder. If you want to make your vocals pop over the background music, all you have to do is download a versatile software - Filmora from Wondershare . The latest version of Filmora has released a new function - audio ducking, which helps you increase your vocals while lower the background music with ease. Download it for free!
After installing Wondershare Filmora, just read this complete guide of using audio ducking in Filmora .
Step 1: Drag and drop multiple video or audio files into the timeline and select one clip you want to hear more clearly.

Step 2: After right-clicking the clip, you can select “Adjust Audio”.

Step 3: Click “Lower the volume of other clips” and adjust the percentage according to your need.

Best 3 Audio Normalizers
Except for Wondershare Filmora, there are other audio normalizers that you can use when you are edit videos. Moreover, we will know the steps of normalizing audios with these sound normalizers.
1. iMovie

Price: Free
Compatibility: macOS
Mac users don’t need a special introduction to this iconic video editing app that has been featured on all versions of macOS that were released since 2003. The process of normalizing audio with iMovie is rather simple as you just have to import an audio or video file that contains sound into the Project Browser and double-click on it. Once the Inspector pops up on the screen you should select the Audio option and click on the Normalize Clip Volume setting. iMovie will then normalize the audio in the selected file, so you should just wait for the process to be over and click Done afterward.
2. Movavi

Price: $79.95 for a lifetime license
Compatibility: Windows, macOS
Movavi video editor offers all the tools you are going to need to finish the video editing process quickly. This video editing software for Mac and PC computers is best suited for video content creators who don’t have a lot of experience, although skilled video editing professionals can also use it to edit their footage. The audio normalization process in Movavi can be completed in just a few easy steps. After creating the project in the Full Feature Mode, you should click on the Add Media Files icon and import the files you’d like to use in that project. Place the files to the appropriate track on the timeline and then double-click on the file that is located on the audio track. Once the Tools panel appears on the screen, you just have to make sure that the Normalize tickbox is checked and Movavi will normalize the audio automatically.
3. Audacity

Price: Free
Compatibility: Linux, Windows, macOS
Audacity is a professional audio editing app that lets you record and edit sound for your videos. You can use this app to create sound effects, merge multiple audio files together, or record narration for each new video you create. Normalizing audio with Audacity is easy because you just have to add the audio clips to the timeline and make sure that the track to which you added a file is selected. The app also lets you select more than just one track, so you can place audio files to two or more tracks and files from each track are going to be adjusted to the same audio level. Once you’ve selected a track or tracks that contain audio clips you’d like to normalize, head over to the Effects menu, choose the Normalize option, and hit OK.
Tips on Audio Normalization
A single scene can contain a lot of different sounds. The sound of someone’s footsteps, ambient sounds, or the dialogue are just a few examples of sounds that are frequently used in videos and movies. The audio volume of each of these sounds shouldn’t be the same, because if the ambient sounds are as loud as the dialogue the audience may find it hard to understand what the characters in that scene are saying. That’s why you should use audio normalization only when you are absolutely sure that using the same audio volume level for two or more audio clips won’t disrupt the flow of your video.
Conclusion
Even though normalizing audio with each of the video editing software products we featured in this article is a straightforward process, this option should only be used if you have no other way to balance the audio volume of a video or an audio file. Which video editing app for Mac and PC computers do you like to use the most to normalize audio in your videos? Leave a comment and share your experiences with us.

Shanoon Cox
Shanoon Cox is a writer and a lover of all things video.
Follow @Shanoon Cox
Shanoon Cox
Mar 27, 2024• Proven solutions
Audio recordings are not always perfect since they can often be too loud or nearly inaudible. In case you are dealing with an audio or video file that has an unbalanced volume you can try to fix this issue by using the audio normalization features which video and audio editing apps for Mac and PC computers offer.

- Part 1: What is Audio Normalization?
- Part 2: How to Normalize Audio [Tutorial]
- Part 3: Top Sound Normalizers
- Part 4: Audio Normalization Tips
What is Audio Normalization?
There are two different types of audio normalization, peak normalization, and loudness normalization. The peak normalization changes the gain that is being applied in order to reduce the highest PCM sample value down to 0 dB, while the loudness normalization reduces the average amplitude to the chosen level. However, the majority of video and audio editing apps combine these two types of audio normalization into a single feature. So, in this article, we are going to show you how you can quickly normalize audio with different video and audio editing apps.
How to Normalize Audio?
The most common reason for using audio normalization features is to bring the audio level of several different audio clips to the same level. In addition, audio normalization can help you make inaudible narration or dialogue a bit louder. If you want to make your vocals pop over the background music, all you have to do is download a versatile software - Filmora from Wondershare . The latest version of Filmora has released a new function - audio ducking, which helps you increase your vocals while lower the background music with ease. Download it for free!
After installing Wondershare Filmora, just read this complete guide of using audio ducking in Filmora .
Step 1: Drag and drop multiple video or audio files into the timeline and select one clip you want to hear more clearly.

Step 2: After right-clicking the clip, you can select “Adjust Audio”.

Step 3: Click “Lower the volume of other clips” and adjust the percentage according to your need.

Best 3 Audio Normalizers
Except for Wondershare Filmora, there are other audio normalizers that you can use when you are edit videos. Moreover, we will know the steps of normalizing audios with these sound normalizers.
1. iMovie

Price: Free
Compatibility: macOS
Mac users don’t need a special introduction to this iconic video editing app that has been featured on all versions of macOS that were released since 2003. The process of normalizing audio with iMovie is rather simple as you just have to import an audio or video file that contains sound into the Project Browser and double-click on it. Once the Inspector pops up on the screen you should select the Audio option and click on the Normalize Clip Volume setting. iMovie will then normalize the audio in the selected file, so you should just wait for the process to be over and click Done afterward.
2. Movavi

Price: $79.95 for a lifetime license
Compatibility: Windows, macOS
Movavi video editor offers all the tools you are going to need to finish the video editing process quickly. This video editing software for Mac and PC computers is best suited for video content creators who don’t have a lot of experience, although skilled video editing professionals can also use it to edit their footage. The audio normalization process in Movavi can be completed in just a few easy steps. After creating the project in the Full Feature Mode, you should click on the Add Media Files icon and import the files you’d like to use in that project. Place the files to the appropriate track on the timeline and then double-click on the file that is located on the audio track. Once the Tools panel appears on the screen, you just have to make sure that the Normalize tickbox is checked and Movavi will normalize the audio automatically.
3. Audacity

Price: Free
Compatibility: Linux, Windows, macOS
Audacity is a professional audio editing app that lets you record and edit sound for your videos. You can use this app to create sound effects, merge multiple audio files together, or record narration for each new video you create. Normalizing audio with Audacity is easy because you just have to add the audio clips to the timeline and make sure that the track to which you added a file is selected. The app also lets you select more than just one track, so you can place audio files to two or more tracks and files from each track are going to be adjusted to the same audio level. Once you’ve selected a track or tracks that contain audio clips you’d like to normalize, head over to the Effects menu, choose the Normalize option, and hit OK.
Tips on Audio Normalization
A single scene can contain a lot of different sounds. The sound of someone’s footsteps, ambient sounds, or the dialogue are just a few examples of sounds that are frequently used in videos and movies. The audio volume of each of these sounds shouldn’t be the same, because if the ambient sounds are as loud as the dialogue the audience may find it hard to understand what the characters in that scene are saying. That’s why you should use audio normalization only when you are absolutely sure that using the same audio volume level for two or more audio clips won’t disrupt the flow of your video.
Conclusion
Even though normalizing audio with each of the video editing software products we featured in this article is a straightforward process, this option should only be used if you have no other way to balance the audio volume of a video or an audio file. Which video editing app for Mac and PC computers do you like to use the most to normalize audio in your videos? Leave a comment and share your experiences with us.

Shanoon Cox
Shanoon Cox is a writer and a lover of all things video.
Follow @Shanoon Cox
Choosing the Right Game Voice Alteration for a Competitive Edge
The world is evolving as time passes. and the gaming industry is also exploring technology reforms. People are now joining the gaming industry as a profession. They stream their gaming sessions along with uploading them on YouTube. The players also communicate through the game for what something popular nowadays is a voice changer for gaming.
The usage of these tools is sometimes for fun and sometimes for some genuine reasons. Due to this, Voice changershave made the gaming world unique and full of suspense. If you are looking for any good voice changer for gaming, we have a solution for you people.
In this article
01 What Factors Make A Nice Voice Changer for Gaming?
02 Nice Voice Changer for Xbox
03 Best Voice Changer for Fortnite
04 Popular Voice Changer for PS4
For Win 7 or later (64-bit)
For macOS 10.12 or later
Part 1. What Factors Make A Nice Voice Changer for Gaming?
Have you ever used a voice changer for gaming before? If not then, allow us to help you out. There are multiple options when it comes to voice changers for gaming. There are some tips and factors depending upon which you can choose a nice voice changer. The coming section of this article will focus on the factors that should be considered while selecting your gaming voice changer.
· Efficiency of Usage
Selecting a voice changer is not only about the sound effects it offers or its features and services. At this point intervenes in the consumer experience it provides. The efficiency here matters a lot. Moreover, the question that ‘Is the software user-friendly?’ is the game-changer in this world. An attractive and easy-to-understand interface is the key to having more consumers.
· Support for Streams
Online streaming and sharing is the most prominent way of communication nowadays. The next thing to check is if the voice changer is compatible with online use? If the answer is ‘Yes,’ then it has secured another point in favor of its usage.
· Sound Library
Finding sound effects is sometimes difficult, so to avoid this, a wide range of sound effects must be available for the user’s ease. If the voice changer has a built-in sound effects library, then it has gained a tick in the checklist. A good voice changer always has a built-in library, and they even allow the user to upload their sound library.
· Trial and Affordability
As no good facility is for free, so good voice changer for gaming is never free. On the contrary, a good voice changer has an option for a free trial for a limited period. Another thing to be considered is whether the amount charged is justifiable by the services provided or not.
· Online Activity Support
Today, the world has gone online, from banking to studies. The software should be compatible with the revolving world technology, and it should support online gaming platforms such as League of Legends, CS: GO, and Fortnite.
Part 2. Nice Voice Changer for Xbox
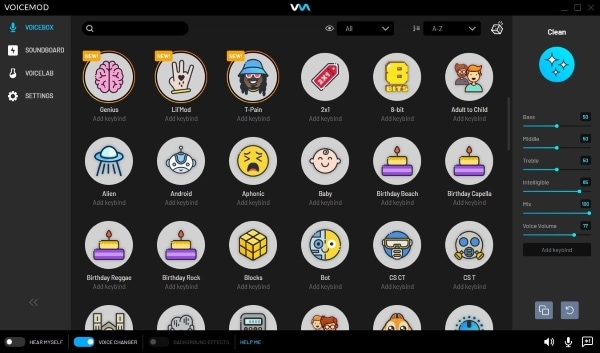
VoiceMod is a good option if you are looking for a voice changer for Xbox. It is the most reliable voice changer for both Xbox One and 360. VoiceMod is a voice modifier that is compatible with all kinds of gaming platforms but is preferred for Xbox. It is a real-time voice changer for gaming as it changes voice in real-time and not in playback.
VoiceMod helps create a unique identity by using real female voices, robots, demons, celebrities, and other voices. It has an extensive built-in library of sound effects. VoiceMod is the best option to enjoy your gaming experience and make it livelier. It allows you to upload a voice of your choice; you can either become a character from Rick and Morty or even Donald Trump.
Key Features
- It provides the user to upload external files of WAV or MP3 format for their use along with using the files from the built-in library.
- VoiceMod is easy to set up and use as compared to other service providers. It allows you can record your voice and add it to the soundboard.
- It has more than 90 voices that are all interesting and different to make the gaming experience better and unique for the consumer.
- Is VoiceMod voice changer harmful? No, VoiceMod can be easily and directly used with Xbox without any harm to the device.
Part 3. Best Voice Changer for Fortnite
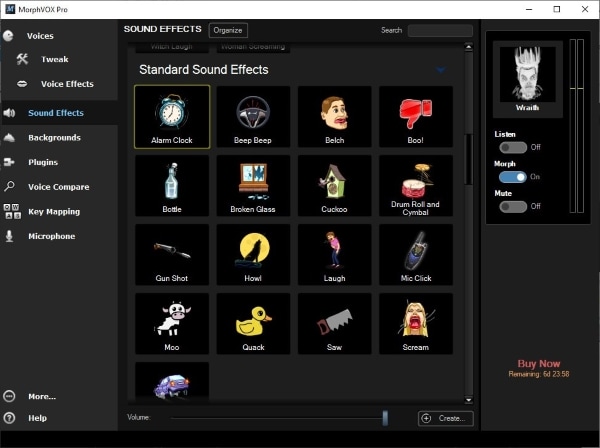
Is there any good and specific voice changer for Fortnite? Yes, there is a voice changer named MorphVOX PRO. It is a tool that modifies your voice according to your personality. The Artificial Intelligence of MorphVOX learns from your voice and creates a unique and strong voice with high quality.
The built-in sound effect library makes it convenient to use this voice changer. MorphVOX is capable of converting your voice in-game or online. Can you modify your voice to male, female, or baby? Yes, MorphVOX can create voices based on age. MorphVOX can also be integrated with online games for what reason gamers find it attractive.
Key Features
- MorphVOX has a background voice remover which removes any unnecessary voice that bothers you.
- Artificial background sounds can be added from the built-in library or can be added by the user to make the listener’s gaming experience better.
- MorphVOX can also be used for online gaming streaming, unlike other service providers.
- The built-in library has funny sounds that help to make the intense and serious gaming scene a little funny.
Part 4. Popular Voice Changer for PS4
The most famous voice changer for gaming on PS4 is the Clownfish Voice Changer . Clownfish allows using it as the best voice changer PS4. For using Clownfish, PS remote play is required. Does the voice changer differ for different games?
Clownfish is installed in the system so all the games can access it and use it without any endow. It integrates with multiple other software and applications, making it the best voice changer for gaming.
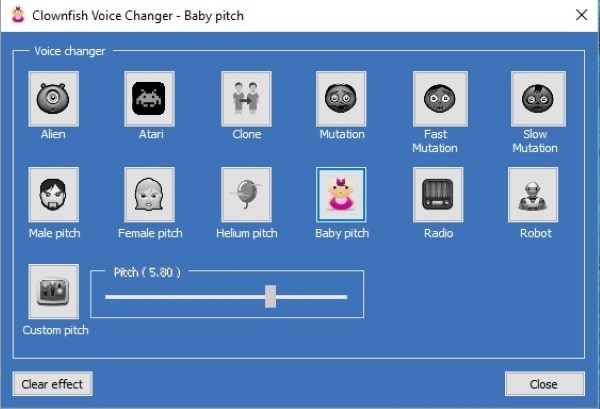
Clownfish is a famous and popular voice changer. It is one of its kind and has a list of voice effects such as aliens, female and male pitch, radio, slow mutation, and mutation along with baby voice. Clownfish is also known for its robotic voice change and also for the Clone and Atari voices.
Key Features
- Clownfish is compatible with both 32-bit and 64-bit versions
- It provides a high-quality built-in sound system and sound management system. It also has access to 14 different voices, including robotic, alien along with male and female voices.
- Clownfish provides you access to Virtual Studio Technology (VST) which creates a multi-dimensional sound effect.
- Clownfish Voice Changer has a music player with an internal playlist along with audio control. User can also add their audios.
Closing Words
This article tried to cover different kinds of voice changers for gaming purposes. The tip and tricks of how to choose the best voice changer were also discussed in the above-written article. We shared different voice changers for gaming, related to Xbox of any kind, to PlayStation, and to a specific game named Fortnite.
02 Nice Voice Changer for Xbox
03 Best Voice Changer for Fortnite
04 Popular Voice Changer for PS4
For Win 7 or later (64-bit)
For macOS 10.12 or later
Part 1. What Factors Make A Nice Voice Changer for Gaming?
Have you ever used a voice changer for gaming before? If not then, allow us to help you out. There are multiple options when it comes to voice changers for gaming. There are some tips and factors depending upon which you can choose a nice voice changer. The coming section of this article will focus on the factors that should be considered while selecting your gaming voice changer.
· Efficiency of Usage
Selecting a voice changer is not only about the sound effects it offers or its features and services. At this point intervenes in the consumer experience it provides. The efficiency here matters a lot. Moreover, the question that ‘Is the software user-friendly?’ is the game-changer in this world. An attractive and easy-to-understand interface is the key to having more consumers.
· Support for Streams
Online streaming and sharing is the most prominent way of communication nowadays. The next thing to check is if the voice changer is compatible with online use? If the answer is ‘Yes,’ then it has secured another point in favor of its usage.
· Sound Library
Finding sound effects is sometimes difficult, so to avoid this, a wide range of sound effects must be available for the user’s ease. If the voice changer has a built-in sound effects library, then it has gained a tick in the checklist. A good voice changer always has a built-in library, and they even allow the user to upload their sound library.
· Trial and Affordability
As no good facility is for free, so good voice changer for gaming is never free. On the contrary, a good voice changer has an option for a free trial for a limited period. Another thing to be considered is whether the amount charged is justifiable by the services provided or not.
· Online Activity Support
Today, the world has gone online, from banking to studies. The software should be compatible with the revolving world technology, and it should support online gaming platforms such as League of Legends, CS: GO, and Fortnite.
Part 2. Nice Voice Changer for Xbox
VoiceMod is a good option if you are looking for a voice changer for Xbox. It is the most reliable voice changer for both Xbox One and 360. VoiceMod is a voice modifier that is compatible with all kinds of gaming platforms but is preferred for Xbox. It is a real-time voice changer for gaming as it changes voice in real-time and not in playback.
VoiceMod helps create a unique identity by using real female voices, robots, demons, celebrities, and other voices. It has an extensive built-in library of sound effects. VoiceMod is the best option to enjoy your gaming experience and make it livelier. It allows you to upload a voice of your choice; you can either become a character from Rick and Morty or even Donald Trump.

Key Features
- It provides the user to upload external files of WAV or MP3 format for their use along with using the files from the built-in library.
- VoiceMod is easy to set up and use as compared to other service providers. It allows you can record your voice and add it to the soundboard.
- It has more than 90 voices that are all interesting and different to make the gaming experience better and unique for the consumer.
- Is VoiceMod voice changer harmful? No, VoiceMod can be easily and directly used with Xbox without any harm to the device.
Part 3. Best Voice Changer for Fortnite
Is there any good and specific voice changer for Fortnite? Yes, there is a voice changer named MorphVOX PRO. It is a tool that modifies your voice according to your personality. The Artificial Intelligence of MorphVOX learns from your voice and creates a unique and strong voice with high quality.
The built-in sound effect library makes it convenient to use this voice changer. MorphVOX is capable of converting your voice in-game or online. Can you modify your voice to male, female, or baby? Yes, MorphVOX can create voices based on age. MorphVOX can also be integrated with online games for what reason gamers find it attractive.

Key Features
- MorphVOX has a background voice remover which removes any unnecessary voice that bothers you.
- Artificial background sounds can be added from the built-in library or can be added by the user to make the listener’s gaming experience better.
- MorphVOX can also be used for online gaming streaming, unlike other service providers.
- The built-in library has funny sounds that help to make the intense and serious gaming scene a little funny.
Part 4. Popular Voice Changer for PS4
The most famous voice changer for gaming on PS4 is the Clownfish Voice Changer . Clownfish allows using it as the best voice changer PS4. For using Clownfish, PS remote play is required. Does the voice changer differ for different games?
Clownfish is installed in the system so all the games can access it and use it without any endow. It integrates with multiple other software and applications, making it the best voice changer for gaming.
Clownfish is a famous and popular voice changer. It is one of its kind and has a list of voice effects such as aliens, female and male pitch, radio, slow mutation, and mutation along with baby voice. Clownfish is also known for its robotic voice change and also for the Clone and Atari voices.

Key Features
- Clownfish is compatible with both 32-bit and 64-bit versions
- It provides a high-quality built-in sound system and sound management system. It also has access to 14 different voices, including robotic, alien along with male and female voices.
- Clownfish provides you access to Virtual Studio Technology (VST) which creates a multi-dimensional sound effect.
- Clownfish Voice Changer has a music player with an internal playlist along with audio control. User can also add their audios.
Closing Words
This article tried to cover different kinds of voice changers for gaming purposes. The tip and tricks of how to choose the best voice changer were also discussed in the above-written article. We shared different voice changers for gaming, related to Xbox of any kind, to PlayStation, and to a specific game named Fortnite.
02 Nice Voice Changer for Xbox
03 Best Voice Changer for Fortnite
04 Popular Voice Changer for PS4
For Win 7 or later (64-bit)
For macOS 10.12 or later
Part 1. What Factors Make A Nice Voice Changer for Gaming?
Have you ever used a voice changer for gaming before? If not then, allow us to help you out. There are multiple options when it comes to voice changers for gaming. There are some tips and factors depending upon which you can choose a nice voice changer. The coming section of this article will focus on the factors that should be considered while selecting your gaming voice changer.
· Efficiency of Usage
Selecting a voice changer is not only about the sound effects it offers or its features and services. At this point intervenes in the consumer experience it provides. The efficiency here matters a lot. Moreover, the question that ‘Is the software user-friendly?’ is the game-changer in this world. An attractive and easy-to-understand interface is the key to having more consumers.
· Support for Streams
Online streaming and sharing is the most prominent way of communication nowadays. The next thing to check is if the voice changer is compatible with online use? If the answer is ‘Yes,’ then it has secured another point in favor of its usage.
· Sound Library
Finding sound effects is sometimes difficult, so to avoid this, a wide range of sound effects must be available for the user’s ease. If the voice changer has a built-in sound effects library, then it has gained a tick in the checklist. A good voice changer always has a built-in library, and they even allow the user to upload their sound library.
· Trial and Affordability
As no good facility is for free, so good voice changer for gaming is never free. On the contrary, a good voice changer has an option for a free trial for a limited period. Another thing to be considered is whether the amount charged is justifiable by the services provided or not.
· Online Activity Support
Today, the world has gone online, from banking to studies. The software should be compatible with the revolving world technology, and it should support online gaming platforms such as League of Legends, CS: GO, and Fortnite.
Part 2. Nice Voice Changer for Xbox
VoiceMod is a good option if you are looking for a voice changer for Xbox. It is the most reliable voice changer for both Xbox One and 360. VoiceMod is a voice modifier that is compatible with all kinds of gaming platforms but is preferred for Xbox. It is a real-time voice changer for gaming as it changes voice in real-time and not in playback.
VoiceMod helps create a unique identity by using real female voices, robots, demons, celebrities, and other voices. It has an extensive built-in library of sound effects. VoiceMod is the best option to enjoy your gaming experience and make it livelier. It allows you to upload a voice of your choice; you can either become a character from Rick and Morty or even Donald Trump.

Key Features
- It provides the user to upload external files of WAV or MP3 format for their use along with using the files from the built-in library.
- VoiceMod is easy to set up and use as compared to other service providers. It allows you can record your voice and add it to the soundboard.
- It has more than 90 voices that are all interesting and different to make the gaming experience better and unique for the consumer.
- Is VoiceMod voice changer harmful? No, VoiceMod can be easily and directly used with Xbox without any harm to the device.
Part 3. Best Voice Changer for Fortnite
Is there any good and specific voice changer for Fortnite? Yes, there is a voice changer named MorphVOX PRO. It is a tool that modifies your voice according to your personality. The Artificial Intelligence of MorphVOX learns from your voice and creates a unique and strong voice with high quality.
The built-in sound effect library makes it convenient to use this voice changer. MorphVOX is capable of converting your voice in-game or online. Can you modify your voice to male, female, or baby? Yes, MorphVOX can create voices based on age. MorphVOX can also be integrated with online games for what reason gamers find it attractive.

Key Features
- MorphVOX has a background voice remover which removes any unnecessary voice that bothers you.
- Artificial background sounds can be added from the built-in library or can be added by the user to make the listener’s gaming experience better.
- MorphVOX can also be used for online gaming streaming, unlike other service providers.
- The built-in library has funny sounds that help to make the intense and serious gaming scene a little funny.
Part 4. Popular Voice Changer for PS4
The most famous voice changer for gaming on PS4 is the Clownfish Voice Changer . Clownfish allows using it as the best voice changer PS4. For using Clownfish, PS remote play is required. Does the voice changer differ for different games?
Clownfish is installed in the system so all the games can access it and use it without any endow. It integrates with multiple other software and applications, making it the best voice changer for gaming.
Clownfish is a famous and popular voice changer. It is one of its kind and has a list of voice effects such as aliens, female and male pitch, radio, slow mutation, and mutation along with baby voice. Clownfish is also known for its robotic voice change and also for the Clone and Atari voices.

Key Features
- Clownfish is compatible with both 32-bit and 64-bit versions
- It provides a high-quality built-in sound system and sound management system. It also has access to 14 different voices, including robotic, alien along with male and female voices.
- Clownfish provides you access to Virtual Studio Technology (VST) which creates a multi-dimensional sound effect.
- Clownfish Voice Changer has a music player with an internal playlist along with audio control. User can also add their audios.
Closing Words
This article tried to cover different kinds of voice changers for gaming purposes. The tip and tricks of how to choose the best voice changer were also discussed in the above-written article. We shared different voice changers for gaming, related to Xbox of any kind, to PlayStation, and to a specific game named Fortnite.
02 Nice Voice Changer for Xbox
03 Best Voice Changer for Fortnite
04 Popular Voice Changer for PS4
For Win 7 or later (64-bit)
For macOS 10.12 or later
Part 1. What Factors Make A Nice Voice Changer for Gaming?
Have you ever used a voice changer for gaming before? If not then, allow us to help you out. There are multiple options when it comes to voice changers for gaming. There are some tips and factors depending upon which you can choose a nice voice changer. The coming section of this article will focus on the factors that should be considered while selecting your gaming voice changer.
· Efficiency of Usage
Selecting a voice changer is not only about the sound effects it offers or its features and services. At this point intervenes in the consumer experience it provides. The efficiency here matters a lot. Moreover, the question that ‘Is the software user-friendly?’ is the game-changer in this world. An attractive and easy-to-understand interface is the key to having more consumers.
· Support for Streams
Online streaming and sharing is the most prominent way of communication nowadays. The next thing to check is if the voice changer is compatible with online use? If the answer is ‘Yes,’ then it has secured another point in favor of its usage.
· Sound Library
Finding sound effects is sometimes difficult, so to avoid this, a wide range of sound effects must be available for the user’s ease. If the voice changer has a built-in sound effects library, then it has gained a tick in the checklist. A good voice changer always has a built-in library, and they even allow the user to upload their sound library.
· Trial and Affordability
As no good facility is for free, so good voice changer for gaming is never free. On the contrary, a good voice changer has an option for a free trial for a limited period. Another thing to be considered is whether the amount charged is justifiable by the services provided or not.
· Online Activity Support
Today, the world has gone online, from banking to studies. The software should be compatible with the revolving world technology, and it should support online gaming platforms such as League of Legends, CS: GO, and Fortnite.
Part 2. Nice Voice Changer for Xbox
VoiceMod is a good option if you are looking for a voice changer for Xbox. It is the most reliable voice changer for both Xbox One and 360. VoiceMod is a voice modifier that is compatible with all kinds of gaming platforms but is preferred for Xbox. It is a real-time voice changer for gaming as it changes voice in real-time and not in playback.
VoiceMod helps create a unique identity by using real female voices, robots, demons, celebrities, and other voices. It has an extensive built-in library of sound effects. VoiceMod is the best option to enjoy your gaming experience and make it livelier. It allows you to upload a voice of your choice; you can either become a character from Rick and Morty or even Donald Trump.

Key Features
- It provides the user to upload external files of WAV or MP3 format for their use along with using the files from the built-in library.
- VoiceMod is easy to set up and use as compared to other service providers. It allows you can record your voice and add it to the soundboard.
- It has more than 90 voices that are all interesting and different to make the gaming experience better and unique for the consumer.
- Is VoiceMod voice changer harmful? No, VoiceMod can be easily and directly used with Xbox without any harm to the device.
Part 3. Best Voice Changer for Fortnite
Is there any good and specific voice changer for Fortnite? Yes, there is a voice changer named MorphVOX PRO. It is a tool that modifies your voice according to your personality. The Artificial Intelligence of MorphVOX learns from your voice and creates a unique and strong voice with high quality.
The built-in sound effect library makes it convenient to use this voice changer. MorphVOX is capable of converting your voice in-game or online. Can you modify your voice to male, female, or baby? Yes, MorphVOX can create voices based on age. MorphVOX can also be integrated with online games for what reason gamers find it attractive.

Key Features
- MorphVOX has a background voice remover which removes any unnecessary voice that bothers you.
- Artificial background sounds can be added from the built-in library or can be added by the user to make the listener’s gaming experience better.
- MorphVOX can also be used for online gaming streaming, unlike other service providers.
- The built-in library has funny sounds that help to make the intense and serious gaming scene a little funny.
Part 4. Popular Voice Changer for PS4
The most famous voice changer for gaming on PS4 is the Clownfish Voice Changer . Clownfish allows using it as the best voice changer PS4. For using Clownfish, PS remote play is required. Does the voice changer differ for different games?
Clownfish is installed in the system so all the games can access it and use it without any endow. It integrates with multiple other software and applications, making it the best voice changer for gaming.
Clownfish is a famous and popular voice changer. It is one of its kind and has a list of voice effects such as aliens, female and male pitch, radio, slow mutation, and mutation along with baby voice. Clownfish is also known for its robotic voice change and also for the Clone and Atari voices.

Key Features
- Clownfish is compatible with both 32-bit and 64-bit versions
- It provides a high-quality built-in sound system and sound management system. It also has access to 14 different voices, including robotic, alien along with male and female voices.
- Clownfish provides you access to Virtual Studio Technology (VST) which creates a multi-dimensional sound effect.
- Clownfish Voice Changer has a music player with an internal playlist along with audio control. User can also add their audios.
Closing Words
This article tried to cover different kinds of voice changers for gaming purposes. The tip and tricks of how to choose the best voice changer were also discussed in the above-written article. We shared different voice changers for gaming, related to Xbox of any kind, to PlayStation, and to a specific game named Fortnite.
Also read:
- New List of Online Repositories Featuring Cat Vocalizations in MP3 for 2024
- Updated Pure Visuals Techniques for Removing Video Soundtracks (Latest Edition)
- 2024 Approved Best 8 Speech to Text Apps for Android and iPhone
- New Tempo Tweak Tools Fast-Paced Guide to Speed Alteration of Sound
- New How to Get a Dry Sound Removing Hiss From Audio for 2024
- New 2024 Approved Guide to Acquiring Realistic Bell Noise Samples
- 2024 Approved Automating Your Voice A Comprehensive Audacity Autotune Installation and Usage Manual
- Premier Virtual TTS Services A Comprehensive List of Online Resources
- New Choosing the Right Time for Music Top-Rated MP3 to Karaoke Tools, On and Offline
- New In 2024, Echoes of Innovation Uncovering the Top 8 Digital Hubs for Comprehensive Free Sound Effect Collections (For Todays Creators)
- 2024 Approved Harmonic Reduction Lowering Beat Rate Without Shifting Pitch Spectrum
- In 2024, Discovering the Most Captivating Anime Character Reinterpretations
- New In 2024, The Vanguard of Anime Character Dubbing Standout Performers
- New In 2024, How to Discern and Assess the Best in the Business for Audio Post-Production Excellence
- New Useful Tips How to Use Voxal Voice Changer on Discord, In 2024
- Updated 2024 Approved Redefining Star Sounds A Comprehensively Detailed Exploration of Vocal Alteration Technology and Alternative Solutions
- Best Background Music Remover to Help You Remove Background Music
- New Complete Insight Into the Wave Editor Vital Elements, Expert Opinions, and Instructional Videos
- New Reentry Guide Regaining Access on Omegle After a Ban for 2024
- In 2024, Exploring Harmony in Motion Discovering the Best Music Animators (Free & Paid)
- New Digital Whiskered Sound Scene
- Updated In 2024, The Mechanics Behind Anime Translations Insights Into Adaptation and Localization
- Updated In 2024, Mastering the Art of Incorporating Soundtracks Into Videos Using Filmora
- Updated The Art of Sonic Depth Incorporating Virtual Reverberation Into Your Windows-Based Audio Projects for 2024
- New In 2024, Detailed Vimeo Video Overview Featuring Aspect Ratio
- New 2024 Approved Discover the Online Havens for High-Fidelity Recordings of Ornithological Sounds
- In 2024, Mastering Podcasting A Look at the Premier Hosting Services
- New Enhancing Your Presentations with Audio PowerPoint Tips for Windows Users & Mac Owners
- New 2024 Approved How to Extract Beats From Songs for YouTube and Other Projects
- New Synchronizing Audio with Visual Media The QuickTime Method for 2024
- 9 Best Free Android Monitoring Apps to Monitor Phone Remotely For your Nokia 130 Music | Dr.fone
- In 2024, 8 Safe and Effective Methods to Unlock Your iPhone 7 Without a Passcode
- Updated In 2024, How to Polish Your Music Video Edits Using Filmora
- Updated 2024 Approved Unlock the Power of Animated Photos Top Tools
- In 2024, How to Fake GPS on Android without Mock Location For your Poco C50 | Dr.fone
- 2024 Approved S Most Popular Video Resume Builders Templates and Tools Inside
- New M4R Conversion for Beginners A Primer on What to Expect for 2024
- New Record Your Gameplay 3 Beginner-Friendly Options
- How To Use Allshare Cast To Turn On Screen Mirroring On Nokia G22 | Dr.fone
- 4 Methods to Turn off Life 360 On Realme GT Neo 5 SE without Anyone Knowing | Dr.fone
- Wondering the Best Alternative to Hola On Oppo Find N3 Flip? Here Is the Answer | Dr.fone
- In 2024, Simple and Effective Ways to Change Your Country on YouTube App Of your Samsung Galaxy S23 FE | Dr.fone
- In 2024, Latest Guide How To Bypass Tecno Pova 5 FRP Without Computer
- In 2024, Top 5 Car Locator Apps for OnePlus Nord CE 3 5G | Dr.fone
- Does Xiaomi 13T support AVCHD video?
- Are You Convincingly Fascinated by the Whole Idea of Augmented Reality and Want to Level up Your Marketing Skills with an AR Integration? Rest Assured, Youve Found the Right Place
- 8 Workable Fixes to the SIM not provisioned MM#2 Error on Lava Blaze 2 | Dr.fone
- 2024 Approved Do You Want to Know How to Add Captivating Audio in Simple Videos? Nothing to Be Concerned About because This Article Will Help You in This Matter
- 2024 Approved Shake-Free Videos Best Mobile Stabilizers
- New How to Stabilize Your Video for Better Impressions in FCPX, In 2024
- Updated Top 5 Video Filter Software Improve Your Videos with Filters for 2024
- How and Where to Find a Shiny Stone Pokémon For Samsung Galaxy S23? | Dr.fone
- New Wish to Rock on YouTube, but Lacking Tricks? Here, We Will Tell You Everything About How the YouTube Algorithm AI Works and How You Can Perform Well According to AI
- Use Device Manager to reinstall hardware drivers on Windows 10 & 7
- How To Recover Data from Apple iPhone 12 Pro? | Dr.fone
- Apple ID Locked for Security Reasons On Apple iPhone 13 mini? Find the Best Solution Here
- Ultimate Guide to Free PPTP VPN For Beginners On Tecno Spark 20 | Dr.fone
- Updated 2024 Approved The 5 Key Factors That Influence My Video to Audio Converter Choice
- Updated 2024 Approved Top-Rated Movie Making Apps for Windows 10
- Can Life360 Track Or See Text Messages? What Can You Do with Life360 On Samsung Galaxy M14 4G? | Dr.fone
- Title: How to Record Voice on iPhone? Step by Step Guide for 2024
- Author: Ella
- Created at : 2024-05-19 06:26:15
- Updated at : 2024-05-20 06:26:15
- Link: https://sound-optimizing.techidaily.com/how-to-record-voice-on-iphone-step-by-step-guide-for-2024/
- License: This work is licensed under CC BY-NC-SA 4.0.


