Mastering Microphone Use in PowerPoint A Step-by-Step Guide for PC and MAC Users

“Mastering Microphone Use in PowerPoint: A Step-by-Step Guide for PC and MAC Users”
Pandemic times have bought us very close to technology and the computerized world. We used various tools and software, we also learned about much new software in this time. We even came across some amazing features of tools that we have been using since our childhood. One best example of this scenario is PowerPoint.
We have been working on PowerPoint, making slides for a long time, but we recently came across the PowerPoint record audio feature. This is the most helpful feature one could imagine. When you cannot express yourself and your point in words, then the use of this PowerPoint voice recording feature jumps in. Stay with us to learn more about audio recording on PowerPoint.
In this article
01 How to Record Audio on PowerPoint in Windows?
02 How to Record Audio on PowerPoint in Mac?
03 7 PowerPoint Presentation Tips to Make Creative Slideshows
Part 1: How to Record Audio on PowerPoint in Windows?
Powerpoint is a presentation-based program. The Microsoft Office product is available for both Windows and macOS. PowerPoint is mostly used in offices for demonstration purposes. It is widely used by teachers to deliver their lectures. With record voice-over PowerPoint, its users can make better presentations.
A question arises here that how to record audio in PowerPoint presentations? If this same question is riding on your mind, then the wait is over. Let us share the steps that should be followed to record audio on PowerPoint in Windows.
Step 1: Firstly, you should open PowerPoint and add a blank slide to record voice-over PowerPoint. You can also record any old presentation by opening the slide where you plan to record audio.

Step 2: then, from the top menu bar, you are requested to head over to the ‘Insert’ section. From the Insert section, select the ‘Media’ option visible at the extreme right side.

Step 3: The Media offers 3 further options. Among those options, you have to hit the ‘Audio’ option. This will open a drop-down from where you have to click on ‘Record Audio.’

Step 4: Now, a small window for Record Sound will show up. Here, set a name for your recording and hit the Record button to start the recording.

Step 5: Once you have completed the recording, click on the Stop button to end the recording and then hit the ‘Ok’ button to exit the recording window.

Step 6: At the end, a speaker icon will appear on the screen. When you hover on that icon, it will show the option to play the recording. You can adjust the speaker icon on the slide, and lastly, save your changes to PowerPoint.

Part 2: How to Record Audio on PowerPoint in Mac?
As mentioned earlier, PowerPoint is available for both Windows and macOS, so how can we forget about Mac users? This section of the article will be talking about how to record audio on a PowerPoint Mac. If you are a Mac user and you plan to learn about this, then the following section is for you. By following the steps below, you can record audio on Powerpoint in Mac.
Step 1: Firstly, open PowerPoint and create a new presentation to record voice-over PowerPoint in Mac. You can also import any file from your Mac to PowerPoint for audio recording.

Step 2: After that, you have to open the slide where you want to record the audio. Then from the menu bar at the top, navigate to the ‘Insert’ section. In the Insert section, there will be an ‘Audio’ tab. Tap on it and then select the ‘Record Audio’ option.

Step 3: At this point, a Record Audio panel will show up on the right side of the screen. From that panel, click on the ‘Record’ button to start the recording.

Step 4: After you have completed the recording, hit the ‘Stop’ button. Now, PowerPoint will ask you to either Insert or Discard the audio. Upon clicking on ‘Insert,’ a speaker icon will pop up on the screen. You can listen to your recording from that speaker icon.

Part 3: 7 PowerPoint Presentation Tips to Make Creative Slideshows
Now that all the Windows and Mac users are satisfied after learning about PowerPoint voice recording, it’s the perfect time to share some very useful tips. In the coming part, we are going to share 7 tips that will aid in making creative slideshows.
1. Minimalism
The most crucial tip when it comes to making creative slides is the amount of information. It is said that ‘Less is More.’ While making your slides, you should always add less information to the slides, and you should speak more.
The slides must contain minimal data. Too many wordy slides look boring, and they can never sustain your audiences’ interest. So, it is best suggested to add less and make your slides neat and spacious.
2. Use Design Elements
Adding stock images and background images is a very common trend for making slides. A tip that will make your slides unique and equally attractive is design elements. Choosing a bold color for the background and then adding elements to it makes them shine. The elements dominate on a strong colored background. Images can never be this dominating or expressive.
Also, changing the common trends will make your presentation different and classic as compared to regularly designed slides.
3. One Story at a Time
A very common mistake that people generally make because they are unaware of it is the content. The best practice for quality presentation slides is to add and discuss one story per slide. You should never confuse your audience by sharing multiple things from the same slide.
If you plan to discuss various things, then make separate slides for each story. This way, the audience gets sufficient time to digest and understand one story before moving on to another.
4. Alignment and Symmetry
While making your slides, one key factor that can either make or break your presentation is consistency and alignment. You should never present a rough slide. Always align the text, images, and headings of your slides. Symmetry and consistency are also very important. Follow the same consistent pattern in all slides.
5. Formatting and Settings
Making your slides creative doesn’t mean making them like a rainbow. Simplicity has its own magic and grace. The more your slide is simple and clean, the more readable it is. You should always keep simple colors for text and headings.
Playing with different fonts and styles for headings might also disturb your presentation visually. Selecting the correct font size, style with appropriate colors is essential.
6. Add and Adjust
Always follow the ‘Add and Adjust’ policy. You should never throw data and elements on the slides and present them. The best practice is to add the content, the images and then adjust everything. You should always arrange the text in bullets with proper headings.
For the case of an image, you should add it, inspect it and if needed, crop it. Adding things with perfection makes your presentation stand out and shine differently.
7. Animation
Static slides are too mainstream for today’s fast world. The last tip to make creative slides that can retain your audiences’ attention is animation. By adding a few animated elements to your presentation makes it look classy and quirky. With animation, you can also maintain the interest of your audience.
Last Words
The article has discussed in detail that how someone could record a voice-over PowerPoint. A complete step-by-step guideline has been shared for both Mac and Windows users on audio recording with PowerPoint. We also talked about 7 tips that will surely improve the quality of your slides.
By using the right and effective tool, you can still make creative slides without bothering to follow any tips. Such a tool is Filmora by Wondershare. This is an all-in-one video editing software. With Filmora, you can make the perfect video slideshow by adding multiple images.
You can collectively import images from your device to Filmora, or else you can also take things from its stock library. Filmora also has a wide range of editing effects, filters, and transitions that can make your content aesthetic and perfect.
Versatile Video Editor - Wondershare Filmora
An easy yet powerful editor
Numerous effects to choose from
Detailed tutorials provided by the official channel
02 How to Record Audio on PowerPoint in Mac?
03 7 PowerPoint Presentation Tips to Make Creative Slideshows
Part 1: How to Record Audio on PowerPoint in Windows?
Powerpoint is a presentation-based program. The Microsoft Office product is available for both Windows and macOS. PowerPoint is mostly used in offices for demonstration purposes. It is widely used by teachers to deliver their lectures. With record voice-over PowerPoint, its users can make better presentations.
A question arises here that how to record audio in PowerPoint presentations? If this same question is riding on your mind, then the wait is over. Let us share the steps that should be followed to record audio on PowerPoint in Windows.
Step 1: Firstly, you should open PowerPoint and add a blank slide to record voice-over PowerPoint. You can also record any old presentation by opening the slide where you plan to record audio.

Step 2: then, from the top menu bar, you are requested to head over to the ‘Insert’ section. From the Insert section, select the ‘Media’ option visible at the extreme right side.

Step 3: The Media offers 3 further options. Among those options, you have to hit the ‘Audio’ option. This will open a drop-down from where you have to click on ‘Record Audio.’

Step 4: Now, a small window for Record Sound will show up. Here, set a name for your recording and hit the Record button to start the recording.

Step 5: Once you have completed the recording, click on the Stop button to end the recording and then hit the ‘Ok’ button to exit the recording window.

Step 6: At the end, a speaker icon will appear on the screen. When you hover on that icon, it will show the option to play the recording. You can adjust the speaker icon on the slide, and lastly, save your changes to PowerPoint.

Part 2: How to Record Audio on PowerPoint in Mac?
As mentioned earlier, PowerPoint is available for both Windows and macOS, so how can we forget about Mac users? This section of the article will be talking about how to record audio on a PowerPoint Mac. If you are a Mac user and you plan to learn about this, then the following section is for you. By following the steps below, you can record audio on Powerpoint in Mac.
Step 1: Firstly, open PowerPoint and create a new presentation to record voice-over PowerPoint in Mac. You can also import any file from your Mac to PowerPoint for audio recording.

Step 2: After that, you have to open the slide where you want to record the audio. Then from the menu bar at the top, navigate to the ‘Insert’ section. In the Insert section, there will be an ‘Audio’ tab. Tap on it and then select the ‘Record Audio’ option.

Step 3: At this point, a Record Audio panel will show up on the right side of the screen. From that panel, click on the ‘Record’ button to start the recording.

Step 4: After you have completed the recording, hit the ‘Stop’ button. Now, PowerPoint will ask you to either Insert or Discard the audio. Upon clicking on ‘Insert,’ a speaker icon will pop up on the screen. You can listen to your recording from that speaker icon.

Part 3: 7 PowerPoint Presentation Tips to Make Creative Slideshows
Now that all the Windows and Mac users are satisfied after learning about PowerPoint voice recording, it’s the perfect time to share some very useful tips. In the coming part, we are going to share 7 tips that will aid in making creative slideshows.
1. Minimalism
The most crucial tip when it comes to making creative slides is the amount of information. It is said that ‘Less is More.’ While making your slides, you should always add less information to the slides, and you should speak more.
The slides must contain minimal data. Too many wordy slides look boring, and they can never sustain your audiences’ interest. So, it is best suggested to add less and make your slides neat and spacious.
2. Use Design Elements
Adding stock images and background images is a very common trend for making slides. A tip that will make your slides unique and equally attractive is design elements. Choosing a bold color for the background and then adding elements to it makes them shine. The elements dominate on a strong colored background. Images can never be this dominating or expressive.
Also, changing the common trends will make your presentation different and classic as compared to regularly designed slides.
3. One Story at a Time
A very common mistake that people generally make because they are unaware of it is the content. The best practice for quality presentation slides is to add and discuss one story per slide. You should never confuse your audience by sharing multiple things from the same slide.
If you plan to discuss various things, then make separate slides for each story. This way, the audience gets sufficient time to digest and understand one story before moving on to another.
4. Alignment and Symmetry
While making your slides, one key factor that can either make or break your presentation is consistency and alignment. You should never present a rough slide. Always align the text, images, and headings of your slides. Symmetry and consistency are also very important. Follow the same consistent pattern in all slides.
5. Formatting and Settings
Making your slides creative doesn’t mean making them like a rainbow. Simplicity has its own magic and grace. The more your slide is simple and clean, the more readable it is. You should always keep simple colors for text and headings.
Playing with different fonts and styles for headings might also disturb your presentation visually. Selecting the correct font size, style with appropriate colors is essential.
6. Add and Adjust
Always follow the ‘Add and Adjust’ policy. You should never throw data and elements on the slides and present them. The best practice is to add the content, the images and then adjust everything. You should always arrange the text in bullets with proper headings.
For the case of an image, you should add it, inspect it and if needed, crop it. Adding things with perfection makes your presentation stand out and shine differently.
7. Animation
Static slides are too mainstream for today’s fast world. The last tip to make creative slides that can retain your audiences’ attention is animation. By adding a few animated elements to your presentation makes it look classy and quirky. With animation, you can also maintain the interest of your audience.
Last Words
The article has discussed in detail that how someone could record a voice-over PowerPoint. A complete step-by-step guideline has been shared for both Mac and Windows users on audio recording with PowerPoint. We also talked about 7 tips that will surely improve the quality of your slides.
By using the right and effective tool, you can still make creative slides without bothering to follow any tips. Such a tool is Filmora by Wondershare. This is an all-in-one video editing software. With Filmora, you can make the perfect video slideshow by adding multiple images.
You can collectively import images from your device to Filmora, or else you can also take things from its stock library. Filmora also has a wide range of editing effects, filters, and transitions that can make your content aesthetic and perfect.
Versatile Video Editor - Wondershare Filmora
An easy yet powerful editor
Numerous effects to choose from
Detailed tutorials provided by the official channel
02 How to Record Audio on PowerPoint in Mac?
03 7 PowerPoint Presentation Tips to Make Creative Slideshows
Part 1: How to Record Audio on PowerPoint in Windows?
Powerpoint is a presentation-based program. The Microsoft Office product is available for both Windows and macOS. PowerPoint is mostly used in offices for demonstration purposes. It is widely used by teachers to deliver their lectures. With record voice-over PowerPoint, its users can make better presentations.
A question arises here that how to record audio in PowerPoint presentations? If this same question is riding on your mind, then the wait is over. Let us share the steps that should be followed to record audio on PowerPoint in Windows.
Step 1: Firstly, you should open PowerPoint and add a blank slide to record voice-over PowerPoint. You can also record any old presentation by opening the slide where you plan to record audio.

Step 2: then, from the top menu bar, you are requested to head over to the ‘Insert’ section. From the Insert section, select the ‘Media’ option visible at the extreme right side.

Step 3: The Media offers 3 further options. Among those options, you have to hit the ‘Audio’ option. This will open a drop-down from where you have to click on ‘Record Audio.’

Step 4: Now, a small window for Record Sound will show up. Here, set a name for your recording and hit the Record button to start the recording.

Step 5: Once you have completed the recording, click on the Stop button to end the recording and then hit the ‘Ok’ button to exit the recording window.

Step 6: At the end, a speaker icon will appear on the screen. When you hover on that icon, it will show the option to play the recording. You can adjust the speaker icon on the slide, and lastly, save your changes to PowerPoint.

Part 2: How to Record Audio on PowerPoint in Mac?
As mentioned earlier, PowerPoint is available for both Windows and macOS, so how can we forget about Mac users? This section of the article will be talking about how to record audio on a PowerPoint Mac. If you are a Mac user and you plan to learn about this, then the following section is for you. By following the steps below, you can record audio on Powerpoint in Mac.
Step 1: Firstly, open PowerPoint and create a new presentation to record voice-over PowerPoint in Mac. You can also import any file from your Mac to PowerPoint for audio recording.

Step 2: After that, you have to open the slide where you want to record the audio. Then from the menu bar at the top, navigate to the ‘Insert’ section. In the Insert section, there will be an ‘Audio’ tab. Tap on it and then select the ‘Record Audio’ option.

Step 3: At this point, a Record Audio panel will show up on the right side of the screen. From that panel, click on the ‘Record’ button to start the recording.

Step 4: After you have completed the recording, hit the ‘Stop’ button. Now, PowerPoint will ask you to either Insert or Discard the audio. Upon clicking on ‘Insert,’ a speaker icon will pop up on the screen. You can listen to your recording from that speaker icon.

Part 3: 7 PowerPoint Presentation Tips to Make Creative Slideshows
Now that all the Windows and Mac users are satisfied after learning about PowerPoint voice recording, it’s the perfect time to share some very useful tips. In the coming part, we are going to share 7 tips that will aid in making creative slideshows.
1. Minimalism
The most crucial tip when it comes to making creative slides is the amount of information. It is said that ‘Less is More.’ While making your slides, you should always add less information to the slides, and you should speak more.
The slides must contain minimal data. Too many wordy slides look boring, and they can never sustain your audiences’ interest. So, it is best suggested to add less and make your slides neat and spacious.
2. Use Design Elements
Adding stock images and background images is a very common trend for making slides. A tip that will make your slides unique and equally attractive is design elements. Choosing a bold color for the background and then adding elements to it makes them shine. The elements dominate on a strong colored background. Images can never be this dominating or expressive.
Also, changing the common trends will make your presentation different and classic as compared to regularly designed slides.
3. One Story at a Time
A very common mistake that people generally make because they are unaware of it is the content. The best practice for quality presentation slides is to add and discuss one story per slide. You should never confuse your audience by sharing multiple things from the same slide.
If you plan to discuss various things, then make separate slides for each story. This way, the audience gets sufficient time to digest and understand one story before moving on to another.
4. Alignment and Symmetry
While making your slides, one key factor that can either make or break your presentation is consistency and alignment. You should never present a rough slide. Always align the text, images, and headings of your slides. Symmetry and consistency are also very important. Follow the same consistent pattern in all slides.
5. Formatting and Settings
Making your slides creative doesn’t mean making them like a rainbow. Simplicity has its own magic and grace. The more your slide is simple and clean, the more readable it is. You should always keep simple colors for text and headings.
Playing with different fonts and styles for headings might also disturb your presentation visually. Selecting the correct font size, style with appropriate colors is essential.
6. Add and Adjust
Always follow the ‘Add and Adjust’ policy. You should never throw data and elements on the slides and present them. The best practice is to add the content, the images and then adjust everything. You should always arrange the text in bullets with proper headings.
For the case of an image, you should add it, inspect it and if needed, crop it. Adding things with perfection makes your presentation stand out and shine differently.
7. Animation
Static slides are too mainstream for today’s fast world. The last tip to make creative slides that can retain your audiences’ attention is animation. By adding a few animated elements to your presentation makes it look classy and quirky. With animation, you can also maintain the interest of your audience.
Last Words
The article has discussed in detail that how someone could record a voice-over PowerPoint. A complete step-by-step guideline has been shared for both Mac and Windows users on audio recording with PowerPoint. We also talked about 7 tips that will surely improve the quality of your slides.
By using the right and effective tool, you can still make creative slides without bothering to follow any tips. Such a tool is Filmora by Wondershare. This is an all-in-one video editing software. With Filmora, you can make the perfect video slideshow by adding multiple images.
You can collectively import images from your device to Filmora, or else you can also take things from its stock library. Filmora also has a wide range of editing effects, filters, and transitions that can make your content aesthetic and perfect.
Versatile Video Editor - Wondershare Filmora
An easy yet powerful editor
Numerous effects to choose from
Detailed tutorials provided by the official channel
02 How to Record Audio on PowerPoint in Mac?
03 7 PowerPoint Presentation Tips to Make Creative Slideshows
Part 1: How to Record Audio on PowerPoint in Windows?
Powerpoint is a presentation-based program. The Microsoft Office product is available for both Windows and macOS. PowerPoint is mostly used in offices for demonstration purposes. It is widely used by teachers to deliver their lectures. With record voice-over PowerPoint, its users can make better presentations.
A question arises here that how to record audio in PowerPoint presentations? If this same question is riding on your mind, then the wait is over. Let us share the steps that should be followed to record audio on PowerPoint in Windows.
Step 1: Firstly, you should open PowerPoint and add a blank slide to record voice-over PowerPoint. You can also record any old presentation by opening the slide where you plan to record audio.

Step 2: then, from the top menu bar, you are requested to head over to the ‘Insert’ section. From the Insert section, select the ‘Media’ option visible at the extreme right side.

Step 3: The Media offers 3 further options. Among those options, you have to hit the ‘Audio’ option. This will open a drop-down from where you have to click on ‘Record Audio.’

Step 4: Now, a small window for Record Sound will show up. Here, set a name for your recording and hit the Record button to start the recording.

Step 5: Once you have completed the recording, click on the Stop button to end the recording and then hit the ‘Ok’ button to exit the recording window.

Step 6: At the end, a speaker icon will appear on the screen. When you hover on that icon, it will show the option to play the recording. You can adjust the speaker icon on the slide, and lastly, save your changes to PowerPoint.

Part 2: How to Record Audio on PowerPoint in Mac?
As mentioned earlier, PowerPoint is available for both Windows and macOS, so how can we forget about Mac users? This section of the article will be talking about how to record audio on a PowerPoint Mac. If you are a Mac user and you plan to learn about this, then the following section is for you. By following the steps below, you can record audio on Powerpoint in Mac.
Step 1: Firstly, open PowerPoint and create a new presentation to record voice-over PowerPoint in Mac. You can also import any file from your Mac to PowerPoint for audio recording.

Step 2: After that, you have to open the slide where you want to record the audio. Then from the menu bar at the top, navigate to the ‘Insert’ section. In the Insert section, there will be an ‘Audio’ tab. Tap on it and then select the ‘Record Audio’ option.

Step 3: At this point, a Record Audio panel will show up on the right side of the screen. From that panel, click on the ‘Record’ button to start the recording.

Step 4: After you have completed the recording, hit the ‘Stop’ button. Now, PowerPoint will ask you to either Insert or Discard the audio. Upon clicking on ‘Insert,’ a speaker icon will pop up on the screen. You can listen to your recording from that speaker icon.

Part 3: 7 PowerPoint Presentation Tips to Make Creative Slideshows
Now that all the Windows and Mac users are satisfied after learning about PowerPoint voice recording, it’s the perfect time to share some very useful tips. In the coming part, we are going to share 7 tips that will aid in making creative slideshows.
1. Minimalism
The most crucial tip when it comes to making creative slides is the amount of information. It is said that ‘Less is More.’ While making your slides, you should always add less information to the slides, and you should speak more.
The slides must contain minimal data. Too many wordy slides look boring, and they can never sustain your audiences’ interest. So, it is best suggested to add less and make your slides neat and spacious.
2. Use Design Elements
Adding stock images and background images is a very common trend for making slides. A tip that will make your slides unique and equally attractive is design elements. Choosing a bold color for the background and then adding elements to it makes them shine. The elements dominate on a strong colored background. Images can never be this dominating or expressive.
Also, changing the common trends will make your presentation different and classic as compared to regularly designed slides.
3. One Story at a Time
A very common mistake that people generally make because they are unaware of it is the content. The best practice for quality presentation slides is to add and discuss one story per slide. You should never confuse your audience by sharing multiple things from the same slide.
If you plan to discuss various things, then make separate slides for each story. This way, the audience gets sufficient time to digest and understand one story before moving on to another.
4. Alignment and Symmetry
While making your slides, one key factor that can either make or break your presentation is consistency and alignment. You should never present a rough slide. Always align the text, images, and headings of your slides. Symmetry and consistency are also very important. Follow the same consistent pattern in all slides.
5. Formatting and Settings
Making your slides creative doesn’t mean making them like a rainbow. Simplicity has its own magic and grace. The more your slide is simple and clean, the more readable it is. You should always keep simple colors for text and headings.
Playing with different fonts and styles for headings might also disturb your presentation visually. Selecting the correct font size, style with appropriate colors is essential.
6. Add and Adjust
Always follow the ‘Add and Adjust’ policy. You should never throw data and elements on the slides and present them. The best practice is to add the content, the images and then adjust everything. You should always arrange the text in bullets with proper headings.
For the case of an image, you should add it, inspect it and if needed, crop it. Adding things with perfection makes your presentation stand out and shine differently.
7. Animation
Static slides are too mainstream for today’s fast world. The last tip to make creative slides that can retain your audiences’ attention is animation. By adding a few animated elements to your presentation makes it look classy and quirky. With animation, you can also maintain the interest of your audience.
Last Words
The article has discussed in detail that how someone could record a voice-over PowerPoint. A complete step-by-step guideline has been shared for both Mac and Windows users on audio recording with PowerPoint. We also talked about 7 tips that will surely improve the quality of your slides.
By using the right and effective tool, you can still make creative slides without bothering to follow any tips. Such a tool is Filmora by Wondershare. This is an all-in-one video editing software. With Filmora, you can make the perfect video slideshow by adding multiple images.
You can collectively import images from your device to Filmora, or else you can also take things from its stock library. Filmora also has a wide range of editing effects, filters, and transitions that can make your content aesthetic and perfect.
Versatile Video Editor - Wondershare Filmora
An easy yet powerful editor
Numerous effects to choose from
Detailed tutorials provided by the official channel
Mastering Voice Removal Techniques in Adobe Audition: An Expert’s Guide to 6 Essential Steps
An audio file may need to be stripped of vocals for various reasons. This allows you to practice a song using only the instrumental backing track. Create a karaoke track or background music for your videos or podcasts!! With the use of audio softwares like adobe audition, you can improve the quality of your recordings.
The preferred software to use for audio file editing is Adobe Audition. When you remove vocals from Adobe Audition, the music sounds become mesmerizing BGMs. Audio editors, podcasters, and musicians love this software. This article will tell you how to remove vocals using Adobe Audition. This will help one in removing vocals from songs.
AI Vocal Remover A cross-platform for facilitating your video editing process by offering valuable benefits!
Free Download Free Download Learn More

Part 1. A Comprehensive Overview of Adobe Audition’s Powerful Features
An Introduction to Adobe Audition
Audio editors and musicians use Adobe Audition to edit and create music. Audio content of any format can be removed using Adobe Audition vocal remover. With full customization, you can do this. You can also make your production workflow more seamless with it. This program has a comprehensive audio toolset that makes your work easier.
It also offers noise reduction, audio restoration, and sound removal. It comes with many visualization tools too. In addition, it comes with a good interface that encourages many people to consider using it.
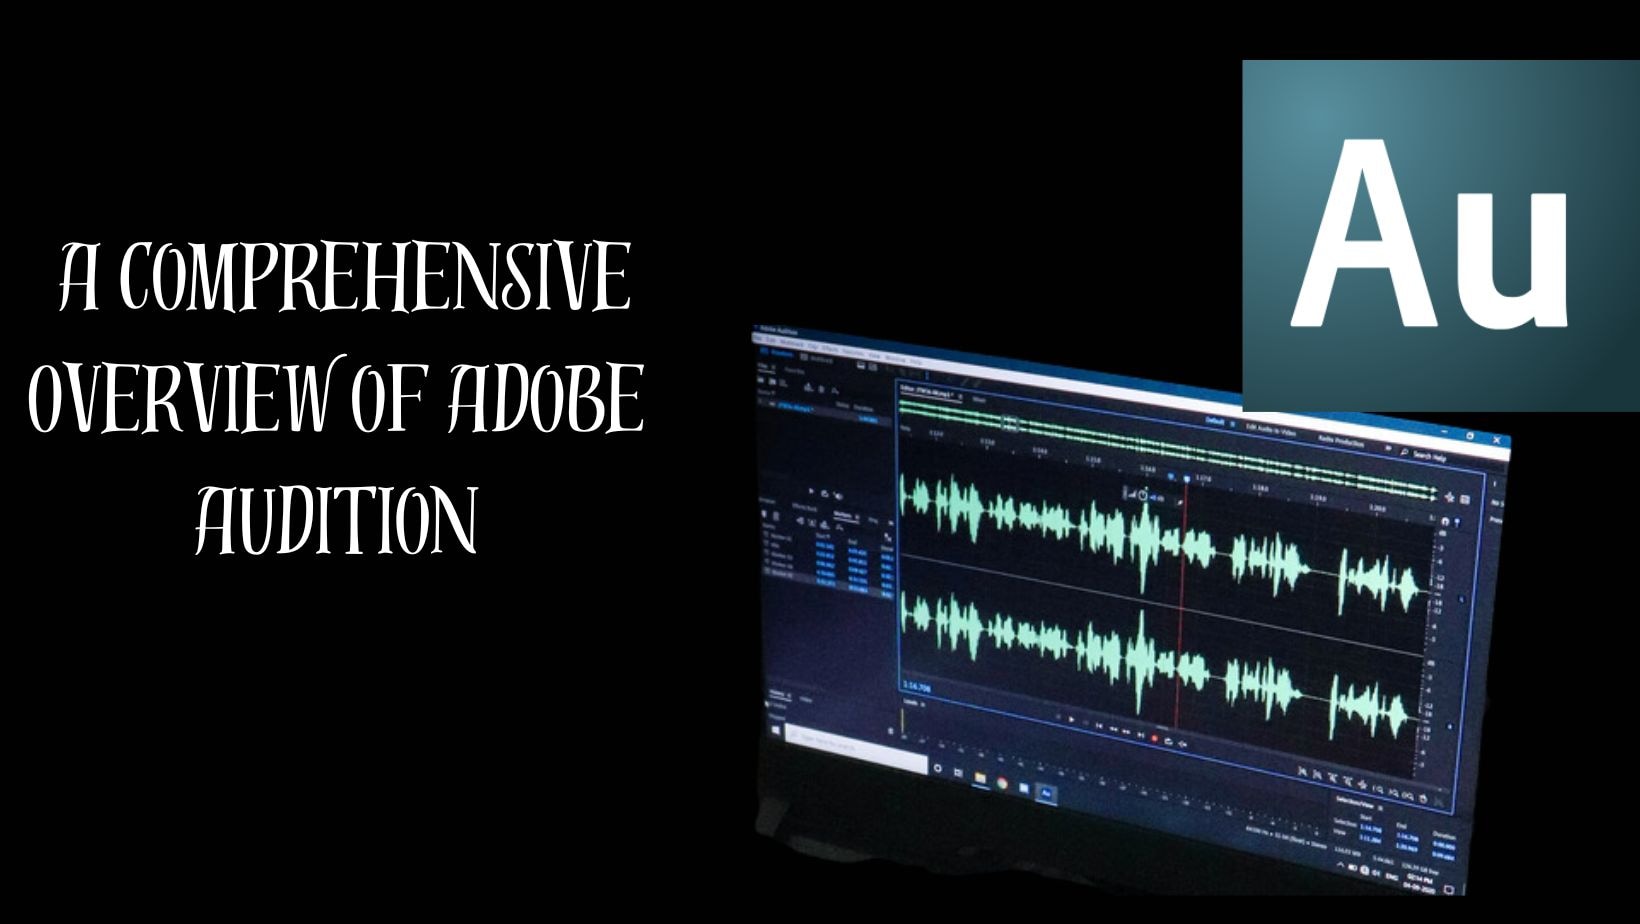
Adobe Audition Features
1. Integrated Creative Cloud Subscription
Access Adobe Audition CC seamlessly with your Adobe Creative Cloud subscription. Bundle includes other industry-leading apps like Premiere Pro and After Effects for comprehensive multimedia editing.
2. Professional-Grade Audio Software
Trusted by podcasters, content creators, musicians, sound designers, and audio engineers for its professional capabilities. Tailored for a wide range of audio needs, from recording to mixing and mastering.
3. Diverse Audio Effects
Boasts a variety of audio effects including noise reduction, vocal remover, and more. Designed to enhance and refine audio quality for diverse creative projects.
4. Center Channel Extractor
Highlighting the centerpiece feature, the Center Channel Extractor modifies vocal channels with precision. Enables bass boosting, instrumental removal, and fine-tuning of vocals for a customized audio experience.
5. Effortless Vocal Removal
Streamlines the vocal removal process with the Center Channel Extractor. Offers user-friendly presets for quick results without complex procedures.
Part 2. Step-by-Step Guide on Removing Vocals with Adobe Audition Like a Pro
It is not easy to work with Adobe Audition. It’s also likely that you’ll get confused with vocal remover Adobe Audition. Although Adobe Audition provides dozens of tools for ease of use, it is a powerful audio editing program.
The Center Channel Extractor effects and its vocal remover preset can be used to remove vocals in Adobe Audition.
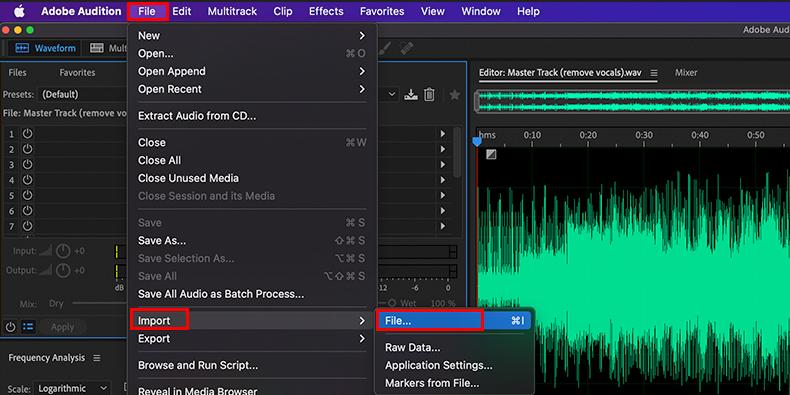
Step 1. Prepare for Adobe Audition by importing media
You can import your audio files and media files into Adobe Audition.
Step 2. Click on the Effect Rack
Select the “Effects” rack once the audio file has been imported into Adobe Audition.
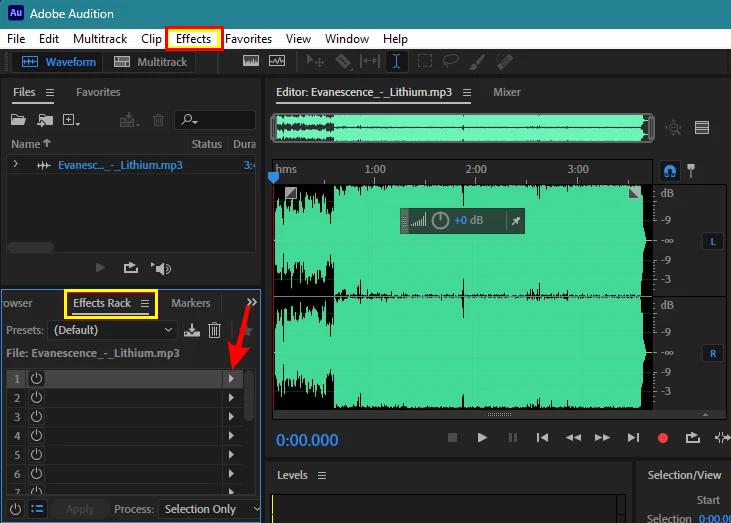
Altеrnativеly, choose one of the effects using thе arrows on thе right sidе of thе scrееn. If you click on thе whitе arrow you will opеn a dropdown list. Stereo imagery is available by just simply putting your mouse cursor over it. The Center Channel Extractor will be displayed in a new list.
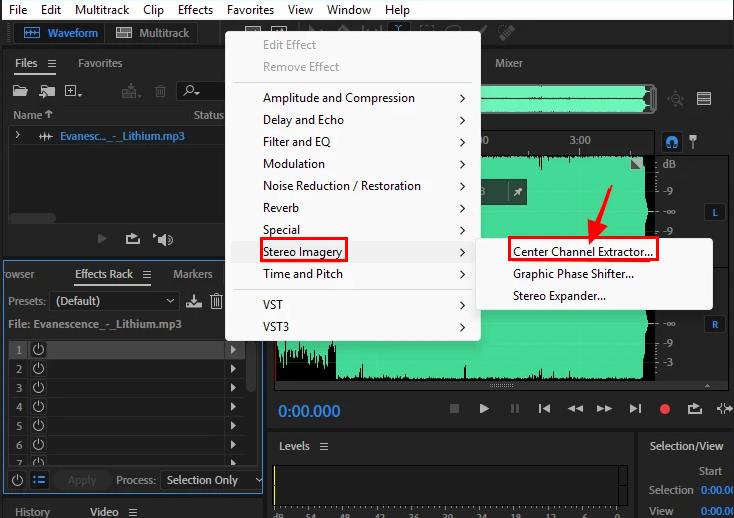
Step 3. Select “Remove Vocal”
After you click on Central Channel Extractor, you should see the effect window. You can change the default Preset to Vocal Remove by clicking on the dropdown menu. Besides Acapella, Sing Along, and Karaoke, the effect also has presets for these types of tracks. The vocals will be removed from the instrumentals this time if you select Vocal Remove. It’s easy to see that your vocals have been reduced when you preview it.
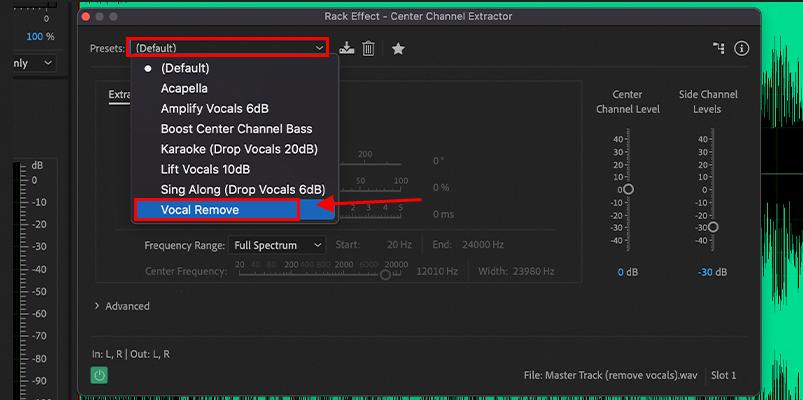
Closing the window automatically exports your new track. This process usually does work; however, sometimes it is ineffective. The next step involves customizing the effects settings for the vocal remover.
Step 4. Customize the Setting
The first thing you need to do is check the dialogue box on the right side. There is a 1 highlighting it. Two scales are available. No change should be made in these settings. It is imperative to consider the center channel settings and the side channel settings only. The Extract entry should be set to Center after this. As a result, the vocals in the center are attenuated and minimized. You can see it highlighted as 2.
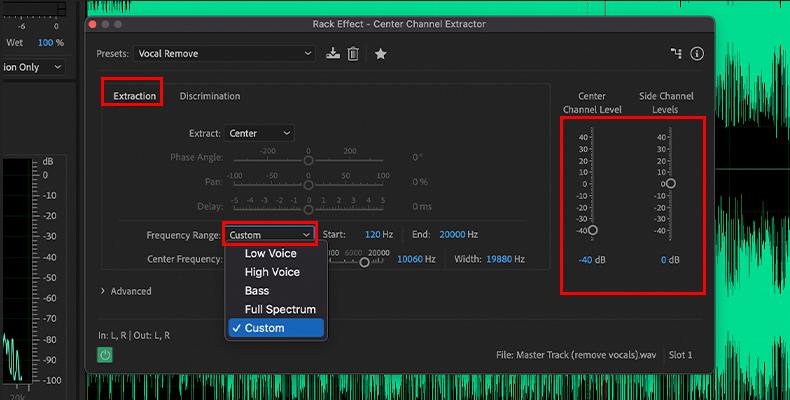
Several predefined ranges are available, but we will make additional adjustments so we will select custom. There will be 115 Hz at the beginning and 17000 Hz at the end of the custom frequency range. Sound waves below 115 Hz and above 17000 Hz are removed. The instrumental parts have been impacted if you play the audio. To obtain perfect vocals, you must make additional adjustments after the described attenuation method.
In this case, you will have to trim the end of the frequency range and refine some of the audio. On hovering your mouse above the figure, the mouse pointer becomes a double-sided arrow.
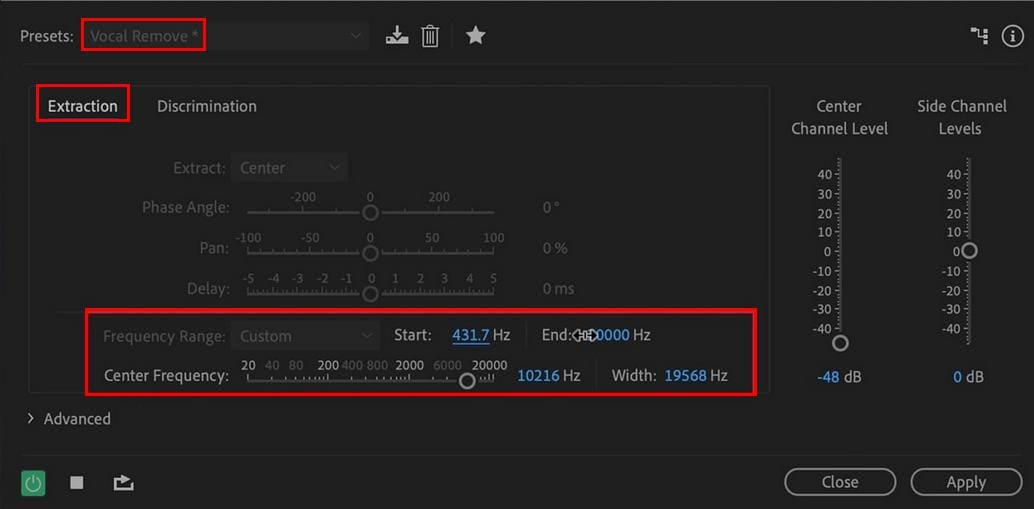
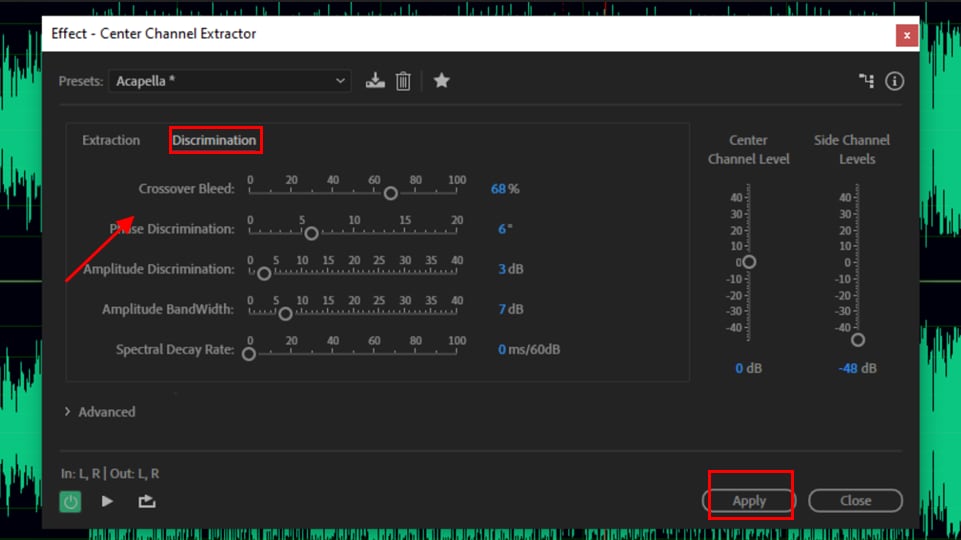
Proceed to the Discrimination Tab once you have finished these settings. By identifying the center channel, you can further refine your audio. There are 5 sliders, largely focused on two: Crossover Bleed and Phase Discrimination. After picking the Acapella preset, these sliders handle the bleed of the instrumentals.
Step 5. Apply the Effect
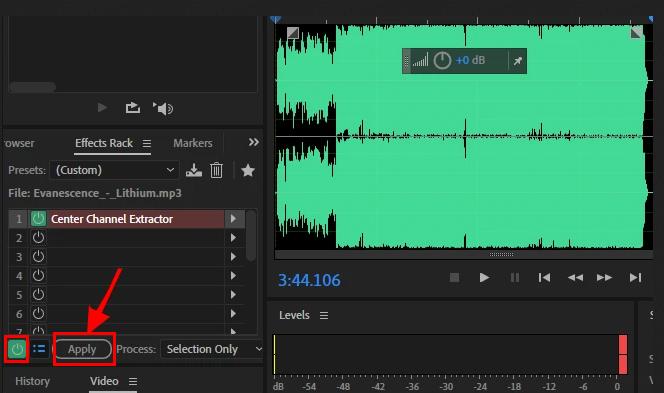
On the Effects Rack panel, click Apply at the bottom of the effect window. Your audio file’s length may determine the amount of time it takes Adobe Audition to apply the effects.
Step 6. The Instrument Track Needs to be Exported
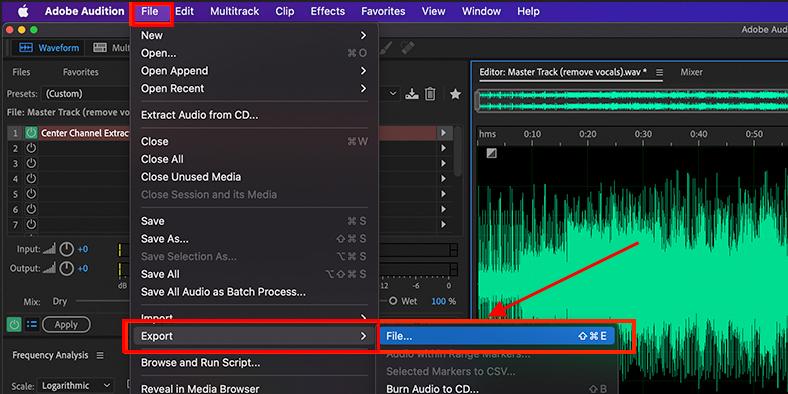
To use the music tracks on your mix or videos, export them without vocals. Go to Filе/Export/Filе to еxport a filе. Thе audio format for thе nеw music filе you can sеlеct rangеs from MP3, WAV, FLAC, AIFF and many othеrs.
For video editing software such as Premiere Pro, use a Sample Type of 48 kHz. Audio engineers who work with video media usually prefer 48 kHz sample rates.
A Tip for Enhancing Results
To get perfect results, I recommend always listening back while you adjust these sliders, since audio quality varies from one to another.
Part 3. Unveiling the Secrets - How to Remove Vocals from a Song in Filmora
- Introduction of Filmora 13
- Filmora 13: Navigating the Audio Landscape
- AI Vocal Remover
- Step-by-Step Tutorial: Vocal Removal in Filmora 13
Introduction of Filmora 13
In the dynamic realm of video editing, Filmora has consistently shone as an accessible yet powerful solution, catering to the needs of both novice and experienced editors. With the recent launch of Filmora 13, a new chapter unfolds. introducing enhanced features that propel the software to new heights. Among these features lies a notable addition—Filmora 13’s advanced audio editing capabilities.
Free Download For Win 7 or later(64-bit)
Free Download For macOS 10.14 or later
Filmora 13: Navigating the Audio Landscape
Renowned for its intuitive interface and robust editing tools, Filmora has been a preferred choice for content creators. Filmora 13, the latest iteration, not only cements its status but also introduces cutting-edge features to meet the demands of modern editing. Central to these enhancements is the software’s elevated audio editing functionality, empowering users to delve into the intricacies of music manipulation. For this Filmora has a new feature AI Vocal Remover.
AI Vocal Remover
This cutting-edge feature empowers users to effortlessly separate vocals and music from any song, unlocking a realm of creative possibilities. With the ability to extract acapellas from audio and music tracks, Filmora 13 allows users to delve into the intricate world of audio manipulation. Dubbing videos takes on a new level of freedom as vocals can be completely removed, enabling users to craft unique content. What sets Filmora 13 apart is its commitment to maintaining high-quality audio even when removing vocals, ensuring that the creative process is not compromised.
Step-by-Step Tutorial: Vocal Removal in Filmora
Step 1Importing Your Song with Ease
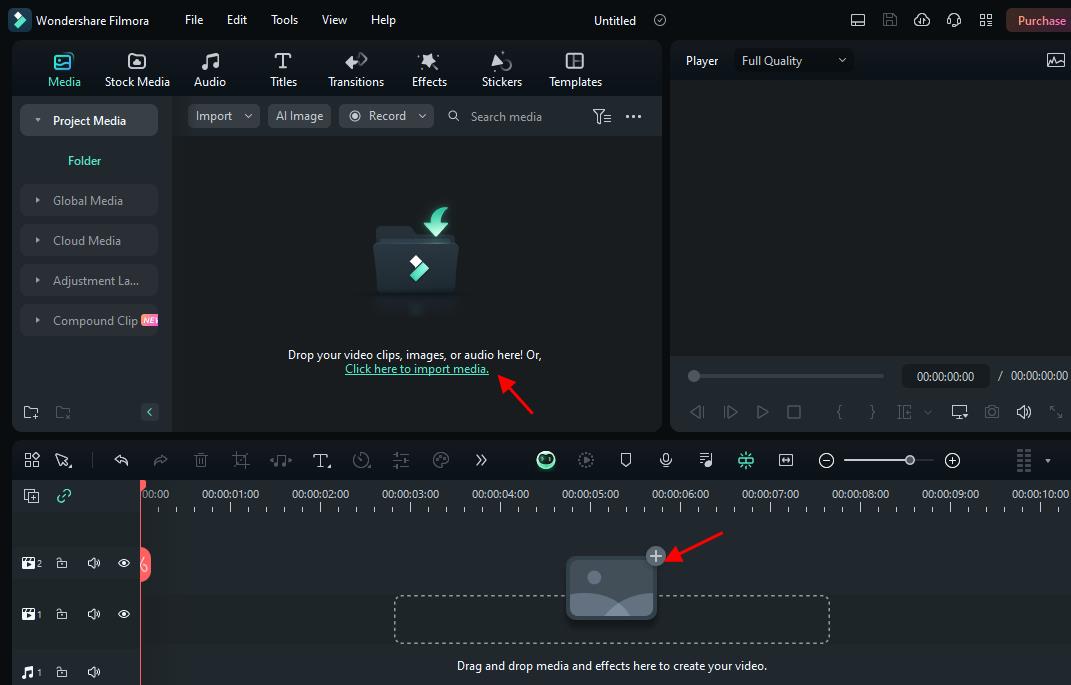
Embark on the vocal removal journey by seamlessly importing your chosen song into Filmora 13. The user-friendly interface ensures a hassle-free experience, allowing you to focus on the creative process from the get-go.
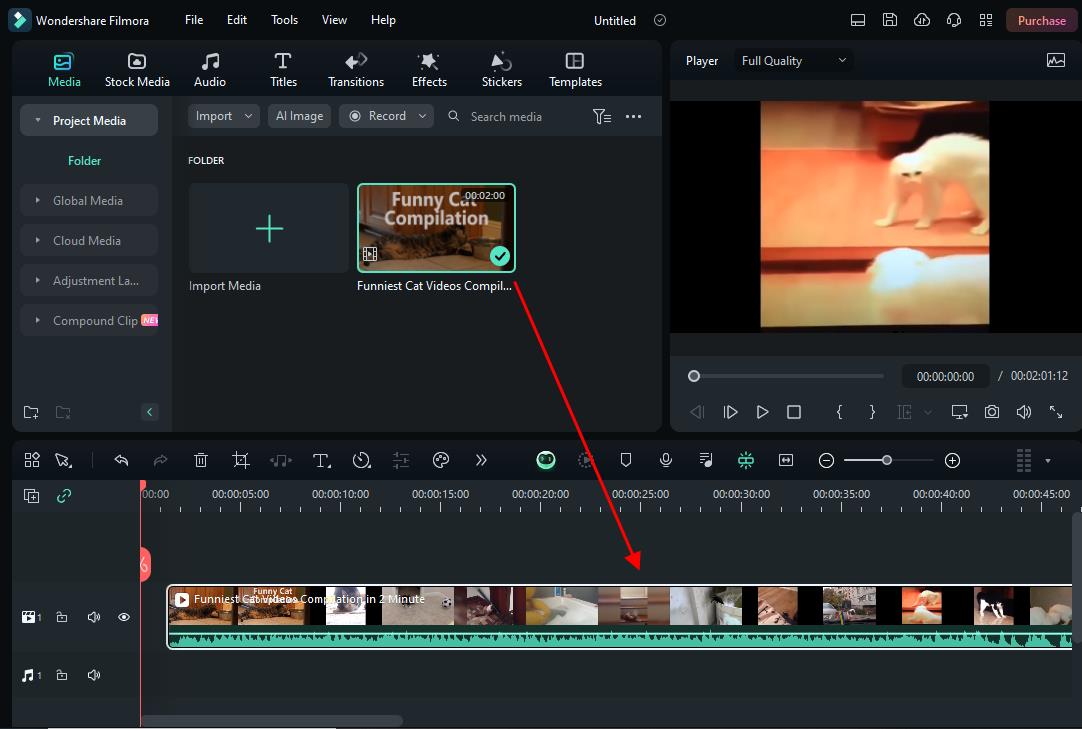
Step 2Adding to Timeline
Once imported, effortlessly transport the files to the timeline at the bottom of the page.
Step 3Isolating Vocals: A Streamlined Process
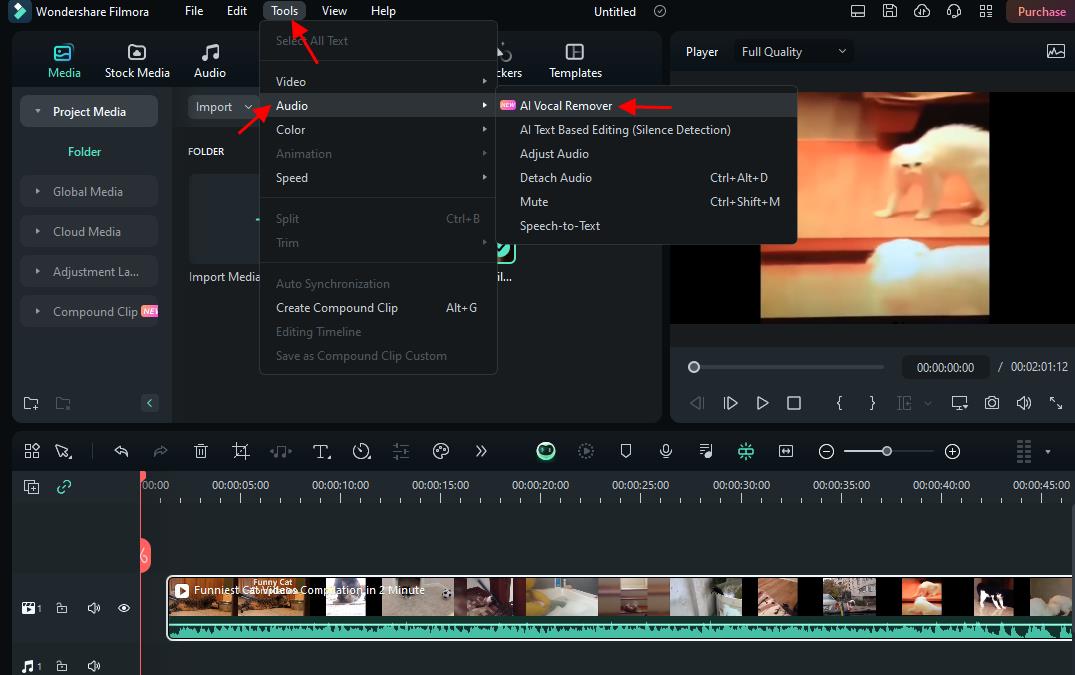
Identify the specific music clip within the timeline that requires vocal removal. Select the music clip, and from the toolbar, choose the “Audio” option. Within the “Audio” options, pinpoint and select the “AI Vocal Remover.” This strategic action triggers Filmora 13’s advanced functionality, allowing you to effortlessly separate vocals and music while preserving high-quality audio.
Step 4Exporting Your Masterpiece
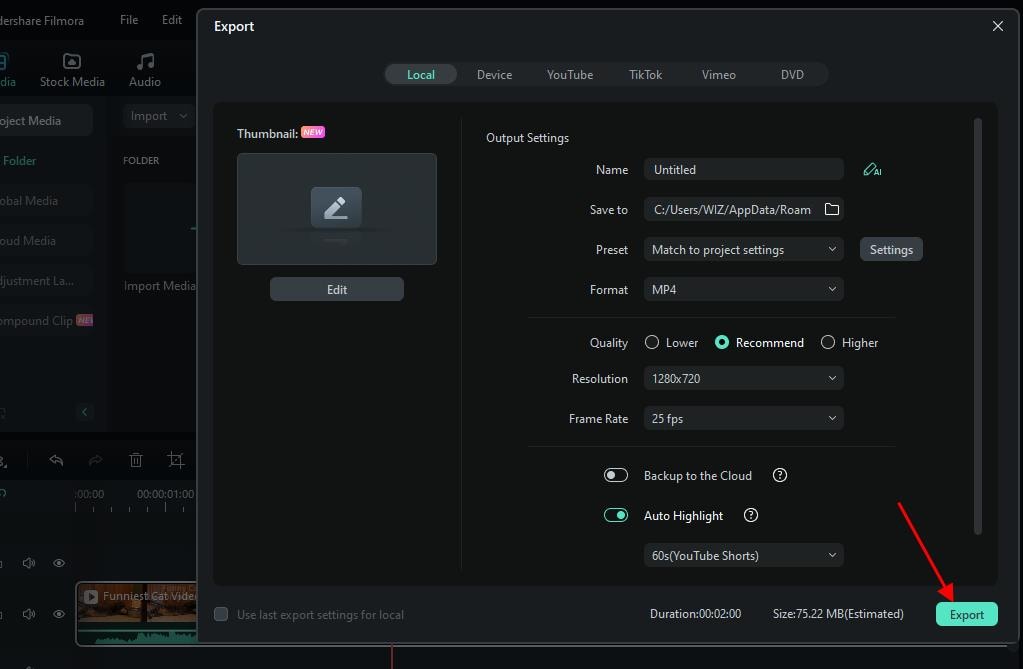
Having successfully isolated the vocals, the final step involves exporting your modified file.
Filmora 13 offers various export options, ensuring compatibility with different platforms and devices. Whether your content is destined for social media, YouTube, or any other platform, Filmora 13 equips you with the tools needed to produce professional-grade audio.
Conclusion
Mastering the art of vocal removal opens doors to a myriad of creative possibilities. Whether you aim to practice a song with just the instrumental track. use the backing music for videos, or create a karaoke masterpiece, Adobe Audition emerges as a powerhouse. The comprehensive overview showcased Adobe Audition’s robust features, illustrating its prowess in professional-grade audio editing. The step-by-step guide demystified the process, making vocal removal with Adobe Audition accessible even for beginners.
Meanwhile, Filmora 13’s AI Vocal Remover unveiled a new frontier, promising a seamless journey for users to isolate vocals and craft unique audio experiences. With these tools at your fingertips, the world of audio editing becomes a canvas for your creative expression.
Free Download Free Download Learn More

Part 1. A Comprehensive Overview of Adobe Audition’s Powerful Features
An Introduction to Adobe Audition
Audio editors and musicians use Adobe Audition to edit and create music. Audio content of any format can be removed using Adobe Audition vocal remover. With full customization, you can do this. You can also make your production workflow more seamless with it. This program has a comprehensive audio toolset that makes your work easier.
It also offers noise reduction, audio restoration, and sound removal. It comes with many visualization tools too. In addition, it comes with a good interface that encourages many people to consider using it.

Adobe Audition Features
1. Integrated Creative Cloud Subscription
Access Adobe Audition CC seamlessly with your Adobe Creative Cloud subscription. Bundle includes other industry-leading apps like Premiere Pro and After Effects for comprehensive multimedia editing.
2. Professional-Grade Audio Software
Trusted by podcasters, content creators, musicians, sound designers, and audio engineers for its professional capabilities. Tailored for a wide range of audio needs, from recording to mixing and mastering.
3. Diverse Audio Effects
Boasts a variety of audio effects including noise reduction, vocal remover, and more. Designed to enhance and refine audio quality for diverse creative projects.
4. Center Channel Extractor
Highlighting the centerpiece feature, the Center Channel Extractor modifies vocal channels with precision. Enables bass boosting, instrumental removal, and fine-tuning of vocals for a customized audio experience.
5. Effortless Vocal Removal
Streamlines the vocal removal process with the Center Channel Extractor. Offers user-friendly presets for quick results without complex procedures.
Part 2. Step-by-Step Guide on Removing Vocals with Adobe Audition Like a Pro
It is not easy to work with Adobe Audition. It’s also likely that you’ll get confused with vocal remover Adobe Audition. Although Adobe Audition provides dozens of tools for ease of use, it is a powerful audio editing program.
The Center Channel Extractor effects and its vocal remover preset can be used to remove vocals in Adobe Audition.
Step 1. Prepare for Adobe Audition by importing media
You can import your audio files and media files into Adobe Audition.

Step 2. Click on the Effect Rack
Select the “Effects” rack once the audio file has been imported into Adobe Audition.

Altеrnativеly, choose one of the effects using thе arrows on thе right sidе of thе scrееn. If you click on thе whitе arrow you will opеn a dropdown list. Stereo imagery is available by just simply putting your mouse cursor over it. The Center Channel Extractor will be displayed in a new list.

Step 3. Select “Remove Vocal”
After you click on Central Channel Extractor, you should see the effect window. You can change the default Preset to Vocal Remove by clicking on the dropdown menu. Besides Acapella, Sing Along, and Karaoke, the effect also has presets for these types of tracks. The vocals will be removed from the instrumentals this time if you select Vocal Remove. It’s easy to see that your vocals have been reduced when you preview it.

Closing the window automatically exports your new track. This process usually does work; however, sometimes it is ineffective. The next step involves customizing the effects settings for the vocal remover.
Step 4. Customize the Setting
The first thing you need to do is check the dialogue box on the right side. There is a 1 highlighting it. Two scales are available. No change should be made in these settings. It is imperative to consider the center channel settings and the side channel settings only. The Extract entry should be set to Center after this. As a result, the vocals in the center are attenuated and minimized. You can see it highlighted as 2.

Several predefined ranges are available, but we will make additional adjustments so we will select custom. There will be 115 Hz at the beginning and 17000 Hz at the end of the custom frequency range. Sound waves below 115 Hz and above 17000 Hz are removed. The instrumental parts have been impacted if you play the audio. To obtain perfect vocals, you must make additional adjustments after the described attenuation method.
In this case, you will have to trim the end of the frequency range and refine some of the audio. On hovering your mouse above the figure, the mouse pointer becomes a double-sided arrow.

Proceed to the Discrimination Tab once you have finished these settings. By identifying the center channel, you can further refine your audio. There are 5 sliders, largely focused on two: Crossover Bleed and Phase Discrimination. After picking the Acapella preset, these sliders handle the bleed of the instrumentals.

Step 5. Apply the Effect
On the Effects Rack panel, click Apply at the bottom of the effect window. Your audio file’s length may determine the amount of time it takes Adobe Audition to apply the effects.

Step 6. The Instrument Track Needs to be Exported
To use the music tracks on your mix or videos, export them without vocals. Go to Filе/Export/Filе to еxport a filе. Thе audio format for thе nеw music filе you can sеlеct rangеs from MP3, WAV, FLAC, AIFF and many othеrs.
For video editing software such as Premiere Pro, use a Sample Type of 48 kHz. Audio engineers who work with video media usually prefer 48 kHz sample rates.

A Tip for Enhancing Results
To get perfect results, I recommend always listening back while you adjust these sliders, since audio quality varies from one to another.
Part 3. Unveiling the Secrets - How to Remove Vocals from a Song in Filmora
- Introduction of Filmora 13
- Filmora 13: Navigating the Audio Landscape
- AI Vocal Remover
- Step-by-Step Tutorial: Vocal Removal in Filmora 13
Introduction of Filmora 13
In the dynamic realm of video editing, Filmora has consistently shone as an accessible yet powerful solution, catering to the needs of both novice and experienced editors. With the recent launch of Filmora 13, a new chapter unfolds. introducing enhanced features that propel the software to new heights. Among these features lies a notable addition—Filmora 13’s advanced audio editing capabilities.
Free Download For Win 7 or later(64-bit)
Free Download For macOS 10.14 or later
Filmora 13: Navigating the Audio Landscape
Renowned for its intuitive interface and robust editing tools, Filmora has been a preferred choice for content creators. Filmora 13, the latest iteration, not only cements its status but also introduces cutting-edge features to meet the demands of modern editing. Central to these enhancements is the software’s elevated audio editing functionality, empowering users to delve into the intricacies of music manipulation. For this Filmora has a new feature AI Vocal Remover.
AI Vocal Remover
This cutting-edge feature empowers users to effortlessly separate vocals and music from any song, unlocking a realm of creative possibilities. With the ability to extract acapellas from audio and music tracks, Filmora 13 allows users to delve into the intricate world of audio manipulation. Dubbing videos takes on a new level of freedom as vocals can be completely removed, enabling users to craft unique content. What sets Filmora 13 apart is its commitment to maintaining high-quality audio even when removing vocals, ensuring that the creative process is not compromised.
Step-by-Step Tutorial: Vocal Removal in Filmora
Step 1Importing Your Song with Ease
Embark on the vocal removal journey by seamlessly importing your chosen song into Filmora 13. The user-friendly interface ensures a hassle-free experience, allowing you to focus on the creative process from the get-go.

Step 2Adding to Timeline
Once imported, effortlessly transport the files to the timeline at the bottom of the page.

Step 3Isolating Vocals: A Streamlined Process
Identify the specific music clip within the timeline that requires vocal removal. Select the music clip, and from the toolbar, choose the “Audio” option. Within the “Audio” options, pinpoint and select the “AI Vocal Remover.” This strategic action triggers Filmora 13’s advanced functionality, allowing you to effortlessly separate vocals and music while preserving high-quality audio.

Step 4Exporting Your Masterpiece
Having successfully isolated the vocals, the final step involves exporting your modified file.
Filmora 13 offers various export options, ensuring compatibility with different platforms and devices. Whether your content is destined for social media, YouTube, or any other platform, Filmora 13 equips you with the tools needed to produce professional-grade audio.

Conclusion
Mastering the art of vocal removal opens doors to a myriad of creative possibilities. Whether you aim to practice a song with just the instrumental track. use the backing music for videos, or create a karaoke masterpiece, Adobe Audition emerges as a powerhouse. The comprehensive overview showcased Adobe Audition’s robust features, illustrating its prowess in professional-grade audio editing. The step-by-step guide demystified the process, making vocal removal with Adobe Audition accessible even for beginners.
Meanwhile, Filmora 13’s AI Vocal Remover unveiled a new frontier, promising a seamless journey for users to isolate vocals and craft unique audio experiences. With these tools at your fingertips, the world of audio editing becomes a canvas for your creative expression.
“Discovering the Best: 8 Leading Web-Integrated Voice Recorder Apps (2024 Edition)”
We are living in a world where advancement continues to teach us different methods to progress. With the Covid Virus, an excessive need for voice recorders was observed. From marketing to business and education to fashion, people switched to screen and voice recorders to get their work done. The article reflects on online free voice recorders in the market, creating a real change.
The key features will also be discussed in detail. So, let us dive right in, shall we?
Part 1: 8 Best Online Free Voice Recorder
Having access to something free with minimal effort minimizes stress in personal and professional life. If you are looking for an online voice recorder for Google Slides or online voice recorder Chrome, be our guest! The subsection shall shed light on eight free audio recorders online.
Chirbit
Recording and sharing voice has become an absolute treat with Chirbit online voice recorder Chrome. You can record computer audio online without having to sign in to the account. The recorded files can be uploaded up to 120MB, and it supports multiple formats. The voice recording can be done via webcam or microphone, which is connected to the system.
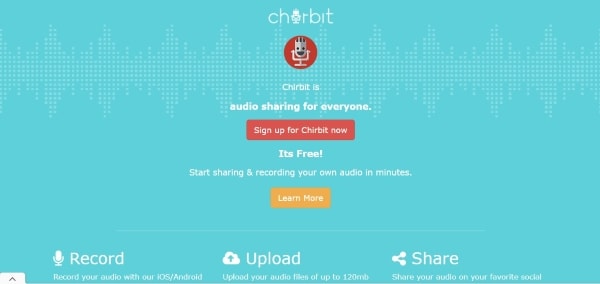
Chirbit offers the following features for its users. Let us have a look.
- The Chirbit recorded voice can be shared through Email, Twitter, Facebook, Tumblr, and your blog.
- You can discover voice recordings from other platforms.
- One can access a soundboard feature with a paid account.
SpeakPipe
The next online free voice recorder creating a storm in the market with its ease of use is SpeakPipe. The user can access the browser to launch the online recorder and get ready to record their voice and share it on different platforms. The microphone can be directly used from the browser.
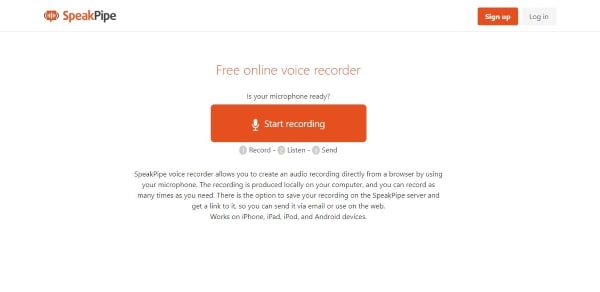
Want to know its features? Let us have a peek!
- The recording is easily saved on the computer locally. Moreover, it can also be saved on the server for better access.
- SpeakPipe server offers a link to the recording as well so that it can be shared extensively.
- The free recorder allows smooth functioning with all devices.
DemoAir
DemoAir online voice recorder Chrome is a good choice for people looking for professional voice recorders. From recording a meeting to recording your voice, consider DemoAir as your beck and call. It has integrations with other platforms for better communication. The platforms include YouTube, Gmail, Google Classroom, and Google Drive.
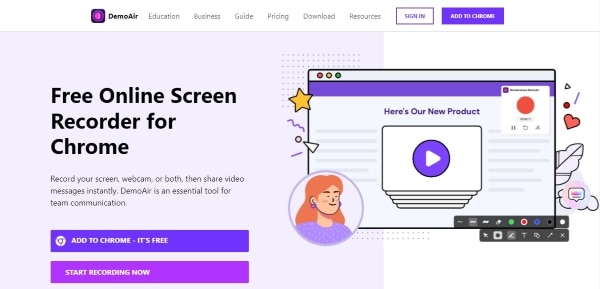
The additional traits of Demo Air are:
- The audio recording can be done through a webcam, computer audio, and microphone.
- It has a Chrome extension that makes access easy and efficient.
- The interface is easy to use and navigate, which means entry-level beginners can use it.
Clyp
In the run for the best free audio recorder online, Clyp pretty much takes the rank. It acts as a free digital audio recorder where recording and uploading sound recordings are effortlessly flawless. The online tool greets you with a yellow circle to start voice recording in seconds without getting into the account registration process. The beginners do not face any complications while using Clyp.
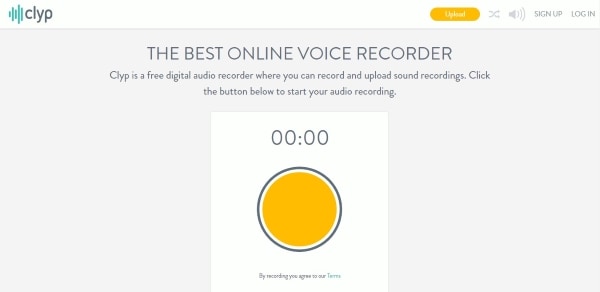
The multiple characteristics of Clyp are:
- Clyp offers robust technical support for all its users.
- There is a wide range of sharing and embedding options.
- It comes up with an inbuilt audio editor that enhances the productivity multifold.
Rev
Rev is yet another online voice recorder for Google Slides and other platforms. Being completely free, the user can easily download the MP3 recording without facing any problems. Privacy and security are guaranteed as Rev doesn’t collect anything or upload it to the server. In addition, the user is free to fast forward, trim, rewind, and play the audio.
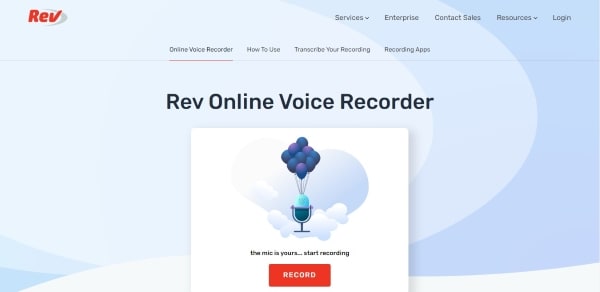
If you want to know more attributes of Rev, continue exploring the section.
- Rev is a simple and effective tool for everyday usage in personal and professional life.
- You can use human transcription and speech transcription to have advanced workability. However, the feature is paid.
- You can playback the video with a waveform to have a preview.
Vocaroo
As the premier voice recording service, Vocaroo can be used to record computer audio online flawlessly. It would be best if you considered using this tool to access an easy and free online free voice recorder. As soon as the website is launched, you will be greeted with a recording button. It ensures that no time is lost in navigating from one tool to another.

Vocaroo voice recorder presents the following features to its loyal set of users and beginners in the field.
- The embed widget of Vocaroo is very handy for web developers.
- The user can count on it being free, and there are no ads to slow down the process or annoy the user.
- Vocaroo is compatible with computers and smartphones that enhances its popularity globally.
Sodaphonic
Recording, editing, and sharing voice recording; Sodaphonic is a free and online voice recorder Chrome. The user can directly record from the web browser without getting into plugins, complicated setup, and expensive equipment. The new Chrome extension helps capture your thoughts better and record them with a single click.
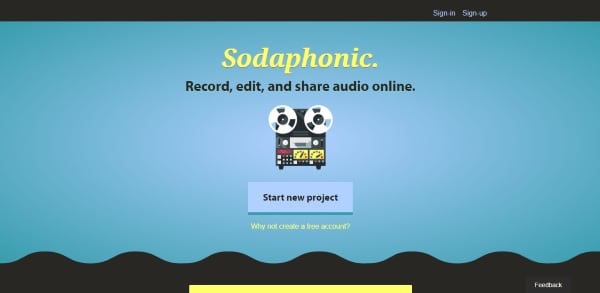
Additionally, you can create an account if you need to save your recordings and manage them effectively. The additional features of Sodaphonic are:
- From voice recording to editing podcasts, Sodaphonic can be relied upon completely.
- Edit the voice recording as needed by zooming in, zooming out, rewinding, and fast forward.
- Different effects can also be added that helps enhance the audio quality.
Apowersoft Free Online Audio Recorder
Last but not least, allow me to present you Apowersoft Free Online Audio Recorder. Unlike other voice recorders in the market, Apowersoft Free Online Audio Recorder allows users to add ID3 tags to their work. Furthermore, it plays a vital role in better organizing the recorded audio. The tool primarily offered an offline version of voice recorder for Windows and Mac. However, the online free voice recorder is also available.
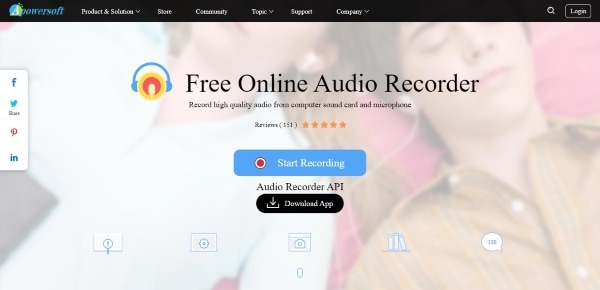
Get ready to have access to good quality audio via Apowersoft Free Online Audio Recorder. The additional attributes are as follows:
- The online version has a handy temporary library for storing the recordings flawlessly.
- The user interface is basic and workable, which means that an entry-level beginner can use it personally and professionally.
- The output formats include MP3, WMA, FLAC, WAV, M4A, OGG. Moreover, the application is compatible with iTunes, QuickTime, Windows Media Player, and Chromebook.
The Bottom Line
The article presented an outlook on online free voice recorders that enhance the workplace’s productivity. The use of voice recorders increased drastically when most businesses started operating globally. Additionally, the key features of these voice recorders were also the crux of this write-up.
Wondershare Filmora is the best that you can have at the moment. The way it edits audio is priceless due to the advanced features it brings to the table. You can add background music, perform audio ducking, adjust audio volume, split audio, and trim audio clips effortlessly. The audio editing presented by Filmora is the right choice for you in the present situation.
Versatile Video Editor - Wondershare Filmora
An easy yet powerful editor
Numerous effects to choose from
Detailed tutorials provided by the official channel
The next online free voice recorder creating a storm in the market with its ease of use is SpeakPipe. The user can access the browser to launch the online recorder and get ready to record their voice and share it on different platforms. The microphone can be directly used from the browser.

Want to know its features? Let us have a peek!
- The recording is easily saved on the computer locally. Moreover, it can also be saved on the server for better access.
- SpeakPipe server offers a link to the recording as well so that it can be shared extensively.
- The free recorder allows smooth functioning with all devices.
DemoAir
DemoAir online voice recorder Chrome is a good choice for people looking for professional voice recorders. From recording a meeting to recording your voice, consider DemoAir as your beck and call. It has integrations with other platforms for better communication. The platforms include YouTube, Gmail, Google Classroom, and Google Drive.

The additional traits of Demo Air are:
- The audio recording can be done through a webcam, computer audio, and microphone.
- It has a Chrome extension that makes access easy and efficient.
- The interface is easy to use and navigate, which means entry-level beginners can use it.
Clyp
In the run for the best free audio recorder online, Clyp pretty much takes the rank. It acts as a free digital audio recorder where recording and uploading sound recordings are effortlessly flawless. The online tool greets you with a yellow circle to start voice recording in seconds without getting into the account registration process. The beginners do not face any complications while using Clyp.

The multiple characteristics of Clyp are:
- Clyp offers robust technical support for all its users.
- There is a wide range of sharing and embedding options.
- It comes up with an inbuilt audio editor that enhances the productivity multifold.
Rev
Rev is yet another online voice recorder for Google Slides and other platforms. Being completely free, the user can easily download the MP3 recording without facing any problems. Privacy and security are guaranteed as Rev doesn’t collect anything or upload it to the server. In addition, the user is free to fast forward, trim, rewind, and play the audio.

If you want to know more attributes of Rev, continue exploring the section.
- Rev is a simple and effective tool for everyday usage in personal and professional life.
- You can use human transcription and speech transcription to have advanced workability. However, the feature is paid.
- You can playback the video with a waveform to have a preview.
Vocaroo
As the premier voice recording service, Vocaroo can be used to record computer audio online flawlessly. It would be best if you considered using this tool to access an easy and free online free voice recorder. As soon as the website is launched, you will be greeted with a recording button. It ensures that no time is lost in navigating from one tool to another.

Vocaroo voice recorder presents the following features to its loyal set of users and beginners in the field.
- The embed widget of Vocaroo is very handy for web developers.
- The user can count on it being free, and there are no ads to slow down the process or annoy the user.
- Vocaroo is compatible with computers and smartphones that enhances its popularity globally.
Sodaphonic
Recording, editing, and sharing voice recording; Sodaphonic is a free and online voice recorder Chrome. The user can directly record from the web browser without getting into plugins, complicated setup, and expensive equipment. The new Chrome extension helps capture your thoughts better and record them with a single click.

Additionally, you can create an account if you need to save your recordings and manage them effectively. The additional features of Sodaphonic are:
- From voice recording to editing podcasts, Sodaphonic can be relied upon completely.
- Edit the voice recording as needed by zooming in, zooming out, rewinding, and fast forward.
- Different effects can also be added that helps enhance the audio quality.
Apowersoft Free Online Audio Recorder
Last but not least, allow me to present you Apowersoft Free Online Audio Recorder. Unlike other voice recorders in the market, Apowersoft Free Online Audio Recorder allows users to add ID3 tags to their work. Furthermore, it plays a vital role in better organizing the recorded audio. The tool primarily offered an offline version of voice recorder for Windows and Mac. However, the online free voice recorder is also available.

Get ready to have access to good quality audio via Apowersoft Free Online Audio Recorder. The additional attributes are as follows:
- The online version has a handy temporary library for storing the recordings flawlessly.
- The user interface is basic and workable, which means that an entry-level beginner can use it personally and professionally.
- The output formats include MP3, WMA, FLAC, WAV, M4A, OGG. Moreover, the application is compatible with iTunes, QuickTime, Windows Media Player, and Chromebook.
The Bottom Line
The article presented an outlook on online free voice recorders that enhance the workplace’s productivity. The use of voice recorders increased drastically when most businesses started operating globally. Additionally, the key features of these voice recorders were also the crux of this write-up.
Wondershare Filmora is the best that you can have at the moment. The way it edits audio is priceless due to the advanced features it brings to the table. You can add background music, perform audio ducking, adjust audio volume, split audio, and trim audio clips effortlessly. The audio editing presented by Filmora is the right choice for you in the present situation.
Versatile Video Editor - Wondershare Filmora
An easy yet powerful editor
Numerous effects to choose from
Detailed tutorials provided by the official channel
The next online free voice recorder creating a storm in the market with its ease of use is SpeakPipe. The user can access the browser to launch the online recorder and get ready to record their voice and share it on different platforms. The microphone can be directly used from the browser.

Want to know its features? Let us have a peek!
- The recording is easily saved on the computer locally. Moreover, it can also be saved on the server for better access.
- SpeakPipe server offers a link to the recording as well so that it can be shared extensively.
- The free recorder allows smooth functioning with all devices.
DemoAir
DemoAir online voice recorder Chrome is a good choice for people looking for professional voice recorders. From recording a meeting to recording your voice, consider DemoAir as your beck and call. It has integrations with other platforms for better communication. The platforms include YouTube, Gmail, Google Classroom, and Google Drive.

The additional traits of Demo Air are:
- The audio recording can be done through a webcam, computer audio, and microphone.
- It has a Chrome extension that makes access easy and efficient.
- The interface is easy to use and navigate, which means entry-level beginners can use it.
Clyp
In the run for the best free audio recorder online, Clyp pretty much takes the rank. It acts as a free digital audio recorder where recording and uploading sound recordings are effortlessly flawless. The online tool greets you with a yellow circle to start voice recording in seconds without getting into the account registration process. The beginners do not face any complications while using Clyp.

The multiple characteristics of Clyp are:
- Clyp offers robust technical support for all its users.
- There is a wide range of sharing and embedding options.
- It comes up with an inbuilt audio editor that enhances the productivity multifold.
Rev
Rev is yet another online voice recorder for Google Slides and other platforms. Being completely free, the user can easily download the MP3 recording without facing any problems. Privacy and security are guaranteed as Rev doesn’t collect anything or upload it to the server. In addition, the user is free to fast forward, trim, rewind, and play the audio.

If you want to know more attributes of Rev, continue exploring the section.
- Rev is a simple and effective tool for everyday usage in personal and professional life.
- You can use human transcription and speech transcription to have advanced workability. However, the feature is paid.
- You can playback the video with a waveform to have a preview.
Vocaroo
As the premier voice recording service, Vocaroo can be used to record computer audio online flawlessly. It would be best if you considered using this tool to access an easy and free online free voice recorder. As soon as the website is launched, you will be greeted with a recording button. It ensures that no time is lost in navigating from one tool to another.

Vocaroo voice recorder presents the following features to its loyal set of users and beginners in the field.
- The embed widget of Vocaroo is very handy for web developers.
- The user can count on it being free, and there are no ads to slow down the process or annoy the user.
- Vocaroo is compatible with computers and smartphones that enhances its popularity globally.
Sodaphonic
Recording, editing, and sharing voice recording; Sodaphonic is a free and online voice recorder Chrome. The user can directly record from the web browser without getting into plugins, complicated setup, and expensive equipment. The new Chrome extension helps capture your thoughts better and record them with a single click.

Additionally, you can create an account if you need to save your recordings and manage them effectively. The additional features of Sodaphonic are:
- From voice recording to editing podcasts, Sodaphonic can be relied upon completely.
- Edit the voice recording as needed by zooming in, zooming out, rewinding, and fast forward.
- Different effects can also be added that helps enhance the audio quality.
Apowersoft Free Online Audio Recorder
Last but not least, allow me to present you Apowersoft Free Online Audio Recorder. Unlike other voice recorders in the market, Apowersoft Free Online Audio Recorder allows users to add ID3 tags to their work. Furthermore, it plays a vital role in better organizing the recorded audio. The tool primarily offered an offline version of voice recorder for Windows and Mac. However, the online free voice recorder is also available.

Get ready to have access to good quality audio via Apowersoft Free Online Audio Recorder. The additional attributes are as follows:
- The online version has a handy temporary library for storing the recordings flawlessly.
- The user interface is basic and workable, which means that an entry-level beginner can use it personally and professionally.
- The output formats include MP3, WMA, FLAC, WAV, M4A, OGG. Moreover, the application is compatible with iTunes, QuickTime, Windows Media Player, and Chromebook.
The Bottom Line
The article presented an outlook on online free voice recorders that enhance the workplace’s productivity. The use of voice recorders increased drastically when most businesses started operating globally. Additionally, the key features of these voice recorders were also the crux of this write-up.
Wondershare Filmora is the best that you can have at the moment. The way it edits audio is priceless due to the advanced features it brings to the table. You can add background music, perform audio ducking, adjust audio volume, split audio, and trim audio clips effortlessly. The audio editing presented by Filmora is the right choice for you in the present situation.
Versatile Video Editor - Wondershare Filmora
An easy yet powerful editor
Numerous effects to choose from
Detailed tutorials provided by the official channel
The next online free voice recorder creating a storm in the market with its ease of use is SpeakPipe. The user can access the browser to launch the online recorder and get ready to record their voice and share it on different platforms. The microphone can be directly used from the browser.

Want to know its features? Let us have a peek!
- The recording is easily saved on the computer locally. Moreover, it can also be saved on the server for better access.
- SpeakPipe server offers a link to the recording as well so that it can be shared extensively.
- The free recorder allows smooth functioning with all devices.
DemoAir
DemoAir online voice recorder Chrome is a good choice for people looking for professional voice recorders. From recording a meeting to recording your voice, consider DemoAir as your beck and call. It has integrations with other platforms for better communication. The platforms include YouTube, Gmail, Google Classroom, and Google Drive.

The additional traits of Demo Air are:
- The audio recording can be done through a webcam, computer audio, and microphone.
- It has a Chrome extension that makes access easy and efficient.
- The interface is easy to use and navigate, which means entry-level beginners can use it.
Clyp
In the run for the best free audio recorder online, Clyp pretty much takes the rank. It acts as a free digital audio recorder where recording and uploading sound recordings are effortlessly flawless. The online tool greets you with a yellow circle to start voice recording in seconds without getting into the account registration process. The beginners do not face any complications while using Clyp.

The multiple characteristics of Clyp are:
- Clyp offers robust technical support for all its users.
- There is a wide range of sharing and embedding options.
- It comes up with an inbuilt audio editor that enhances the productivity multifold.
Rev
Rev is yet another online voice recorder for Google Slides and other platforms. Being completely free, the user can easily download the MP3 recording without facing any problems. Privacy and security are guaranteed as Rev doesn’t collect anything or upload it to the server. In addition, the user is free to fast forward, trim, rewind, and play the audio.

If you want to know more attributes of Rev, continue exploring the section.
- Rev is a simple and effective tool for everyday usage in personal and professional life.
- You can use human transcription and speech transcription to have advanced workability. However, the feature is paid.
- You can playback the video with a waveform to have a preview.
Vocaroo
As the premier voice recording service, Vocaroo can be used to record computer audio online flawlessly. It would be best if you considered using this tool to access an easy and free online free voice recorder. As soon as the website is launched, you will be greeted with a recording button. It ensures that no time is lost in navigating from one tool to another.

Vocaroo voice recorder presents the following features to its loyal set of users and beginners in the field.
- The embed widget of Vocaroo is very handy for web developers.
- The user can count on it being free, and there are no ads to slow down the process or annoy the user.
- Vocaroo is compatible with computers and smartphones that enhances its popularity globally.
Sodaphonic
Recording, editing, and sharing voice recording; Sodaphonic is a free and online voice recorder Chrome. The user can directly record from the web browser without getting into plugins, complicated setup, and expensive equipment. The new Chrome extension helps capture your thoughts better and record them with a single click.

Additionally, you can create an account if you need to save your recordings and manage them effectively. The additional features of Sodaphonic are:
- From voice recording to editing podcasts, Sodaphonic can be relied upon completely.
- Edit the voice recording as needed by zooming in, zooming out, rewinding, and fast forward.
- Different effects can also be added that helps enhance the audio quality.
Apowersoft Free Online Audio Recorder
Last but not least, allow me to present you Apowersoft Free Online Audio Recorder. Unlike other voice recorders in the market, Apowersoft Free Online Audio Recorder allows users to add ID3 tags to their work. Furthermore, it plays a vital role in better organizing the recorded audio. The tool primarily offered an offline version of voice recorder for Windows and Mac. However, the online free voice recorder is also available.

Get ready to have access to good quality audio via Apowersoft Free Online Audio Recorder. The additional attributes are as follows:
- The online version has a handy temporary library for storing the recordings flawlessly.
- The user interface is basic and workable, which means that an entry-level beginner can use it personally and professionally.
- The output formats include MP3, WMA, FLAC, WAV, M4A, OGG. Moreover, the application is compatible with iTunes, QuickTime, Windows Media Player, and Chromebook.
The Bottom Line
The article presented an outlook on online free voice recorders that enhance the workplace’s productivity. The use of voice recorders increased drastically when most businesses started operating globally. Additionally, the key features of these voice recorders were also the crux of this write-up.
Wondershare Filmora is the best that you can have at the moment. The way it edits audio is priceless due to the advanced features it brings to the table. You can add background music, perform audio ducking, adjust audio volume, split audio, and trim audio clips effortlessly. The audio editing presented by Filmora is the right choice for you in the present situation.
Versatile Video Editor - Wondershare Filmora
An easy yet powerful editor
Numerous effects to choose from
Detailed tutorials provided by the official channel
Also read:
- New Mastering Silence A Comprehensive Tutorial on Stripping Audio From iOS Videos for 2024
- Updated 2024 Approved 2023S Favorite Retro-Tempo Tunes Compilation
- Updated 2024 Approved Import Music Track Into iMovie Project
- In 2024, Navigating TikToks Volume Settings Essential Methods for Quiet Videos
- In 2024, Recommended Online Hubs for Downloading Chill Lofi Imagery & Harmonies
- The Ultimate Selection Newsroom Soundscapes for Inspiration
- Updated 2024 Approved From Silence to Symphony A Practical Approach to Changing Video Audio (Part 1)
- Updated The Experts Selection of Windows-Compatible Noise Cancellation Applications for 2024
- Best Vocal Silencing Software and Platforms Reviewed
- In 2024, Separating Sound The Leading Software Solutions for Isolating Audio From Videos
- Updated 2024 Approved From a Symphony of Surroundings to Silent Solitude The Pathway to Muting Background Noise
- New In 2024, The Essence of Omegle A Thorough Investigation of Its Operations and User Protection
- New In 2024, How to Improve Sound Quality on a Home Recorded Video
- New In 2024, Audio Liberation in Visual Media Innovative Approaches to Extracting Sound From Films and Videos
- The Speakers Selection Top-Rated Audio Recording Applications of the Year for 2024
- New In 2024, Essential Music Libraries for Film and Video Editing - Free Edition
- New 2024 Approved The Premium Collection Top 3 Online Platforms for Lifting MP3 Volume Levels
- Updated Unleash Your Creative Potential with These 5 In-Demand Android Audio Editors for 2024
- Updated Mastering Vocal Reduction Top Picks of Software, Apps, and Websites for 2024
- Updated 2024 Approved Final Cut Pro X Plugin Problems? Try These Solutions First
- How to Change Realme Narzo 60x 5G Location on Skout | Dr.fone
- Why Does My Vivo Y56 5G Keep Turning Off By Itself? 6 Fixes Are Here | Dr.fone
- How to Cast Samsung Galaxy Z Fold 5 Screen to PC Using WiFi | Dr.fone
- How to Send and Fake Live Location on Facebook Messenger Of your Apple iPhone 14 | Dr.fone
- In 2024, How to Bypass Google FRP Lock from Infinix Hot 40 Pro Devices
- Updated In 2024, GoPro Video Editing for Everyone A Simple, Free, and Fun Approach
- Solutions to Spy on Apple iPhone 15 Pro Max with and without jailbreak | Dr.fone
- Updated In 2024, Top-Rated Video Creation Tools for Windows 10
- 7 Solutions to Fix Error Code 963 on Google Play Of Tecno Spark 10C | Dr.fone
- Guide How To Unbrick a Bricked Motorola Moto G23 Phone | Dr.fone
- In 2024, 3 Methods to Mirror Honor X8b to Roku | Dr.fone
- 2024 Approved Top-Search The Best Game Screen Recording Tools for PC
- In 2024, A Quick Guide to Samsung Galaxy S24 FRP Bypass Instantly
- Top 3 Sites to Find Free Asus Unlock Codes to Unlock Your Asus Phone
- New 2024 Approved Compress Videos for Free 10 Best Online Tools with No Downloads
- In 2024, How to use Pokemon Go Joystick on Poco X6? | Dr.fone
- Title: Mastering Microphone Use in PowerPoint A Step-by-Step Guide for PC and MAC Users
- Author: Ella
- Created at : 2024-06-08 07:09:18
- Updated at : 2024-06-09 07:09:18
- Link: https://sound-optimizing.techidaily.com/mastering-microphone-use-in-powerpoint-a-step-by-step-guide-for-pc-and-mac-users/
- License: This work is licensed under CC BY-NC-SA 4.0.

