
:max_bytes(150000):strip_icc():format(webp)/samsung-unveils-new-products-at-its-annual-unpacked-event-1200186175-0a17180ae84e47f488f43d3afbb7daa6.jpg)
New 2024 Approved Mastering the Connection Linking Your AirPods to a Windows or Mac Computer
Mastering the Connection: Linking Your AirPods to a Windows or Mac Computer

If you have genuinely original Apple AirPods, there is no hard rule to use them with iPhone, iMac, or iPad. You can also connect AirPods to PC, e.g., Windows 10.
It’s no surprise that Apple AirPods are the best AirPods in the market yet. They are reliable, compact, sound great, have noise cancellation, have long-lasting battery life, and come with reliable connectivity. We can say Apple AirPods are the best companion for music, and video call experiences are the best on AirPods.
The great thing is that you can do all that on your PC or Laptop and easily connect AirPods to PC or laptop. But you are all here to learn that how we can connect AirPods to PC. However, the connectivity of AirPods works seamlessly when there are Apple devices at the second end.
The process from which we connect Airpods to PC is not complicated. I can tell you what do you need to connect Airpods to PC. And I will also tell you what common issues you can face while connecting Airpods to PC and how we can troubleshoot those issues.
How to connect AirPods to PC or laptop
The process we can Connect AirPods to PC or any laptop is not a complex procedure. You can connect it to any Bluetooth device you connect with your system. But like the Apple environment, AirPods will not connect automatically; you have to pair them manually first.
“AirPods can pair with any devices other than Apple devices, but the seamless connectivity is the issue that AirPods only shows with Apple devices. ”
- First of all, get your AirPods charged.
- If you are using Windows 10, you can see the start menu in the lower-left corner, click on it and then go for the settings option available there.
- In settings, you can see numerous options, but you have to click on “Devices.”

- Make sure your PC’s Bluetooth is set to on.
- Click add Bluetooth or other devices.
- From add a device window, click on Bluetooth.

- Now open your AirPods case and Press and hold a small button on the case’s back for several seconds. For Airpods users of generation 1, the light you can see inside the case will start blinking to white. For users of generation 2 case or AirPods pros user, the light will be in front of the case and also start blinking to white.
- AirPods will emerge on the list of devices that are ready to connect with your PC.

- Click at your AirPods from the list, and then the window will appear a dialogue box, saying that you are now successfully connected to your AirPods.

Your PC doesn’t support Bluetooth?
If you are one of those several users whose PC doesn’t support Bluetooth functionality, you still want to connect Airpods to your PC. Well, there is no need to worry about it. If your PC doesn’t support Bluetooth functionality, you can still connect your Airpods with it using Bluetooth adapters. There are multiple Bluetooth adapters that you can use for connecting your PC with your Airpods. It is one of the easiest and simple ways that you can use. We will list down some of the best Bluetooth adaptors that you can choose based on your requirements and needs.
1.TP-Link USB Bluetooth Adapter

Compatible with Windows 10/9/8/7/XP
- Latest Bluetooth 4.0
- Sleek and ultra-small size
- Broader transformation range
2.ASUS USB-BT400 USB Adapter

Latest Bluetooth 4.0 Technology
- USB 2.0
- Up to 3Mbps Speed
- Supports all Windows versions
3.ZEXMTE Long Range USB Bluetooth 5.0 Adapter

Supports Latest Bluetooth 5.0 version
- Enhanced Anti-Interface
- Class 1 Radio Technology
- Supports all versions of Windows
Pros
Other than the seamless connectivity of AirPods with Apple products, it offers one of the most excellent perks, Active Noise Cancellation (ANC). It helps you when you want to focus on anything and want to tune yourself to get yourself out of this world, and then this product can cancel a big amount of noise around you which you can keep ON and OFF according to your need.
All audio control will still work with windows, and it’s not compulsory to have an Apple device at another end. For example, clicking on the AirPod will pause and play the music, clicking 2 or 3 times forward and backward, and holding AirPods can switch On and Off the ANC mode.
Audio quality is also a big perk while using AirPods with a PC. The regular AirPods are okay in terms of music experience, but there are 5 stars for AirPods Pro.
Battery life is also an advantage if you are an AirPod user. The battery life of AirPods is good and can last longer when you connect AirPods to PC.
Besides all these perks, people also like the Build and Look of AirPods. Everyone used to talk about it when they were newly launched. Now AirPods are common and also is a “status symbol,” it’s true, and that’s worth it.
Cons
With windows, you can use only the basic features of AirPods. AirPods will not work to their full potential, and there are also more features that AirPods offers.
Price is a big disadvantage because you can get Microsoft’s Surface Earbuds and Google’s Pixel Buds. Both have some perk’s that you can not get with AirPods. Some also give preference to them look wise also. And also touch control are also better in Google Pixel Buds and Microsoft’s Surface EarBuds.
Wearing AirPods and keeping them in ear’s while working or jogging is tricky. AirPods fall off easily. But on the other hand, Google Pixel Buds and Microsoft’s Surface EarBuds are easy to handle and comfortable to wear compared to AirPods.
AirPods are build in a way that they can work best with Apple devices. You can face issues if you are using it with windows or any other device other than Apple. For example, Automatic ear detection, Automatic pairing. Music will not automatically pause when you take AirPods out from your ears.
Music controls are features that we can’t miss here. You can have only basic controls. You can miss a lot of features like Siri access.
If you have genuinely original Apple AirPods, there is no hard rule to use them with iPhone, iMac, or iPad. You can also connect AirPods to PC, e.g., Windows 10.
It’s no surprise that Apple AirPods are the best AirPods in the market yet. They are reliable, compact, sound great, have noise cancellation, have long-lasting battery life, and come with reliable connectivity. We can say Apple AirPods are the best companion for music, and video call experiences are the best on AirPods.
The great thing is that you can do all that on your PC or Laptop and easily connect AirPods to PC or laptop. But you are all here to learn that how we can connect AirPods to PC. However, the connectivity of AirPods works seamlessly when there are Apple devices at the second end.
The process from which we connect Airpods to PC is not complicated. I can tell you what do you need to connect Airpods to PC. And I will also tell you what common issues you can face while connecting Airpods to PC and how we can troubleshoot those issues.
How to connect AirPods to PC or laptop
The process we can Connect AirPods to PC or any laptop is not a complex procedure. You can connect it to any Bluetooth device you connect with your system. But like the Apple environment, AirPods will not connect automatically; you have to pair them manually first.
“AirPods can pair with any devices other than Apple devices, but the seamless connectivity is the issue that AirPods only shows with Apple devices. ”
- First of all, get your AirPods charged.
- If you are using Windows 10, you can see the start menu in the lower-left corner, click on it and then go for the settings option available there.
- In settings, you can see numerous options, but you have to click on “Devices.”
- Make sure your PC’s Bluetooth is set to on.
- Click add Bluetooth or other devices.
- From add a device window, click on Bluetooth.
- Now open your AirPods case and Press and hold a small button on the case’s back for several seconds. For Airpods users of generation 1, the light you can see inside the case will start blinking to white. For users of generation 2 case or AirPods pros user, the light will be in front of the case and also start blinking to white.
- AirPods will emerge on the list of devices that are ready to connect with your PC.
- Click at your AirPods from the list, and then the window will appear a dialogue box, saying that you are now successfully connected to your AirPods.
Your PC doesn’t support Bluetooth?
If you are one of those several users whose PC doesn’t support Bluetooth functionality, you still want to connect Airpods to your PC. Well, there is no need to worry about it. If your PC doesn’t support Bluetooth functionality, you can still connect your Airpods with it using Bluetooth adapters. There are multiple Bluetooth adapters that you can use for connecting your PC with your Airpods. It is one of the easiest and simple ways that you can use. We will list down some of the best Bluetooth adaptors that you can choose based on your requirements and needs.
1.TP-Link USB Bluetooth Adapter
Compatible with Windows 10/9/8/7/XP
- Latest Bluetooth 4.0
- Sleek and ultra-small size
- Broader transformation range
2.ASUS USB-BT400 USB Adapter
Latest Bluetooth 4.0 Technology
- USB 2.0
- Up to 3Mbps Speed
- Supports all Windows versions
3.ZEXMTE Long Range USB Bluetooth 5.0 Adapter
Supports Latest Bluetooth 5.0 version
- Enhanced Anti-Interface
- Class 1 Radio Technology
- Supports all versions of Windows
Pros
Other than the seamless connectivity of AirPods with Apple products, it offers one of the most excellent perks, Active Noise Cancellation (ANC). It helps you when you want to focus on anything and want to tune yourself to get yourself out of this world, and then this product can cancel a big amount of noise around you which you can keep ON and OFF according to your need.
All audio control will still work with windows, and it’s not compulsory to have an Apple device at another end. For example, clicking on the AirPod will pause and play the music, clicking 2 or 3 times forward and backward, and holding AirPods can switch On and Off the ANC mode.
Audio quality is also a big perk while using AirPods with a PC. The regular AirPods are okay in terms of music experience, but there are 5 stars for AirPods Pro.
Battery life is also an advantage if you are an AirPod user. The battery life of AirPods is good and can last longer when you connect AirPods to PC.
Besides all these perks, people also like the Build and Look of AirPods. Everyone used to talk about it when they were newly launched. Now AirPods are common and also is a “status symbol,” it’s true, and that’s worth it.
Cons
With windows, you can use only the basic features of AirPods. AirPods will not work to their full potential, and there are also more features that AirPods offers.
Price is a big disadvantage because you can get Microsoft’s Surface Earbuds and Google’s Pixel Buds. Both have some perk’s that you can not get with AirPods. Some also give preference to them look wise also. And also touch control are also better in Google Pixel Buds and Microsoft’s Surface EarBuds.
Wearing AirPods and keeping them in ear’s while working or jogging is tricky. AirPods fall off easily. But on the other hand, Google Pixel Buds and Microsoft’s Surface EarBuds are easy to handle and comfortable to wear compared to AirPods.
AirPods are build in a way that they can work best with Apple devices. You can face issues if you are using it with windows or any other device other than Apple. For example, Automatic ear detection, Automatic pairing. Music will not automatically pause when you take AirPods out from your ears.
Music controls are features that we can’t miss here. You can have only basic controls. You can miss a lot of features like Siri access.
Essential Compilation: Discovering the Top 11 Free Audio Customization Tools for iOS & Android Gadgets
Best Voice Changer Apps for iPhone and Android

Benjamin Arango
Mar 27, 2024• Proven solutions
Have you ever wondered what your voice would sound like if you were a cartoon character, a robot, or an older version of yourself? Changing how your voice sounds has never been easier, regardless of the Smartphone model you have, since voice changer apps can be used on both iPhone and Android devices.
Even though there is nothing wrong with modulating your voice to have fun with your friends, using voice changer apps to pull malicious pranks or bully strangers online is far from acceptable. Read on if you would like to find out more about the best voice changer apps for iPhone and Android devices and discover the one you enjoy using the most.
Best Voice Changer Apps for iPhone and Android
Creating a new ringtone, making a voice recording, or having fun with your friends are only a few reasons why so many people choose to try out voice changer apps. The vast majority of these apps feature well-equipped audio effects libraries that enable users to have fun with their friends and hear how they would sound if they were drunk or after inhaling helium. So, let’s take a look at some of the best voice changer apps on the market.


Changing video voice on Windows and Mac with Wondershare Filmora
Do you want to change the voice in video on Windows and Mac and don’t know which software can meet this requirement? Try Filmra video editor , which provides several ways to change voice over, such as changing the voice speed or changing the pitch. Download the trial version below and find out more possibility in video creation with Filmora.
1. Celebrity Voice Changer – Face
Price: Free, but offers in-app purchases
Compatibility: iOS 9.0 or later
User Rating: 4.0
In case you would like to sound like your favorite movie star of TV host, then Celebrity Voice Changer is one of the best choices you can make. Besides the standard set of options, the app also lets you request new voices since its machine learning technology can mimic virtually anyone’s voice. However, Celebrity Voice Changer is currently only available in English and it cannot modulate speech in other languages. In addition, you must make an in-app purchase in order to gain access to all of the app’s features or unlock the unlimited usage of the app.
Pros
- Automatic voice modulation
- Huge selection of voice filters
- The app generates video files that are better adjusted to the audience on social media than audio files
- Excellent impressions of celebrities
Cons
- Unreasonably expensive
- The app’s Deep Learning technology still has a lot of room for improvement
2. Snapchat
Price: Free, but offers in-app purchases
Compatibility: iOS 10.0 or later, Android 4.4 or up
User Rating: 3.8
With more than 203 million daily users, Snapchat is one of the largest messaging platforms on the market. Previously, we’ve shared how to change gender on Snapchat , beside that, the app lets its users capture short moments or the so-called Snaps and share them with friends. In addition to hundreds of video filters , Snapchat also features a broad spectrum of voice changing effects that make Snaps more entertaining. Even so, the audio recording options Snapchat offers are far from ideal, because the app doesn’t allow you to edit the files you create with it. Using Snapchat will drain your battery quickly, which is why you must pay attention to how frequently you use this app.
Pros
- The easy voice modulation process
- Excellent messaging options
- Grants you access to a large community of likeminded people
- Lenses and filters are updated on a daily basis
Cons
- Editing voice changes after you create a Snap is not possible
- Snapchat is not primarily a voice changer app
Check the detailed information about How to Change Voice on Snapchat with 2 Easy Methods >>
3. Voice Changer
Price: Free
Compatibility: Android 4.1 and up
User Rating: 4.3

Changing your voice with this app won’t take more than a few moments of your time. You just have to launch the app and hit the microphone button to record a message or a joke you would like to modulate. Once you’re happy with the audio recording you made, you can proceed to choose from more than twenty voice effects that will make you sound like a dwarf, a robot, or an alien. The app’s file-sharing capabilities enable you to post your audio recordings to any social media platform of your choosing or store your files and use them as many times as you want.
Pros
- Entertaining and easy to use
- The simple three-step voice modulation process
- Good selection of voice filters
- Excellent file sharing options
Cons
- The app displays ads
- No audio editing tools
4. Voicy: Celebrity Voice Changer
**Price:**Free, but offers in-app purchases
Compatibility: iOS 10 or later
User Rating: 4.3

Impersonating your favorite celebrity can be a fun way to prank your friends on social media. Voicy features a broad selection of celebrity voice impersonations you can use to make you sound like a famous actress or TV personality. The app utilizes a machine learning technology that can generate more than forty avatars and allows the users to experiment with different voice effects. The free version of the app offers only limited capabilities, so if you want to gain access to all of the Voicy’s features, you must choose a weekly, monthly or an annual subscription.
Pros
- Equipped with a powerful machine learning technology
- Offers a vast selection of voice avatars
- The quick voice modification process
- A great choice if you want to make a parody
Cons
- More expensive than the competition
- Support only the English language
5. Video Voice Changer – Fun Editor
Price: Free, but offers in-app purchases
Compatibility: iOS 8.0 or later
User Rating: 4.4

Changing the voices in the videos you record with your iPhones or iPads is a straightforward process that takes a minimum amount of effort. You can either use this iOS-based app to capture videos you’re going to dub or import them from the albums in which they are stored. The Video Voice Changer app is a great option if you want to dub videos directly from your phone because it enables you to change the voices in your videos and make them sound like mice, bears or ghosts. There are over thirty voice effects to choose from, so you can easily pick the one that best fits the video you’re editing.
Pros
- Equipped with video recording tools
- Excellent dubbing features
- A rich selection of voice effects
- Allows users to share their creations on Facebook, Instagram, and other social media platforms
Cons
- You must make an in-app purchase to unlock all of the app’s features
- No audio mixing options
6. Video Voice Changer FX
**Price:**Free, but offers in-app purchases
Compatibility: Android 4.1 and up
User Rating: 4.1

This is a simple app, anyone can use to change the voices in a video. Simply upload a video file from an SD card in your phone and choose an audio effect you want to apply. The app’s collection of funny voices includes options like echo, squirrel, space ship or chipmunk. As soon as you select the voice effect you want to add to a video, the app will start generating a new video that will be saved to your phone. Sharing the videos you edit with Video Voice Changer FX to social media directly from the app is not an option.
Pros
- Fun and easy to use
- Great price to performance ratio
- Changing a voice requires just a few taps
- Allows users to switch between effects while the video is playing
Cons
- No audio or video recording capability
- Doesn’t support social media sharing
7. Squeak Voice Changer
**Price:**Free, but offers in-app purchases
Compatibility: Android 4.3 and up
User Rating: 3.9

Every joke you want to share with your online friends is going to be a little funnier if you record it with Squeak Voice Changer. You just have to tap on the Record button and choose one of the available effects. Each voice changing effect this app offers is represented by a character so you should select Jamie the Jolly if you want to make your voice sound like you’re at a party or Bruce the Sentimental Bot if you want your voice to sound artificial. All the recordings you make with Squeak Voice Changer can be easily shared on social media.
Pros
- Equipped with audio recording options
- Cute and memorable characters that represent voice effects
- Inexpensive and fun to use
- Functional app design
Cons
- Poor selection of voice effects
- The AI only recognizes the English language
8. Voice Changer with Effects
**Price:**Free
Compatibility: Android 4.1 and up
User Rating: 4.5
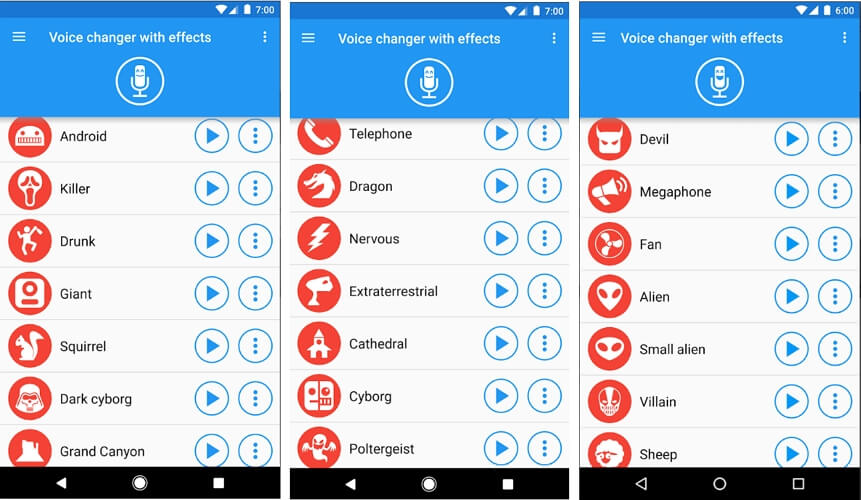
This Android-based app is designed to make fun and easy since voice modulation features enable you to play voice recording backward or change your voice to sound robotic or even alien. Besides recording your voice, the app also lets you modulate pre-recorded sounds and save them to your phone or use them as ringtones or notification sounds. Furthermore, the app lets you add sounds to images and share them to Facebook. The Voice Changer with Effects enables you to share all audio files you process with it to any of the most popular social media platforms.
Pros
- The app has over 50,000,000 installs
- Equipped with a text to voice feature
- Setting a new ringtone with this app is easy
- Supports editing of pre-recorded audio files
Cons
- Contains ads
- No audio or video editing options
9. Voice Changer
**Price:**Free
Compatibility: Android 4.1 and up
User Rating: 4.4

If you are looking for an Android app that lets you modulate your voice quickly and effortlessly, then Voice Changer may be one of the best options you can find on the market. You can record your voice by simply tapping on the microphone and speaking into your phone’s speaker and then apply one of the audio effects this app offers. Optionally, you can import an audio file you already recorded into the app and then apply Martian, Foreigner, Giant or Child effects to your voice recording. The best part is that you can apply each effect to the audio files you’re editing as many times as you want.
Pros
- Loads of funny effects
- Simple audio recording setup
- Intuitive and modernly designed interface
- Enables users to share audio files via Bluetooth or social media platforms
Cons
- No video editing tools
- The quality of output audio files can vary
10. Voice FX
**Price:**Free, but offers in-app purchases
Compatibility: Android 4.0.3 and up
User Rating: 3.8

Modulating voices in all types of audio files is a straightforward and fun process that can be completed in just a few taps. During the audio recording session, you can apply all voice effects to the sound you are recording and stream it live to your web browsers or media players you’re using. Voice FX changes your voice in real time, which enables you to preview your results before deciding if you want to save them. All files you export from this app will be saved in the MP3 format so you can use them as ringtones on your Android device.
Pros
- Allows users to modulate pre-recorded audio files
- Voice effects are applied in real time
- Offers live streaming features
- Exports files in the MP3 format
Cons
- Prone to glitches
- A limited selection of voice effects
11. Voice Changer Plus
**Price:**Free, but offers in-app purchases
Compatibility: iOS 8.0 or later
User Rating: 4.8
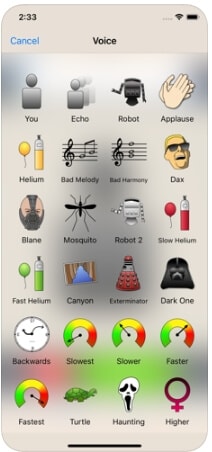
iPhone and iPad owners in need of a voice changer app that grants them complete creative freedom over the modulation of the voices they record, should consider using the Voice Changer Plus. The app features more than fifty voice effects and it provides support for voiceover recordings. Moreover, you can edit all your audio files even after you saved them, enabling you to find new ways to improve your recordings over time. Voice Changer Plus is also equipped with trim controls, so you can remove all parts of your audio files you don’t want to share with your friends on social media.
Pros
- Offers more voice effects than most of its competitors
- Provides voiceover recording options
- Users can trim their audio files
- All audio recordings can be edited after the voice modulation
Cons
- In-app purchase is required in order to unlock all of the app’s features
- Modulating audio in video files is not an option
Below is a quick comparison table among these voice changer apps, hope it will be helpful.
| App | Supported OS | User Rating | Voice Templates |
|---|---|---|---|
| Celebrity Voice Changer - Face | iOS 9.0 or later | 4.0 | Yes |
| Snapchat | iOS 10.0 or later, Android 4.4 or up | 3.8 | No |
| Voice Changer by e3games | Android 4.1 and up | 4.3 | Yes |
| Voicy: Celebrity Voice Changer | iOS 10 or later | 4.3 | Yes |
| Video Voice Changer – Fun Editor | iOS 8.0 or later | 4.4 | Yes |
| Video Voice Changer FX | Android 4.1 and up | 4.1 | Yes |
| Squeak Voice Changer | Android 4.3 and up | 3.9 | Yes |
| Voice Changer with Effects | Android 4.1 and up | 4.5 | Yes |
| Voice Changer | Android 4.1 and up | 4.4 | Yes |
| Voice FX | Android 4.0.3 and up | 3.8 | Yes |
| Voice Changer Plus | iOS 8.0 or later | 4.8 | Yes |
Conclusion
Everybody enjoys a good joke, and the apps we featured in this article enable you to have a lot of fun while experimenting with different voice modulation options. All of the voice effects these apps offer can change a voice automatically, but if you would like to alter the voices in your videos you must choose an app that supports this option. Which of the best voice changer apps for iPhone and Android devices are you going to choose? Leave a comment, and share your opinions with us.
Benjamin Arango
Benjamin Arango is a writer and a lover of all things video.
Follow @Benjamin Arango
Benjamin Arango
Mar 27, 2024• Proven solutions
Have you ever wondered what your voice would sound like if you were a cartoon character, a robot, or an older version of yourself? Changing how your voice sounds has never been easier, regardless of the Smartphone model you have, since voice changer apps can be used on both iPhone and Android devices.
Even though there is nothing wrong with modulating your voice to have fun with your friends, using voice changer apps to pull malicious pranks or bully strangers online is far from acceptable. Read on if you would like to find out more about the best voice changer apps for iPhone and Android devices and discover the one you enjoy using the most.
Best Voice Changer Apps for iPhone and Android
Creating a new ringtone, making a voice recording, or having fun with your friends are only a few reasons why so many people choose to try out voice changer apps. The vast majority of these apps feature well-equipped audio effects libraries that enable users to have fun with their friends and hear how they would sound if they were drunk or after inhaling helium. So, let’s take a look at some of the best voice changer apps on the market.
Changing video voice on Windows and Mac with Wondershare Filmora
Do you want to change the voice in video on Windows and Mac and don’t know which software can meet this requirement? Try Filmra video editor , which provides several ways to change voice over, such as changing the voice speed or changing the pitch. Download the trial version below and find out more possibility in video creation with Filmora.
1. Celebrity Voice Changer – Face
Price: Free, but offers in-app purchases
Compatibility: iOS 9.0 or later
User Rating: 4.0
In case you would like to sound like your favorite movie star of TV host, then Celebrity Voice Changer is one of the best choices you can make. Besides the standard set of options, the app also lets you request new voices since its machine learning technology can mimic virtually anyone’s voice. However, Celebrity Voice Changer is currently only available in English and it cannot modulate speech in other languages. In addition, you must make an in-app purchase in order to gain access to all of the app’s features or unlock the unlimited usage of the app.
Pros
- Automatic voice modulation
- Huge selection of voice filters
- The app generates video files that are better adjusted to the audience on social media than audio files
- Excellent impressions of celebrities
Cons
- Unreasonably expensive
- The app’s Deep Learning technology still has a lot of room for improvement
2. Snapchat
Price: Free, but offers in-app purchases
Compatibility: iOS 10.0 or later, Android 4.4 or up
User Rating: 3.8
With more than 203 million daily users, Snapchat is one of the largest messaging platforms on the market. Previously, we’ve shared how to change gender on Snapchat , beside that, the app lets its users capture short moments or the so-called Snaps and share them with friends. In addition to hundreds of video filters , Snapchat also features a broad spectrum of voice changing effects that make Snaps more entertaining. Even so, the audio recording options Snapchat offers are far from ideal, because the app doesn’t allow you to edit the files you create with it. Using Snapchat will drain your battery quickly, which is why you must pay attention to how frequently you use this app.
Pros
- The easy voice modulation process
- Excellent messaging options
- Grants you access to a large community of likeminded people
- Lenses and filters are updated on a daily basis
Cons
- Editing voice changes after you create a Snap is not possible
- Snapchat is not primarily a voice changer app
Check the detailed information about How to Change Voice on Snapchat with 2 Easy Methods >>
3. Voice Changer
Price: Free
Compatibility: Android 4.1 and up
User Rating: 4.3
Changing your voice with this app won’t take more than a few moments of your time. You just have to launch the app and hit the microphone button to record a message or a joke you would like to modulate. Once you’re happy with the audio recording you made, you can proceed to choose from more than twenty voice effects that will make you sound like a dwarf, a robot, or an alien. The app’s file-sharing capabilities enable you to post your audio recordings to any social media platform of your choosing or store your files and use them as many times as you want.
Pros
- Entertaining and easy to use
- The simple three-step voice modulation process
- Good selection of voice filters
- Excellent file sharing options
Cons
- The app displays ads
- No audio editing tools
4. Voicy: Celebrity Voice Changer
**Price:**Free, but offers in-app purchases
Compatibility: iOS 10 or later
User Rating: 4.3
Impersonating your favorite celebrity can be a fun way to prank your friends on social media. Voicy features a broad selection of celebrity voice impersonations you can use to make you sound like a famous actress or TV personality. The app utilizes a machine learning technology that can generate more than forty avatars and allows the users to experiment with different voice effects. The free version of the app offers only limited capabilities, so if you want to gain access to all of the Voicy’s features, you must choose a weekly, monthly or an annual subscription.
Pros
- Equipped with a powerful machine learning technology
- Offers a vast selection of voice avatars
- The quick voice modification process
- A great choice if you want to make a parody
Cons
- More expensive than the competition
- Support only the English language
5. Video Voice Changer – Fun Editor
Price: Free, but offers in-app purchases
Compatibility: iOS 8.0 or later
User Rating: 4.4
Changing the voices in the videos you record with your iPhones or iPads is a straightforward process that takes a minimum amount of effort. You can either use this iOS-based app to capture videos you’re going to dub or import them from the albums in which they are stored. The Video Voice Changer app is a great option if you want to dub videos directly from your phone because it enables you to change the voices in your videos and make them sound like mice, bears or ghosts. There are over thirty voice effects to choose from, so you can easily pick the one that best fits the video you’re editing.
Pros
- Equipped with video recording tools
- Excellent dubbing features
- A rich selection of voice effects
- Allows users to share their creations on Facebook, Instagram, and other social media platforms
Cons
- You must make an in-app purchase to unlock all of the app’s features
- No audio mixing options
6. Video Voice Changer FX
**Price:**Free, but offers in-app purchases
Compatibility: Android 4.1 and up
User Rating: 4.1
This is a simple app, anyone can use to change the voices in a video. Simply upload a video file from an SD card in your phone and choose an audio effect you want to apply. The app’s collection of funny voices includes options like echo, squirrel, space ship or chipmunk. As soon as you select the voice effect you want to add to a video, the app will start generating a new video that will be saved to your phone. Sharing the videos you edit with Video Voice Changer FX to social media directly from the app is not an option.
Pros
- Fun and easy to use
- Great price to performance ratio
- Changing a voice requires just a few taps
- Allows users to switch between effects while the video is playing
Cons
- No audio or video recording capability
- Doesn’t support social media sharing
7. Squeak Voice Changer
**Price:**Free, but offers in-app purchases
Compatibility: Android 4.3 and up
User Rating: 3.9
Every joke you want to share with your online friends is going to be a little funnier if you record it with Squeak Voice Changer. You just have to tap on the Record button and choose one of the available effects. Each voice changing effect this app offers is represented by a character so you should select Jamie the Jolly if you want to make your voice sound like you’re at a party or Bruce the Sentimental Bot if you want your voice to sound artificial. All the recordings you make with Squeak Voice Changer can be easily shared on social media.
Pros
- Equipped with audio recording options
- Cute and memorable characters that represent voice effects
- Inexpensive and fun to use
- Functional app design
Cons
- Poor selection of voice effects
- The AI only recognizes the English language
8. Voice Changer with Effects
**Price:**Free
Compatibility: Android 4.1 and up
User Rating: 4.5
This Android-based app is designed to make fun and easy since voice modulation features enable you to play voice recording backward or change your voice to sound robotic or even alien. Besides recording your voice, the app also lets you modulate pre-recorded sounds and save them to your phone or use them as ringtones or notification sounds. Furthermore, the app lets you add sounds to images and share them to Facebook. The Voice Changer with Effects enables you to share all audio files you process with it to any of the most popular social media platforms.
Pros
- The app has over 50,000,000 installs
- Equipped with a text to voice feature
- Setting a new ringtone with this app is easy
- Supports editing of pre-recorded audio files
Cons
- Contains ads
- No audio or video editing options
9. Voice Changer
**Price:**Free
Compatibility: Android 4.1 and up
User Rating: 4.4
If you are looking for an Android app that lets you modulate your voice quickly and effortlessly, then Voice Changer may be one of the best options you can find on the market. You can record your voice by simply tapping on the microphone and speaking into your phone’s speaker and then apply one of the audio effects this app offers. Optionally, you can import an audio file you already recorded into the app and then apply Martian, Foreigner, Giant or Child effects to your voice recording. The best part is that you can apply each effect to the audio files you’re editing as many times as you want.
Pros
- Loads of funny effects
- Simple audio recording setup
- Intuitive and modernly designed interface
- Enables users to share audio files via Bluetooth or social media platforms
Cons
- No video editing tools
- The quality of output audio files can vary
10. Voice FX
**Price:**Free, but offers in-app purchases
Compatibility: Android 4.0.3 and up
User Rating: 3.8
Modulating voices in all types of audio files is a straightforward and fun process that can be completed in just a few taps. During the audio recording session, you can apply all voice effects to the sound you are recording and stream it live to your web browsers or media players you’re using. Voice FX changes your voice in real time, which enables you to preview your results before deciding if you want to save them. All files you export from this app will be saved in the MP3 format so you can use them as ringtones on your Android device.
Pros
- Allows users to modulate pre-recorded audio files
- Voice effects are applied in real time
- Offers live streaming features
- Exports files in the MP3 format
Cons
- Prone to glitches
- A limited selection of voice effects
11. Voice Changer Plus
**Price:**Free, but offers in-app purchases
Compatibility: iOS 8.0 or later
User Rating: 4.8
iPhone and iPad owners in need of a voice changer app that grants them complete creative freedom over the modulation of the voices they record, should consider using the Voice Changer Plus. The app features more than fifty voice effects and it provides support for voiceover recordings. Moreover, you can edit all your audio files even after you saved them, enabling you to find new ways to improve your recordings over time. Voice Changer Plus is also equipped with trim controls, so you can remove all parts of your audio files you don’t want to share with your friends on social media.
Pros
- Offers more voice effects than most of its competitors
- Provides voiceover recording options
- Users can trim their audio files
- All audio recordings can be edited after the voice modulation
Cons
- In-app purchase is required in order to unlock all of the app’s features
- Modulating audio in video files is not an option
Below is a quick comparison table among these voice changer apps, hope it will be helpful.
| App | Supported OS | User Rating | Voice Templates |
|---|---|---|---|
| Celebrity Voice Changer - Face | iOS 9.0 or later | 4.0 | Yes |
| Snapchat | iOS 10.0 or later, Android 4.4 or up | 3.8 | No |
| Voice Changer by e3games | Android 4.1 and up | 4.3 | Yes |
| Voicy: Celebrity Voice Changer | iOS 10 or later | 4.3 | Yes |
| Video Voice Changer – Fun Editor | iOS 8.0 or later | 4.4 | Yes |
| Video Voice Changer FX | Android 4.1 and up | 4.1 | Yes |
| Squeak Voice Changer | Android 4.3 and up | 3.9 | Yes |
| Voice Changer with Effects | Android 4.1 and up | 4.5 | Yes |
| Voice Changer | Android 4.1 and up | 4.4 | Yes |
| Voice FX | Android 4.0.3 and up | 3.8 | Yes |
| Voice Changer Plus | iOS 8.0 or later | 4.8 | Yes |
Conclusion
Everybody enjoys a good joke, and the apps we featured in this article enable you to have a lot of fun while experimenting with different voice modulation options. All of the voice effects these apps offer can change a voice automatically, but if you would like to alter the voices in your videos you must choose an app that supports this option. Which of the best voice changer apps for iPhone and Android devices are you going to choose? Leave a comment, and share your opinions with us.
Benjamin Arango
Benjamin Arango is a writer and a lover of all things video.
Follow @Benjamin Arango
Quick Guide to Disabling Zoom Microphones on PC/Mac and iOS Devices
Zoom Meeting is a beneficial application, and video conferencing is on another level because of this app. Zoom offers high-quality audio and video. With this conferencing app, cross-platform messaging is also possible, and you can also schedule your meeting calendar with Zoom.
Many offices conduct formal meetings through Zoom. During the pandemic era, online classes were taken through Zoom. Sometimes, you wish to mute the mic and sit back. What bothers you is that you don’t know how to mute audio in zoom. If this is your case, then stay with us. We are about to discuss how you can mute zoom audio.
In this article
01 How to Mute Zoom Audio on Windows and Mac
02 How to Mute Zoom Audio on iPhone and Android
03 Tips To Optimize Zoom Audio Settings for Better Performance
04 Frequently Asked Questions about Zoom
Part 1. How to Mute Zoom Audio on Windows and Mac
Imagine you are having a meeting on Zoom, and there are a lot of people in the meeting. You are trying to do some office work, but their voices disturb you. You cannot even leave the meeting. What are you going to do now? Are you going to submit average quality work?
One thing that you can do is to mute audio on Zoom. The question is, do you know how to mute the microphone on zoom? Let us share the steps that will help you to mute Zoom audio on your Windows or Mac.
Step 1: First of all, open the desktop Zoom app and start a call. Then, for the options to appear on the screen, you need to move the cursor.
Step 2: To mute any participant, bring the cursor over their name. The options will appear. You can click on the blue ‘Mute’ button to mute them. Or else, you can open a pop-up menu by right-clicking on the participants’ names. There, select the option of ‘Mute Audio.’ You can unmute them in the same way.

Step 3: If you are the meeting host, you can manage all participants at once. For that, look at the bottom toolbar hit the ‘Manage Participants’ tab. Zoom meeting will display the total count of the participants in a sidebar on the screen. Along with the participants’ names, a microphone and video icon will also appear.

Step 5: If you are the meeting host, then you can mute individual participants. You have to bring the cursor over the microphone icon. A ‘Mute’ and ‘Unmute’ buttons will show up.

Step 6: Being the host, you can ‘Mute All’ and ‘Unmute All’ participants at once by clicking on these buttons at the bottom. A pop-up will appear on the screen, don’t forget to check the box. With this, the participants can unmute themselves.
Step 7: Also, the participants receive a message if the host is muting or unmuting everyone. To complete the process and apply the changes, hit the ‘Continue’ button.

Part 2. How to Mute Zoom Audio on iPhone and Android
Zoom meeting is compatible with Windows, Mac, Android, and also iPhone. You don’t need to always join zoom meetings with your computer. Sometimes, you join zoom with your mobile. In any case, you might need to mute zoom audio. Sadly, you don’t know how to mute Zoom audio. Let us share an easy step-by-step guideline to do this on both Android and iPhone.
Step 1: If you want to mute the sound of your mobile device, then in the top left corner, tap on the volume button. You will see ‘X’ appears over the speaker icon. You can tap on it again to play the sound.

Step 2: Being the host, you can manage participants. For that, look at the bottom and click on the ‘Participants’ tab. A pop-up will appear on your screen, and you can individually mute participants. For this, you need to hit the microphone icon visible next to the participants’ names. You can easily reverse this and unmute it by tapping on the microphone icon again. You can also manage the settings by clicking on the participant’s name.

Step 3: The host has the authority to Mute all participants at once. For this, the host needs to tap on the ‘Mute All’ button from the bottom. The host needs to check the box. This will allow the participants to unmute themselves.

Step 4: Lastly, once you are done and satisfied with everything, hit the ‘Close’ option. This will close the participants’ window.
Part 3. Tips To Optimize Zoom Audio Settings for Better Performance
Although Zoom meeting is itself an amazing app with so many different features, among those features, one is that Zoom has high-quality video and audio. Besides everything, you can still improve Zoom Audio’s performance by following the tips that are shared below.
· Reduce Background Noise
Your audio performance is instantly improved if you reduce background noise. Any disturbing noise in the background falls under this category. It can be the fan, air conditioning, ticking clocks, etc. You should move away from the noise.
· Use High-Quality Microphone
For better audio performance, use a high-quality microphone for your Zoom meetings. This factor is the most important factor when it comes to improving audio. Investing in a decent and good external microphone is never a bad option.
· Stable Internet Connection
With a weak internet connection, your voice breaks. If you want to have improved Zoom audio performance, then make sure that you have a stable internet connection. Distortion and disturbance cause problems while communicating.
· Distance from Microphone
You must sit at an average distance from your microphone. Sitting too close will sound like you are shouting. Whereas sitting too far, your voice is quieter, and background noise sounds loud. So, measure the appropriate distance from the microphone.
Part 4. Frequently Asked Questions about Zoom
1. Can you mute Zoom audio without muting the computer?
Yes, you can mute zoom without muting your computer. For Windows, look at the bottom right corner. Right-click on the speaker/volume icon. A pop-up menu will appear; from there, select ‘Open Volume Mixer.’ When Volume Mixer appears on the screen, turn down and mute the volume for Zoom Meetings.
In case you are a Mac user, then let us tell you what to do. During the Zoom call, click on the Zoom Meetings Control for Audio. Then select the option of ‘Audio Settings.’ From the audio setting panel, you can turn down the volume for the ‘Speaker.’ This lowers the volume for Zoom meetings and can even mute it.
2. How can I improve my zoom video quality?
Various ways could be adopted to improve the video quality for Zoom meetings. For instance, you can use the ‘Touch up my Appearance’ feature. Or else, you can enable HD, apply Studio Effects, enable Zoom’s Low Light Adjustment setting, etc.
3. How do I change the resolution of a video Zoom?
For changing the resolution of Zoom video, firstly open Zoom on either your mobile or computer. Then, head over to the ‘Settings’ section. There, you need to select ‘Video Quality’ settings. Lastly, check the box with HD. This will enable the HD option, and your device will stream high-quality videos.
4. How do you set a virtual background on Zoom without a green screen?
For setting a virtual background on Zoom, you firstly need to sign in to your account. After that, you should open the ‘Settings’ by clicking on your profile picture. From settings, select ‘Virtual Background.’ Now, you can add the image that you want as your virtual background. You can even upload any image and video by hitting the ‘+’ sign.
5. Where do you get zoom backgrounds?
Zoom website offers a variety of cool virtual backgrounds. You can easily download them and use them. In comparison, there is another site that offers free backgrounds. You can also download virtual background images from Unsplash and use them easily.
Final Thoughts
Now are days, Zoom Meeting is being widely used. This article will surely increase your knowledge regarding Zoom Audio. We have shared the steps for both computer and mobile for Zoom mute microphone. We also shared tips that will help you improve the Zoom audio performance.
02 How to Mute Zoom Audio on iPhone and Android
03 Tips To Optimize Zoom Audio Settings for Better Performance
04 Frequently Asked Questions about Zoom
Part 1. How to Mute Zoom Audio on Windows and Mac
Imagine you are having a meeting on Zoom, and there are a lot of people in the meeting. You are trying to do some office work, but their voices disturb you. You cannot even leave the meeting. What are you going to do now? Are you going to submit average quality work?
One thing that you can do is to mute audio on Zoom. The question is, do you know how to mute the microphone on zoom? Let us share the steps that will help you to mute Zoom audio on your Windows or Mac.
Step 1: First of all, open the desktop Zoom app and start a call. Then, for the options to appear on the screen, you need to move the cursor.
Step 2: To mute any participant, bring the cursor over their name. The options will appear. You can click on the blue ‘Mute’ button to mute them. Or else, you can open a pop-up menu by right-clicking on the participants’ names. There, select the option of ‘Mute Audio.’ You can unmute them in the same way.
Step 3: If you are the meeting host, you can manage all participants at once. For that, look at the bottom toolbar hit the ‘Manage Participants’ tab. Zoom meeting will display the total count of the participants in a sidebar on the screen. Along with the participants’ names, a microphone and video icon will also appear.
Step 5: If you are the meeting host, then you can mute individual participants. You have to bring the cursor over the microphone icon. A ‘Mute’ and ‘Unmute’ buttons will show up.
Step 6: Being the host, you can ‘Mute All’ and ‘Unmute All’ participants at once by clicking on these buttons at the bottom. A pop-up will appear on the screen, don’t forget to check the box. With this, the participants can unmute themselves.
Step 7: Also, the participants receive a message if the host is muting or unmuting everyone. To complete the process and apply the changes, hit the ‘Continue’ button.
Part 2. How to Mute Zoom Audio on iPhone and Android
Zoom meeting is compatible with Windows, Mac, Android, and also iPhone. You don’t need to always join zoom meetings with your computer. Sometimes, you join zoom with your mobile. In any case, you might need to mute zoom audio. Sadly, you don’t know how to mute Zoom audio. Let us share an easy step-by-step guideline to do this on both Android and iPhone.
Step 1: If you want to mute the sound of your mobile device, then in the top left corner, tap on the volume button. You will see ‘X’ appears over the speaker icon. You can tap on it again to play the sound.
Step 2: Being the host, you can manage participants. For that, look at the bottom and click on the ‘Participants’ tab. A pop-up will appear on your screen, and you can individually mute participants. For this, you need to hit the microphone icon visible next to the participants’ names. You can easily reverse this and unmute it by tapping on the microphone icon again. You can also manage the settings by clicking on the participant’s name.
Step 3: The host has the authority to Mute all participants at once. For this, the host needs to tap on the ‘Mute All’ button from the bottom. The host needs to check the box. This will allow the participants to unmute themselves.
Step 4: Lastly, once you are done and satisfied with everything, hit the ‘Close’ option. This will close the participants’ window.
Part 3. Tips To Optimize Zoom Audio Settings for Better Performance
Although Zoom meeting is itself an amazing app with so many different features, among those features, one is that Zoom has high-quality video and audio. Besides everything, you can still improve Zoom Audio’s performance by following the tips that are shared below.
· Reduce Background Noise
Your audio performance is instantly improved if you reduce background noise. Any disturbing noise in the background falls under this category. It can be the fan, air conditioning, ticking clocks, etc. You should move away from the noise.
· Use High-Quality Microphone
For better audio performance, use a high-quality microphone for your Zoom meetings. This factor is the most important factor when it comes to improving audio. Investing in a decent and good external microphone is never a bad option.
· Stable Internet Connection
With a weak internet connection, your voice breaks. If you want to have improved Zoom audio performance, then make sure that you have a stable internet connection. Distortion and disturbance cause problems while communicating.
· Distance from Microphone
You must sit at an average distance from your microphone. Sitting too close will sound like you are shouting. Whereas sitting too far, your voice is quieter, and background noise sounds loud. So, measure the appropriate distance from the microphone.
Part 4. Frequently Asked Questions about Zoom
1. Can you mute Zoom audio without muting the computer?
Yes, you can mute zoom without muting your computer. For Windows, look at the bottom right corner. Right-click on the speaker/volume icon. A pop-up menu will appear; from there, select ‘Open Volume Mixer.’ When Volume Mixer appears on the screen, turn down and mute the volume for Zoom Meetings.
In case you are a Mac user, then let us tell you what to do. During the Zoom call, click on the Zoom Meetings Control for Audio. Then select the option of ‘Audio Settings.’ From the audio setting panel, you can turn down the volume for the ‘Speaker.’ This lowers the volume for Zoom meetings and can even mute it.
2. How can I improve my zoom video quality?
Various ways could be adopted to improve the video quality for Zoom meetings. For instance, you can use the ‘Touch up my Appearance’ feature. Or else, you can enable HD, apply Studio Effects, enable Zoom’s Low Light Adjustment setting, etc.
3. How do I change the resolution of a video Zoom?
For changing the resolution of Zoom video, firstly open Zoom on either your mobile or computer. Then, head over to the ‘Settings’ section. There, you need to select ‘Video Quality’ settings. Lastly, check the box with HD. This will enable the HD option, and your device will stream high-quality videos.
4. How do you set a virtual background on Zoom without a green screen?
For setting a virtual background on Zoom, you firstly need to sign in to your account. After that, you should open the ‘Settings’ by clicking on your profile picture. From settings, select ‘Virtual Background.’ Now, you can add the image that you want as your virtual background. You can even upload any image and video by hitting the ‘+’ sign.
5. Where do you get zoom backgrounds?
Zoom website offers a variety of cool virtual backgrounds. You can easily download them and use them. In comparison, there is another site that offers free backgrounds. You can also download virtual background images from Unsplash and use them easily.
Final Thoughts
Now are days, Zoom Meeting is being widely used. This article will surely increase your knowledge regarding Zoom Audio. We have shared the steps for both computer and mobile for Zoom mute microphone. We also shared tips that will help you improve the Zoom audio performance.
Also read:
- Updated 2024 Approved Enhancing Narrative Flow Advanced Methods for Cross-Clip Integration
- Updated The Insiders Guide to Removing Background Noise From Videos in Adobe Premiere Pro for 2024
- Discovering Authentic Canine Vocalizations in Sound Libraries for 2024
- Updated In 2024, Creative Commons Chorus Compilation for Slideshow Synthesis
- Pioneering Linux Audio Capture Discovering the Five Most-Loved Recorders and Tips for Excellence for 2024
- Updated The Best Free Online DAW Software Your 2023 Guide to Browser-Based Recording
- 2024 Approved The Ultimate Guide to Music-Driven Editing Perfect Pacing with Beat Alignment in Final Cut Pro X
- Updated Unveiling MAGIX Samplitudes Capabilities Are They Superseding Competitors?
- Cutting-Edge Pop Playlist Ideal Background Music for Video Content Creation for 2024
- Advanced Audio Setup Installing and Removing Audacity From Chrome OS Devices
- Updated In 2024, Practical Guidelines Enhancing Communication on Discord Through Voxy Voice Alteration
- Mastering Audio Recording Techniques Androids Leading Competitors to Audacity for 2024
- New Redefining Virtual Conversations The Ultimate Guide to Employing the Voxal Voice Alteration in Discord Communities
- Updated Best Free Ways to Remove Static Noise From Audio in Seconds
- Updated Comparative Analysis of MAGIX Samplitude with Other Audio Workstations for 2024
- Androids Best Face-to-Face Apps The Ultimate List for 2024
- New Comparing Leading Virtual Chat Websites Whats Better than Omegle Today?
- New Music Meets Motion Advanced Techniques for Beats Alignment in Final Cut Pro X for 2024
- New In 2024, Thunderous Acclaim Synthesizer
- Updated Master Effortless Audio Enhancement with These 7 Online Audio Processors
- Updated Premier Noise-Canceling Software for Enhancing Music and Speech Clarity
- New From Cloud to Disk The Comprehensive Guide to Extracting Songs From Spotify Playlists
- New 2024 Approved Optimal Auto Tuneshop with Mac Compatibility
- 10 FREE Online MP3 to Text Converters-Wondershare Filmora for 2024
- New Navigating Vocaroos Sound Recording Procedures Insights and Options
- Voice Capture Made Easy The Ultimate Mac Users Guide for High-Quality Recordings
- Updated The Ultimate List of 8 Powerful DAW Options Revolutionize Your Music Production Process
- Updated In 2024, The Ultimate Guide to Silencing Background Sounds in Studio Recordings
- Updated The Art of Auditory Alignment Selecting Ideal Frequency Filters
- Innovative Communication How to Preserve Your Discussions Using Google Voice for 2024
- In 2024, Ultimate Selection Top-Rated Montage Anthems
- New Demystifying Clubhouse Understanding the Social Networks Foundation, Purpose, and Potential Impact
- Updated 2024 Approved Trimming MP4 Content A Focus on Solo Soundtrack
- 2024 Approved Pushing Boundaries Top 15 Revolutionary Songs in Rock
- In 2024, Unleash Your Inner Producer Explore the Best 8 DAW Apps Available on Android
- New The Best Batch MP3 Conversion Services with Text Output – Compatible with SmoothVideoPro for 2024
- Something You May Need To Know About Rap Music for 2024
- In 2024, Getting Acquainted with Google Play Musics Integrated Podcast Listening Capabilities
- New How to Convert WhatsApp Audio to MP3 in the Quickest Way for 2024
- Updated 12 Aesthetic GIF Instagram for Marketers
- What Is an AI Presentation Maker? | Wondershare Virbo Glossary
- New Free and Unrestricted 10 Top Video Editing Apps for Android for 2024
- New Top Free Online Resources to Blur Image Backgrounds for 2024
- How to Detect and Stop mSpy from Spying on Your Gionee F3 Pro | Dr.fone
- Updated In 2024, Elevate Your Lessons Top 10 Educational Animation Software
- How to Track a Lost Samsung Galaxy F54 5G for Free? | Dr.fone
- Updated In 2024, Quick Answer What Is a GIF File?
- How To Transfer WhatsApp From iPhone 12 Pro Max to Android? | Dr.fone
- 2024 Approved The Art of Visual Storytelling A Beginners Guide to Professional Movie Making
- In 2024, Why is iPogo not working On Vivo Y100i? Fixed | Dr.fone
- New 2024 Approved Shake It Off How to Remove Camera Shake in Adobe Premiere Pro
- 4 Ways to Fix Android Blue Screen of Death On Tecno Spark 20 | Dr.fone
- How Can We Bypass Nokia C110 FRP?
- Top 5 Motorola G54 5G Bypass FRP Tools for PC That Actually Work
- In 2024, Easy Steps to Loop YouTube Videos on iPhone
- How does the stardust trade cost In pokemon go On Honor Magic 6? | Dr.fone
- 8 Best Apps for Screen Mirroring Google Pixel 7a PC | Dr.fone
- How to Unlock iPhone 13 Without Passcode? | Dr.fone
- In 2024, How to get the dragon scale and evolution-enabled pokemon On Vivo Y28 5G? | Dr.fone
- Updated Try This Simple Trick to Make Instant 3D GIF that Pops Out of Your Screen. Here Are a Few Memorable Examples of the Most Popular 3D GIFs
- New In 2024, Popular Tips on Learning Animate Rigging
- How to Simulate GPS Movement in AR games On Nokia C12? | Dr.fone
- How To Fix Unresponsive Phone Touchscreen Of Huawei Nova Y71 | Dr.fone
- Tips and Tricks for Apple ID Locked Issue From iPhone 6s
- Full Guide to Catch 100 IV Pokémon Using a Map On Honor 90 Lite | Dr.fone
- Title: New 2024 Approved Mastering the Connection Linking Your AirPods to a Windows or Mac Computer
- Author: Ella
- Created at : 2024-05-05 02:33:49
- Updated at : 2024-05-06 02:33:49
- Link: https://sound-optimizing.techidaily.com/new-2024-approved-mastering-the-connection-linking-your-airpods-to-a-windows-or-mac-computer/
- License: This work is licensed under CC BY-NC-SA 4.0.
