
:max_bytes(150000):strip_icc():format(webp)/TwitterVideoDownload-5b605aaac9e77c002c3a42f3.jpg)
New In 2024, 13 Free Music Production Software for Windows/Mac/Online
“13+ Accessible No-Cost Audio Engineering Applications for All Platforms [Updated 2023]”
13 Free Music Production Software for Windows/Mac/Online

Benjamin Arango
Mar 27, 2024• Proven solutions
13 Free Music Production Software for Windows/Mac/Online
Technology advances have spread through all fields of human activity, including music recording and development. The invention of music development tools has made it simpler for people engaged in the creation of music in one form or another.
Numerous applications for music development are on the market, and some are meant for musicians, and others are for educators and teachers. There is also a need to direct prospective customers to the right free music production software.
A comprehensive analysis of some of the best music development tools has been conducted to help you make the correct decision while you’re ready to purchase the app. This comprehensive Music Production Software Guide will provide solutions to many of your unanswered questions relating to the purchase of music production software.
- Part 1: Free Music Production Software for Windows
- Part 2: Free Music Production Software for Mac
- Part 3: Free Music Production Software Online
Part 1: Free Music Production Software for Windows
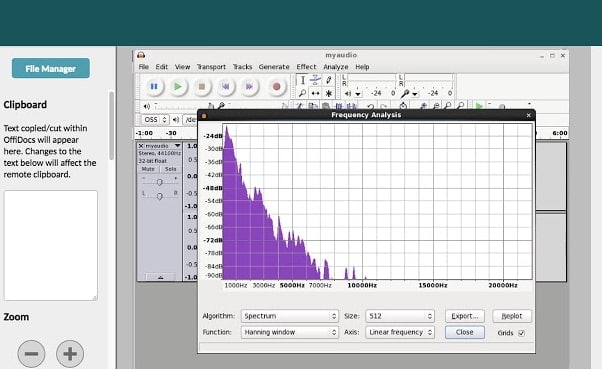
1. Audacity
The system for music development is not complete without an audio editor. Audacity is the best free music creation software available on the market. Audacity is open-source and extensive and provides a wide range of tools and effects for performing all audio editing and recording activities. It is created by a community of volunteers and provides regular notifications almost every month. It’s lightweight, safe, and intuitive enough to be used by novice music makers.
Pros
- It is open-source
- It can load VST plugins
Cons
- Only 32-bit plugins are allowed
- Limited features
2. Ardour
Ardour is a highly integrated program of music production that allows users to record and edit on Mac, Linux, and Windows operating systems. Ardour Music Production Software was created by integrating the efforts of the world’s skilled team, such as recording technicians, programmers, and musicians. Such experienced technicians make their concerted and thorough efforts to build the program. Ardour is one of the few applications in music production that respects honesty. The accessibility of this program allows app developers to concentrate on functionality that matters to consumers rather than to construct compelling apps for advertising purposes. This is a system that should be celebrated for its user-focused functionality.
Pros
- It has excellent user-friendliness
- It is available on Mac, Linux, and Windows
Cons
- It lacks a few integral features
- It is difficult to operate for people new to audio editing

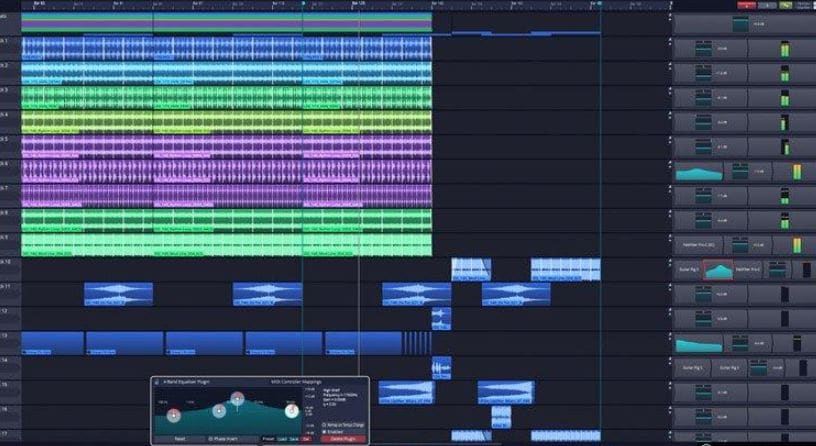
3. Tracktion T7
The people at Tracktion seem to have reached a reasonably canny business model by launching older DAW versions for free and without anything removed.
The convention appears to make it possible to access the edition without charge of two iterations before the new one. You will not be provided with all new functionality, but you will receive an update every time the company updates its flagship DAW, which it does nearly every year.
The growing section is adjustable to match the workflow, and the bottom panel adjusts so that any parameters anywhere on the screen can be seen.
Pros
- It features an unlimited number of audio and MIDI tracks
- It is able to host multiple plugin formats
Cons
- It doesn’t provide all the features at once
- It does not support many plugins
4. LMMS
LMMS is a fully free music production software for windows for music development. It is an open-source and also a project platform for the community. LMMS is a cross-platform device app. It makes it easier to manufacture beats, particularly when many music production professionals have to manufacture quality music with their computers.
Thanks to the powerful sample, beat and melody design, mixing and synthetic sound processes, and many other features, the LMMS music production software provides high-quality audio output. The product also features playback tools, plugins, and samples to produce powerful, high-quality sound.
Pros
- It is compatible with Linux, Windows, and Mac
- Hydrogen project files and MIDI can be imported easily for editing
Cons
- It eats a lot of memory and requires a high-end device to support it
- Some users complained that understanding its working is difficult

5. Cakewalk
This is an exciting app for music production to purchase. It is a fantastic tech to invest in music production. Cakewalk Sonar Artist Software is one of Cakewalk Sonar Artist ‘s great productions. Cakewalk is known for an excellent GUI, an excellent mixing console, an excellent commercial radio system, and limitless MIDI tracks.
A good device to use as part of your instruments for the development of music is the Cakewalk Sonar Artist Music Production program. It stands out as a program packed with excellent features amongst its counterparts. And the app is unmatched in the area of apps.
Pros
- You can share music compilation directly to social media
- You can easily add effects to your tracks
Cons
- It is priced, very high
- One window interface makes it hectic

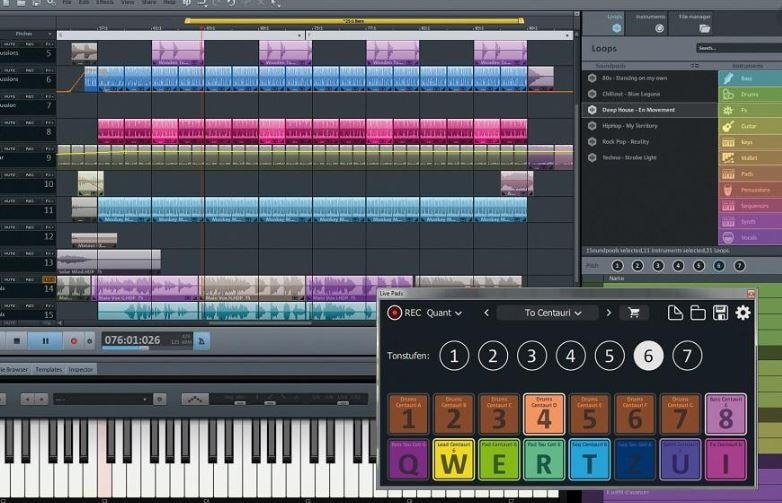
6. Music Maker by Magix
This app is a special program for sound engineers, skilled musicians, and accomplished music producers, developed by US Magix Entertainment. It offers an excellent forum for creative music development in music production professionals.
In reality, the software for music production is excellent software for the Music Maker by Magix. In the field of music post-production and music mastering, mixing and arrangement, recording, and more, the software achieved remarkable breakthroughs. Thanks to the successful combination of a technical device and highly flexible workflow, the Music Maker by Magix has achieved this groundbreaking success.
With creative algorithm and superb plugin effects, the Music Maker by Magix program enables music manufacturers to develop their ideas in line with the highest quality in this industry.
Pros
- It is great for EDM producers
Cons
- It is not suitable for newbies
- The GUI feels a bit cluttered
Part 2: Free Music Production Software for Mac
7. Garageband
This is a music development studio app that is designed to function on Mac. It is a great free music production software for Mac. This software has a full sound collection, which includes virtual instruments, voice, and guitar preset.
GarageBand is a well-known app for music development and is an excellent tool for music beginners. Many people have chosen GarageBand because it does not match the ease and ease of use for recording purposes in particular.
The user-friendly interface makes you easy to create music with a more unobstructed view of what you’re recording. Apps from GarageBand captured the attention of others because of their ease-to-use and user-friendliness.
Pros
- The software offers some nicely packaged preset for vocal and guitar recording
- Productive workflow
Cons
- It has limited plugins
- It is only supported for Mac platforms

8. Ableton Live
The Ableton Live 10 Suite is a dynamic and comprehensive program for the creation and performance of musical recordings.
An essential feature of this software is that it allows you to work on your time-based workflow without affecting the live session. This means that the software gives you a rare chance to get involved with the workflow without stopping live performance.
The Multitrack Recording Technology of Ableton Live10 Suite allows music producers to adjust the speed and pacing of any audio during the recording. To make these adjustments, you don’t have to pause the recording. This is one of the striking characteristics which makes this product a good option for all.
Pros
- Adjusting the speed and pace of audio is a delight
- Sophisticated MIDI/audio routing capabilities
Cons
- It has a traditional design
- Not enough updates to fix the buggy features

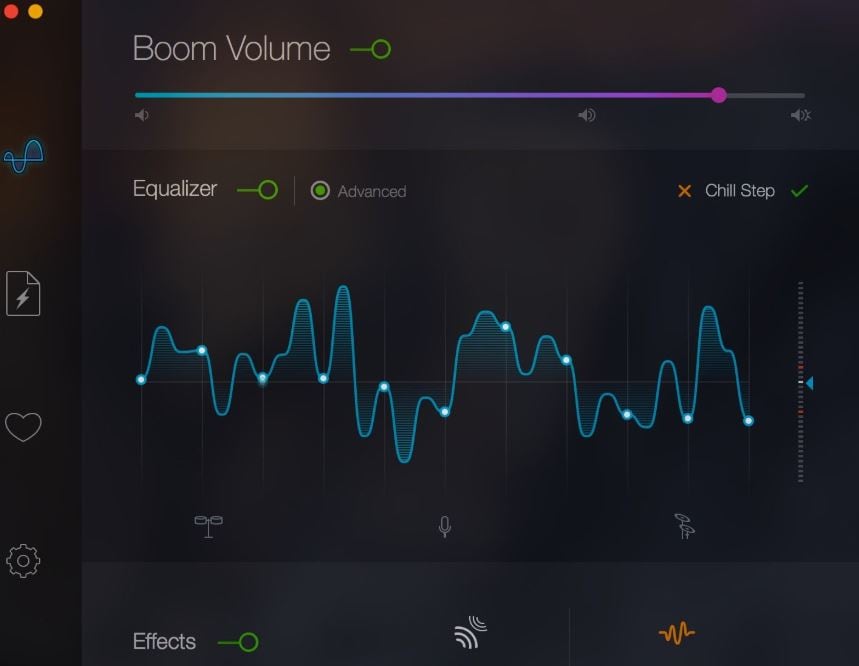
9. Boom 3D
Boom 3D for Mac & Windows is an award-winning pro sound improvement software designed to play your media content on any and all of your devices, phones, or streaming services with amazing 3D effects. No costly headphones or sound boosters will be needed to make your music feel like it! Designed in a new immersive 3D surround sound technology, Boom 3D redefines how people listen to music, watch films, or play games with some headphones on their devices. 3D sound provides the option to check the LFE (subwoofer), and the audio intensity of each Virtual 3D Surround audio system speaker.
Pros
- It comes with loads of content
- Audio quality can be enhanced
Cons
- The design is not suitable for everybody
- It does not have a Linux version
10. Mixxx
For beginners, Mixxx is just another great device. This is also one of the best free music production software downloads for your music. This software supports all Mac, Windows, and Linux platforms.
The application provides you with a DJ-mixing environment and supports all standard formats such as Mp3 and many other formats.
Pros
- It is a great app for beginners
- Supported by Mac, Windows, and Linux
Cons
- It doesn’t support many plugins
- GUI isn’t that great

Part 3: Free Music Production Software Online
11. Soundation
Soundation is a platform that provides free music production software online only capabilities. The free version and three paid versions are offered. You can use this to build your tracks unless you have the resources to do so if you need a web-based music maker and editor.
If you pay, even after you have made your music, you can always cancel. Remember first to save them to your hard drive. If you need paid characteristics, pay for the monthly plan again through PayPal, and you have to use it for a month.
Pros
- Great SSL-modelled mixer
- You can use its devices as a plugin
Cons
- It works only online

12. Audiotool
Audiotool is a popular app for music production hosted online and can be used without installation from inside your browser. It uses a cloud-based network to store all your music and files wherever you are. It is also confirmed that you will share music and tracks directly with YouTube, SoundCloud, and Facebook on its own publishing site. They have premium releases from Loopmasters and some fantastic online VSTs, for example, Heisenberg, Machiniste, Bassline, and Beatbox 8 & 9.
Pros
- No installation needed
- You can directly share it to your social media
Cons
- It works only online
- No upgrades

13. Soundtrap
Soundtrap is not only an online music studio but a training site for students and instructors. The STEAM Curriculum is an online learning resource that helps students to follow music and podcasts, incorporated into the Web app. As we mentioned earlier, in addition to the online Web App, you can also use it on different devices, share it with other users, and work in innovative projects for your music.
The interface is simple, easy to use, and easy to understand. It is simply an instrument for innovation; you don’t have to learn how to apply VST or any other technical elements to music creation. You can also record your MIDI instruments directly from your machine or device’s mic.
Pros
- It provides a great platform for teachers to teach their students
- It is very easy to use
Cons
- It only has a limited number of plugins
- It cannot be used professionally

Conclusion
If you make music on a computer, the most important resource in your artistic arsenal is your DAW; in your home recording system, you ‘re probably going to have the MIDI keyboard, audio interface, studio monitor speakers, and maybe a microphone or two. But your program is at the core of it all. Not everyone can afford expensive DAWs, but one must not worry as free music production software are present to aid us.
It is important to have a DAW with which you are pleased and, perhaps more importantly, a DAW, which allows you to turn your ideas into music as quickly and painlessly as possible. So make sure you choose the best one for you according to your needs. Hopefully, this guide will aid you!


Benjamin Arango
Benjamin Arango is a writer and a lover of all things video.
Follow @Benjamin Arango
Benjamin Arango
Mar 27, 2024• Proven solutions
13 Free Music Production Software for Windows/Mac/Online
Technology advances have spread through all fields of human activity, including music recording and development. The invention of music development tools has made it simpler for people engaged in the creation of music in one form or another.
Numerous applications for music development are on the market, and some are meant for musicians, and others are for educators and teachers. There is also a need to direct prospective customers to the right free music production software.
A comprehensive analysis of some of the best music development tools has been conducted to help you make the correct decision while you’re ready to purchase the app. This comprehensive Music Production Software Guide will provide solutions to many of your unanswered questions relating to the purchase of music production software.
- Part 1: Free Music Production Software for Windows
- Part 2: Free Music Production Software for Mac
- Part 3: Free Music Production Software Online
Part 1: Free Music Production Software for Windows
1. Audacity
The system for music development is not complete without an audio editor. Audacity is the best free music creation software available on the market. Audacity is open-source and extensive and provides a wide range of tools and effects for performing all audio editing and recording activities. It is created by a community of volunteers and provides regular notifications almost every month. It’s lightweight, safe, and intuitive enough to be used by novice music makers.
Pros
- It is open-source
- It can load VST plugins
Cons
- Only 32-bit plugins are allowed
- Limited features
2. Ardour
Ardour is a highly integrated program of music production that allows users to record and edit on Mac, Linux, and Windows operating systems. Ardour Music Production Software was created by integrating the efforts of the world’s skilled team, such as recording technicians, programmers, and musicians. Such experienced technicians make their concerted and thorough efforts to build the program. Ardour is one of the few applications in music production that respects honesty. The accessibility of this program allows app developers to concentrate on functionality that matters to consumers rather than to construct compelling apps for advertising purposes. This is a system that should be celebrated for its user-focused functionality.
Pros
- It has excellent user-friendliness
- It is available on Mac, Linux, and Windows
Cons
- It lacks a few integral features
- It is difficult to operate for people new to audio editing
3. Tracktion T7
The people at Tracktion seem to have reached a reasonably canny business model by launching older DAW versions for free and without anything removed.
The convention appears to make it possible to access the edition without charge of two iterations before the new one. You will not be provided with all new functionality, but you will receive an update every time the company updates its flagship DAW, which it does nearly every year.
The growing section is adjustable to match the workflow, and the bottom panel adjusts so that any parameters anywhere on the screen can be seen.
Pros
- It features an unlimited number of audio and MIDI tracks
- It is able to host multiple plugin formats
Cons
- It doesn’t provide all the features at once
- It does not support many plugins
4. LMMS
LMMS is a fully free music production software for windows for music development. It is an open-source and also a project platform for the community. LMMS is a cross-platform device app. It makes it easier to manufacture beats, particularly when many music production professionals have to manufacture quality music with their computers.
Thanks to the powerful sample, beat and melody design, mixing and synthetic sound processes, and many other features, the LMMS music production software provides high-quality audio output. The product also features playback tools, plugins, and samples to produce powerful, high-quality sound.
Pros
- It is compatible with Linux, Windows, and Mac
- Hydrogen project files and MIDI can be imported easily for editing
Cons
- It eats a lot of memory and requires a high-end device to support it
- Some users complained that understanding its working is difficult
5. Cakewalk
This is an exciting app for music production to purchase. It is a fantastic tech to invest in music production. Cakewalk Sonar Artist Software is one of Cakewalk Sonar Artist ‘s great productions. Cakewalk is known for an excellent GUI, an excellent mixing console, an excellent commercial radio system, and limitless MIDI tracks.
A good device to use as part of your instruments for the development of music is the Cakewalk Sonar Artist Music Production program. It stands out as a program packed with excellent features amongst its counterparts. And the app is unmatched in the area of apps.
Pros
- You can share music compilation directly to social media
- You can easily add effects to your tracks
Cons
- It is priced, very high
- One window interface makes it hectic
6. Music Maker by Magix
This app is a special program for sound engineers, skilled musicians, and accomplished music producers, developed by US Magix Entertainment. It offers an excellent forum for creative music development in music production professionals.
In reality, the software for music production is excellent software for the Music Maker by Magix. In the field of music post-production and music mastering, mixing and arrangement, recording, and more, the software achieved remarkable breakthroughs. Thanks to the successful combination of a technical device and highly flexible workflow, the Music Maker by Magix has achieved this groundbreaking success.
With creative algorithm and superb plugin effects, the Music Maker by Magix program enables music manufacturers to develop their ideas in line with the highest quality in this industry.
Pros
- It is great for EDM producers
Cons
- It is not suitable for newbies
- The GUI feels a bit cluttered
Part 2: Free Music Production Software for Mac
7. Garageband
This is a music development studio app that is designed to function on Mac. It is a great free music production software for Mac. This software has a full sound collection, which includes virtual instruments, voice, and guitar preset.
GarageBand is a well-known app for music development and is an excellent tool for music beginners. Many people have chosen GarageBand because it does not match the ease and ease of use for recording purposes in particular.
The user-friendly interface makes you easy to create music with a more unobstructed view of what you’re recording. Apps from GarageBand captured the attention of others because of their ease-to-use and user-friendliness.
Pros
- The software offers some nicely packaged preset for vocal and guitar recording
- Productive workflow
Cons
- It has limited plugins
- It is only supported for Mac platforms
8. Ableton Live
The Ableton Live 10 Suite is a dynamic and comprehensive program for the creation and performance of musical recordings.
An essential feature of this software is that it allows you to work on your time-based workflow without affecting the live session. This means that the software gives you a rare chance to get involved with the workflow without stopping live performance.
The Multitrack Recording Technology of Ableton Live10 Suite allows music producers to adjust the speed and pacing of any audio during the recording. To make these adjustments, you don’t have to pause the recording. This is one of the striking characteristics which makes this product a good option for all.
Pros
- Adjusting the speed and pace of audio is a delight
- Sophisticated MIDI/audio routing capabilities
Cons
- It has a traditional design
- Not enough updates to fix the buggy features
9. Boom 3D
Boom 3D for Mac & Windows is an award-winning pro sound improvement software designed to play your media content on any and all of your devices, phones, or streaming services with amazing 3D effects. No costly headphones or sound boosters will be needed to make your music feel like it! Designed in a new immersive 3D surround sound technology, Boom 3D redefines how people listen to music, watch films, or play games with some headphones on their devices. 3D sound provides the option to check the LFE (subwoofer), and the audio intensity of each Virtual 3D Surround audio system speaker.
Pros
- It comes with loads of content
- Audio quality can be enhanced
Cons
- The design is not suitable for everybody
- It does not have a Linux version
10. Mixxx
For beginners, Mixxx is just another great device. This is also one of the best free music production software downloads for your music. This software supports all Mac, Windows, and Linux platforms.
The application provides you with a DJ-mixing environment and supports all standard formats such as Mp3 and many other formats.
Pros
- It is a great app for beginners
- Supported by Mac, Windows, and Linux
Cons
- It doesn’t support many plugins
- GUI isn’t that great
Part 3: Free Music Production Software Online
11. Soundation
Soundation is a platform that provides free music production software online only capabilities. The free version and three paid versions are offered. You can use this to build your tracks unless you have the resources to do so if you need a web-based music maker and editor.
If you pay, even after you have made your music, you can always cancel. Remember first to save them to your hard drive. If you need paid characteristics, pay for the monthly plan again through PayPal, and you have to use it for a month.
Pros
- Great SSL-modelled mixer
- You can use its devices as a plugin
Cons
- It works only online
12. Audiotool
Audiotool is a popular app for music production hosted online and can be used without installation from inside your browser. It uses a cloud-based network to store all your music and files wherever you are. It is also confirmed that you will share music and tracks directly with YouTube, SoundCloud, and Facebook on its own publishing site. They have premium releases from Loopmasters and some fantastic online VSTs, for example, Heisenberg, Machiniste, Bassline, and Beatbox 8 & 9.
Pros
- No installation needed
- You can directly share it to your social media
Cons
- It works only online
- No upgrades
13. Soundtrap
Soundtrap is not only an online music studio but a training site for students and instructors. The STEAM Curriculum is an online learning resource that helps students to follow music and podcasts, incorporated into the Web app. As we mentioned earlier, in addition to the online Web App, you can also use it on different devices, share it with other users, and work in innovative projects for your music.
The interface is simple, easy to use, and easy to understand. It is simply an instrument for innovation; you don’t have to learn how to apply VST or any other technical elements to music creation. You can also record your MIDI instruments directly from your machine or device’s mic.
Pros
- It provides a great platform for teachers to teach their students
- It is very easy to use
Cons
- It only has a limited number of plugins
- It cannot be used professionally
Conclusion
If you make music on a computer, the most important resource in your artistic arsenal is your DAW; in your home recording system, you ‘re probably going to have the MIDI keyboard, audio interface, studio monitor speakers, and maybe a microphone or two. But your program is at the core of it all. Not everyone can afford expensive DAWs, but one must not worry as free music production software are present to aid us.
It is important to have a DAW with which you are pleased and, perhaps more importantly, a DAW, which allows you to turn your ideas into music as quickly and painlessly as possible. So make sure you choose the best one for you according to your needs. Hopefully, this guide will aid you!
Benjamin Arango
Benjamin Arango is a writer and a lover of all things video.
Follow @Benjamin Arango
Innovative Audio Editing: Implementing and Designing Keyframes in Adobe Premiere Pro (Mac)
How to Create Audio Keyframes in Adobe Premiere Pro on Mac
Benjamin Arango
Aug 18, 2022• Proven solutions
Keyframing is one of the most vital components in post-production that can be applied to video and audio tracks. For instance, by adding keyframes in Premiere Pro, you can easily apply properties and values to a specific segment. To do this, you can set up an audio keyframe at the start and another one at the ending of the selected part.
Therefore, with the Premiere Pro keyframe options, you can achieve a gradual flow in your tracks. Without much ado, I’m going to help you set up audio keyframes in Premiere Pro with their vital operations in this post.
Part 1: How to Add Audio Keyframes in Adobe Premiere Pro on Mac?
As I have mentioned, to apply adjustments or properties to a specific point in the audio track, we can use Adobe Premiere keyframes. As of now, there are two kinds of keyframes in Adobe Premiere – Clip Keyframe and Track Keyframe. Before you start adding keyframes in Premiere Pro, you should know their difference.
- Clip Keyframes: This would apply audio effects for the selected clip (like adjusting the volume level). The audio keyframe will only apply to the clip that you have selected and not the entire track.
- Track Keyframes: These audio keyframes in Premiere are applied to the entire audio track (they have values like Volume and Mute).
Now when we have covered the basics, let’s learn how to set up audio keyframes in Premiere on your Mac.
Step 1: Add the Audio Track on Adobe Premiere Pro
To start with, you can launch Adobe Premiere Pro, go to your Project > Import, and simply load any audio track. You can also drag and drop any audio file to the project as well.

Once the audio track is added to the project, you can further drag and drop it to the sequence section (timelines) at the bottom.

Step 2: Show Keyframes for the Track
The application would automatically render different keyframes already present in the track. For this, you need to first select the ribbon of your audio track from the timeline. Now, just right-click on the working area and click on the “Show Audio Keyframes” button from the context menu.

If you want, you can also click on the “Show Keyframes” button that is depicted by a radio/circle icon on the timeline.

Step 3: Work on Audio Keyframes in Premiere Pro
Now, you can view either clip or track keyframes for the track. For this, you can just right-click the keyframe button on the timeline to get different options. Here, you can choose to get Clip or Track keyframes in Premiere Pro. There are options to mute the entire audio or set up its volume under the track option.

Once you have enabled the audio keyframe options in Premiere Pro, you can view keyframes in a highlighted color. You can now take the assistance of the Pen tool or press the CMD key on your Mac to select keyframes. This will let you select the starting and ending keyframes in Premiere Pro so that you can easily apply the desired effect to the selected segment.

Part 2: How to Fade Audio In/Out with Keyframes in Adobe Premiere Pro on Mac?
Once you have learned how to use the Adobe Premiere keyframe feature, you can apply all kinds of transitions and effects to a segment. Let’s suppose you wish to implement fade-in or out features for any segment. In this case, we will use the Clip Keyframing option in Premiere Pro to achieve these transitions the way we like.
Step 1: Get Clip Keyframes in Premiere Pro
Firstly, you can just add any audio track to your Premiere Pro project and drag it to the timeline. You can just click on the show keyframes button to start adding keyframes in Premiere Pro.
If you want, you can just right-click the track, go to the Show Clip Keyframes > Volume > Level option. This will show the level of the volume for different keyframes, letting you pick the right segments to fade in and out.

Step 2: Apply Fade-in or Out options
Once you have clip keyframes in your track, you can easily do whatever you like. You can use the Pen tool or press the CMD key on your Mac to select the starting and the ending of the clip.
Now, go to the audio segment from the timeline and simply place the audio level up (to fade-in) or down (to fade-out). You can set the audio levels for different segments the way you like to customize these operations in your audio track.

Pro Tip: Use Inbuilt Fade In/Out Transitions
With keyframes in Premiere Pro, you can certainly customize the fade in/out options. Though, if you are running short on time, then you can use its inbuilt features for audio adjustments.
For this, you can just go to its Effects > Audio Transitions option. To fade-out any clip, select the Crossfade > Exponential Fade and simply drag and drop to the location of your choice.

In the same way, you can also go to Effects > Audio Transitions > Crossfade and choose the “Constant Gain” feature. You can drag and drop the Contact Gain effect on any segment to implement the fade-in effect.
That’s a wrap, everyone! I’m sure that after reading this post, you would be able to set up audio keyframes in Adobe Premiere Pro. Since adding keyframes in Premiere can be done automatically, it would save your time in audio editing and post-production. Mostly, the clip audio keyframing is used in Adobe to customize the sound at any desired segment. Apart from fade-in or out, there are tons of other effects that you can apply to your audio tracks with the help of keyframes. Go ahead and try the Adobe Premiere Pro keyframing feature and let us know about your experience in the comments.
Benjamin Arango
Benjamin Arango is a writer and a lover of all things video.
Follow @Benjamin Arango
Benjamin Arango
Aug 18, 2022• Proven solutions
Keyframing is one of the most vital components in post-production that can be applied to video and audio tracks. For instance, by adding keyframes in Premiere Pro, you can easily apply properties and values to a specific segment. To do this, you can set up an audio keyframe at the start and another one at the ending of the selected part.
Therefore, with the Premiere Pro keyframe options, you can achieve a gradual flow in your tracks. Without much ado, I’m going to help you set up audio keyframes in Premiere Pro with their vital operations in this post.
Part 1: How to Add Audio Keyframes in Adobe Premiere Pro on Mac?
As I have mentioned, to apply adjustments or properties to a specific point in the audio track, we can use Adobe Premiere keyframes. As of now, there are two kinds of keyframes in Adobe Premiere – Clip Keyframe and Track Keyframe. Before you start adding keyframes in Premiere Pro, you should know their difference.
- Clip Keyframes: This would apply audio effects for the selected clip (like adjusting the volume level). The audio keyframe will only apply to the clip that you have selected and not the entire track.
- Track Keyframes: These audio keyframes in Premiere are applied to the entire audio track (they have values like Volume and Mute).
Now when we have covered the basics, let’s learn how to set up audio keyframes in Premiere on your Mac.
Step 1: Add the Audio Track on Adobe Premiere Pro
To start with, you can launch Adobe Premiere Pro, go to your Project > Import, and simply load any audio track. You can also drag and drop any audio file to the project as well.
Once the audio track is added to the project, you can further drag and drop it to the sequence section (timelines) at the bottom.
Step 2: Show Keyframes for the Track
The application would automatically render different keyframes already present in the track. For this, you need to first select the ribbon of your audio track from the timeline. Now, just right-click on the working area and click on the “Show Audio Keyframes” button from the context menu.
If you want, you can also click on the “Show Keyframes” button that is depicted by a radio/circle icon on the timeline.
Step 3: Work on Audio Keyframes in Premiere Pro
Now, you can view either clip or track keyframes for the track. For this, you can just right-click the keyframe button on the timeline to get different options. Here, you can choose to get Clip or Track keyframes in Premiere Pro. There are options to mute the entire audio or set up its volume under the track option.
Once you have enabled the audio keyframe options in Premiere Pro, you can view keyframes in a highlighted color. You can now take the assistance of the Pen tool or press the CMD key on your Mac to select keyframes. This will let you select the starting and ending keyframes in Premiere Pro so that you can easily apply the desired effect to the selected segment.
Part 2: How to Fade Audio In/Out with Keyframes in Adobe Premiere Pro on Mac?
Once you have learned how to use the Adobe Premiere keyframe feature, you can apply all kinds of transitions and effects to a segment. Let’s suppose you wish to implement fade-in or out features for any segment. In this case, we will use the Clip Keyframing option in Premiere Pro to achieve these transitions the way we like.
Step 1: Get Clip Keyframes in Premiere Pro
Firstly, you can just add any audio track to your Premiere Pro project and drag it to the timeline. You can just click on the show keyframes button to start adding keyframes in Premiere Pro.
If you want, you can just right-click the track, go to the Show Clip Keyframes > Volume > Level option. This will show the level of the volume for different keyframes, letting you pick the right segments to fade in and out.
Step 2: Apply Fade-in or Out options
Once you have clip keyframes in your track, you can easily do whatever you like. You can use the Pen tool or press the CMD key on your Mac to select the starting and the ending of the clip.
Now, go to the audio segment from the timeline and simply place the audio level up (to fade-in) or down (to fade-out). You can set the audio levels for different segments the way you like to customize these operations in your audio track.
Pro Tip: Use Inbuilt Fade In/Out Transitions
With keyframes in Premiere Pro, you can certainly customize the fade in/out options. Though, if you are running short on time, then you can use its inbuilt features for audio adjustments.
For this, you can just go to its Effects > Audio Transitions option. To fade-out any clip, select the Crossfade > Exponential Fade and simply drag and drop to the location of your choice.
In the same way, you can also go to Effects > Audio Transitions > Crossfade and choose the “Constant Gain” feature. You can drag and drop the Contact Gain effect on any segment to implement the fade-in effect.
That’s a wrap, everyone! I’m sure that after reading this post, you would be able to set up audio keyframes in Adobe Premiere Pro. Since adding keyframes in Premiere can be done automatically, it would save your time in audio editing and post-production. Mostly, the clip audio keyframing is used in Adobe to customize the sound at any desired segment. Apart from fade-in or out, there are tons of other effects that you can apply to your audio tracks with the help of keyframes. Go ahead and try the Adobe Premiere Pro keyframing feature and let us know about your experience in the comments.
Benjamin Arango
Benjamin Arango is a writer and a lover of all things video.
Follow @Benjamin Arango
BEST Video Voice Changer Apps
BEST Video Voice Changer Apps

Liza Brown
Mar 27, 2024• Proven solutions
Have you ever wanted to change your voice while making videos? Or change the voices in an existing video? You are not alone. Here are some questions people have asked on Yahoo Answer.
- Is there any free software you can download that can change your voice in an audio or video that has already been recorded?
- Hello, I’m making a video. I want to change my voice pitch to high, low, fast, and slow. I want to know if you know any easy and simple software. Thanks
Now comes the solution. I recommend Wondershare Filmora , a comprehensive video editing software much more accessible than Adobe After Effects. We’ll show you how to change a recorded voice or original voice in an existing video/audio with Wondershare Filmora. In the end, we also listed the three best video voice changer apps for Android and iOS for you to a reference. If you prefer to edit audio with online tools, you can also find one online voice changer at the end of the article.
- Part 1: How to change voice in the video with Filmora? [via Pitch & Speed]
- Part 2: Best voice changer apps for Android and iPhone
- Part 3: Change Voice in video online
For Win 7 or later (64-bit)
For macOS 10.12 or later
Part 1: Step-by-step guide to Change the Voices in Videos in Filmora
Filmora is one of the best video editing software for computer with easy-to-use yet powerful enough tools to edit videos and audio. For free trial users, if you’re exporting audio from Wondershare Filmora, there will be no watermark nor limitations. So, you can download it and experience the audio editing features for free.
![]()
A cross-platform for making videos anywhere for all creators

Why your video editing isn’t good enough? How about some creative inspo?
- 100 Million+ Users
- 150+ Countries and Regions
- 4 Million+ Social Media Followers
- 5 Million+ Stock Media for Use
* Secure Download

Now, with a step-by-step tutorial, let’s check how to add and change the voice in Filmora.
Step 1: Add voiceover or add videos
Wondershare Filmora allows you to change the voice of video/audio and recorded voiceover. You can either click “Import” on the primary windows to import video/audio files to the User’s Album or click the voiceover button above Timeline to record your own voice. The imported video/audio files could then be added to the Timeline for editing, while the recorded audio would automatically appear on the Audio track.

You will open the editing panel whenever you double-click on the added video/audio or recorded voiceover on the Timeline. You should see options such as Speed, Volume, Fade in, Fade out and Pitch.
Step 2: Change Voice by Changing Pitch Option
Both video/audio files and voiceover on the Timeline have the Pitch option. You could easily change the voice of video or reca orded voiceover through it. Just drag the little triangle button to the desired position. The value will vary from -12 to 12.

Step 3: Change Voice in Video by Setting Speed (Optional)
As you could see, there are 4 settings for the Speed option. The Video Speed option will take effect on both video and audio track you selected. For music files and voiceover, the Speed option also works but only affect the audio itself.

Step 4: Export changed video/audio
When you are satisfied with the changed voice, it’s time to save the video or audio. All popular video formats and MP3 audio formats are supported. To do so, click “Export” and select “Format”. From the list, choose a format you want and click “Export” button. The file will be exported to the specified folder on computer.

Tips: Always preview your video/audio on the preview windows to ensure it’s what you want before exporting.
Part 2: 3 Best Video Voice Changer Apps for iPhone and Android
Besides changing voice in video with the desktop software like Wondershare Filmora video editor, you can now try some video voice changer apps for Android and iPhone. The process is quite simple. Try out the video voice changer app that lets you change your voice throughout the video.
1. Video Voice Changer and Editor
You select a video and trim it or leave it as it is as per your choice. If you wish to trim the video, it is created and from this video, the audio part is separated. The list of voice effects includes the voice of men and women of various ages and chipmunks. You can select anyone from the list of voice effects and modify the audio file. You are then prompted to check the audio for changes or directly move on to create the video. The result is indeed amusing and hilarious.
Support: Android

2. Video Voice Changer FX
The video voice changer app helps you to make your viewers enjoy thoroughly when you change your voice to the sounds of various funny creatures. It is very simple as you just need to record a video or choose one from the SD card, select the voice effects like the devil, alien, robot, squirrel, etc. and your video is ready.
Support: Android

3. DubYou
Make your friends laugh with DubYou video voice changer app. From sharing your photos with a background commentary to making your pet talk, echo sound creation to changing the complete sound of the video, you can try all with this video voice changer and share it on the social network like Facebook, Vimeo, and more.
Support: iOS

We have also selected somebest pitch change apps for iOS and Android , hope you will enjoy changing pitch in video with those best pitch changer apps.
Part 3: Change Video Voice with Online Voice Changer
2. voicechanger.io

You can upload the audio from your computer or use the microphone to record your own voice over. Remember, the audio file is limited to 100 MB at uploading. This online voice changer provides about 50 voice templates that you can use including Dalek Robot, Alien Robot, Frog Robot, Ghost, and chipmunk.
You can download the changed voice in .wav format without any difficulty. Besides, voicechanger.io also allows you to create customizable voice by adding audio effects such as pitch shift, phaser, speed, and alien robot. It also provides a Female and Male voice to try if you don’t want to upload your own voice file.
Conclusion
Above are the simple free ways that you can change voice in videos. You can complete the voice changing via some desktop video editing software like Filmora or with the online video changer tool. Some good voice changer apps may not list above but please share your favorite in the comment and let me know your choice.
Liza Brown
Liza Brown is a writer and a lover of all things video.
Follow @Liza Brown
Liza Brown
Mar 27, 2024• Proven solutions
Have you ever wanted to change your voice while making videos? Or change the voices in an existing video? You are not alone. Here are some questions people have asked on Yahoo Answer.
- Is there any free software you can download that can change your voice in an audio or video that has already been recorded?
- Hello, I’m making a video. I want to change my voice pitch to high, low, fast, and slow. I want to know if you know any easy and simple software. Thanks
Now comes the solution. I recommend Wondershare Filmora , a comprehensive video editing software much more accessible than Adobe After Effects. We’ll show you how to change a recorded voice or original voice in an existing video/audio with Wondershare Filmora. In the end, we also listed the three best video voice changer apps for Android and iOS for you to a reference. If you prefer to edit audio with online tools, you can also find one online voice changer at the end of the article.
- Part 1: How to change voice in the video with Filmora? [via Pitch & Speed]
- Part 2: Best voice changer apps for Android and iPhone
- Part 3: Change Voice in video online
For Win 7 or later (64-bit)
For macOS 10.12 or later
Part 1: Step-by-step guide to Change the Voices in Videos in Filmora
Filmora is one of the best video editing software for computer with easy-to-use yet powerful enough tools to edit videos and audio. For free trial users, if you’re exporting audio from Wondershare Filmora, there will be no watermark nor limitations. So, you can download it and experience the audio editing features for free.
![]()
A cross-platform for making videos anywhere for all creators
Why your video editing isn’t good enough? How about some creative inspo?
- 100 Million+ Users
- 150+ Countries and Regions
- 4 Million+ Social Media Followers
- 5 Million+ Stock Media for Use
* Secure Download
Now, with a step-by-step tutorial, let’s check how to add and change the voice in Filmora.
Step 1: Add voiceover or add videos
Wondershare Filmora allows you to change the voice of video/audio and recorded voiceover. You can either click “Import” on the primary windows to import video/audio files to the User’s Album or click the voiceover button above Timeline to record your own voice. The imported video/audio files could then be added to the Timeline for editing, while the recorded audio would automatically appear on the Audio track.
You will open the editing panel whenever you double-click on the added video/audio or recorded voiceover on the Timeline. You should see options such as Speed, Volume, Fade in, Fade out and Pitch.
Step 2: Change Voice by Changing Pitch Option
Both video/audio files and voiceover on the Timeline have the Pitch option. You could easily change the voice of video or reca orded voiceover through it. Just drag the little triangle button to the desired position. The value will vary from -12 to 12.
Step 3: Change Voice in Video by Setting Speed (Optional)
As you could see, there are 4 settings for the Speed option. The Video Speed option will take effect on both video and audio track you selected. For music files and voiceover, the Speed option also works but only affect the audio itself.
Step 4: Export changed video/audio
When you are satisfied with the changed voice, it’s time to save the video or audio. All popular video formats and MP3 audio formats are supported. To do so, click “Export” and select “Format”. From the list, choose a format you want and click “Export” button. The file will be exported to the specified folder on computer.
Tips: Always preview your video/audio on the preview windows to ensure it’s what you want before exporting.
Part 2: 3 Best Video Voice Changer Apps for iPhone and Android
Besides changing voice in video with the desktop software like Wondershare Filmora video editor, you can now try some video voice changer apps for Android and iPhone. The process is quite simple. Try out the video voice changer app that lets you change your voice throughout the video.
1. Video Voice Changer and Editor
You select a video and trim it or leave it as it is as per your choice. If you wish to trim the video, it is created and from this video, the audio part is separated. The list of voice effects includes the voice of men and women of various ages and chipmunks. You can select anyone from the list of voice effects and modify the audio file. You are then prompted to check the audio for changes or directly move on to create the video. The result is indeed amusing and hilarious.
Support: Android
2. Video Voice Changer FX
The video voice changer app helps you to make your viewers enjoy thoroughly when you change your voice to the sounds of various funny creatures. It is very simple as you just need to record a video or choose one from the SD card, select the voice effects like the devil, alien, robot, squirrel, etc. and your video is ready.
Support: Android
3. DubYou
Make your friends laugh with DubYou video voice changer app. From sharing your photos with a background commentary to making your pet talk, echo sound creation to changing the complete sound of the video, you can try all with this video voice changer and share it on the social network like Facebook, Vimeo, and more.
Support: iOS
We have also selected somebest pitch change apps for iOS and Android , hope you will enjoy changing pitch in video with those best pitch changer apps.
Part 3: Change Video Voice with Online Voice Changer
2. voicechanger.io
You can upload the audio from your computer or use the microphone to record your own voice over. Remember, the audio file is limited to 100 MB at uploading. This online voice changer provides about 50 voice templates that you can use including Dalek Robot, Alien Robot, Frog Robot, Ghost, and chipmunk.
You can download the changed voice in .wav format without any difficulty. Besides, voicechanger.io also allows you to create customizable voice by adding audio effects such as pitch shift, phaser, speed, and alien robot. It also provides a Female and Male voice to try if you don’t want to upload your own voice file.
Conclusion
Above are the simple free ways that you can change voice in videos. You can complete the voice changing via some desktop video editing software like Filmora or with the online video changer tool. Some good voice changer apps may not list above but please share your favorite in the comment and let me know your choice.
Liza Brown
Liza Brown is a writer and a lover of all things video.
Follow @Liza Brown
Also read:
- 2024 Approved Top 8 Downloaded Audio Tracks Capturing Natural Precipitation Sounds
- New In 2024, Behind the Scenes with Lexis Audio Editor Expert Reviews and Practical Walkthroughs
- Updated 2024 Approved Premier Choices for Accessing Lofi Beats and Imagery
- Converting Audio to Text
- Updated The World of Vocal Manipulators An Overview, Testimonials, and Substitutes
- 2024 Approved The Step-by-Step Guide to Personalizing Mobile Notifications
- A Curated Selection Top 8 Streaming Audio Tools to Enhance Your Broadcasts for 2024
- Updated The Ultimate Compendium of Selecting Premium Audio Formats
- Shielding the Sound Comprehensive Guide to Dismissing Wind Turbulence in Recordings
- In 2024, The Ultimate Guide to Audio Recorders for Windows PCs Top 10 Picks
- New In 2024, Unleash the Power of Your Voice In-Depth Tutorial for Voice Change Using Audacity
- In 2024, Accelerating Audio on Windows The Leading 10 Tools for Immediate Volume Increase
- Updated Easy Voice Modification Utilities Functions and Comparisons
- New Adjusting Audio Levels in Digital Recordings
- Updated 2024 Approved Cyber Disturbances Audio Set - Unlimited, FREE
- Updated 2024 Approved How to Reduce Background Noise Using iMovie An Overview
- Updated 2024 Approved Techniques to Silence Audio Streams From New MKV File Versions
- Voice Clarity Revolution An Overview of Noise Reduction Strategies in Audio Editing Web Portals
- New Seeking Out Elaborate Zombie Soundtracks
- Updated Exploring Diverse Dog Bark and Yelp Sounds Resources
- New Unveiling Song Strings Top 10 Approaches to Eradicating Melodic Voices in Recordings
- New 2024 Approved Mac Audiophiles Guide to the Best 5 Audio Mixing Tools
- Updated Leading Audio-Modification Programs A Comprehensive Guide for 2024
- Updated 2024 Approved Converting MP3 Soundtracks Effortless Switch to MP4 Formats
- In 2024, Strategies for Creating Fluid Movement Between Video Segments
- Stranger Chat App Recommendations Safe, Functional, and Fun for 2024
- Solutions to Repair Corrupt Excel File 2000
- In 2024, 5 Easy Ways to Copy Contacts from Nubia Z50S Pro to iPhone 14 and 15 | Dr.fone
- How to Mirror PC Screen to Vivo Y200 Phones? | Dr.fone
- In 2024, Best Free Apple iPhone 11 Pro Max IMEI Checker
- In 2024, How to Change OnePlus Open Location on Skout | Dr.fone
- 2024 Approved Waht Is AI Pixel Art Generator?
- All Must-Knows to Use Fake GPS GO Location Spoofer On Infinix Smart 8 Pro | Dr.fone
- Three Solutions to Hard Reset Vivo Y28 5G? | Dr.fone
- New 2024 Approved Unlocking the Power of 16X9 Top 5 Calculator Tips
- How to Transfer Photos From Vivo X100 Pro to Samsung Galaxy S21 Ultra | Dr.fone
- 3 Solutions to Hard Reset Vivo Y55s 5G (2023) Phone Using PC | Dr.fone
- The FCPX Fix-It Guide Solving Common Problems and Optimizing Workflow for 2024
- How To Update or Downgrade Apple iPhone 11 Pro Max Without Losing Data? | Dr.fone
- Updated 2024 Approved Free Video Flipper Software Rotate Your Videos Online
- 5 Easy Ways to Change Location on YouTube TV On Poco C65 | Dr.fone
- In 2024, Latest way to get Shiny Meltan Box in Pokémon Go Mystery Box On Samsung Galaxy S23 Tactical Edition | Dr.fone
- In 2024, How To Leave a Life360 Group On Oppo A59 5G Without Anyone Knowing? | Dr.fone
- In 2024, How to Remove Forgotten PIN Of Your Infinix Smart 8 HD
- Easy Video Editing Software for Beginners for 2024
- Top IMEI Unlokers for Your OnePlus Ace 2V Phone
- In 2024, A Quick Guide to ZTE Blade A73 5G FRP Bypass Instantly
- Boost Engagement with the Right Video Aspect Ratio on Instagram
- In 2024, Detailed guide of ispoofer for pogo installation On Samsung Galaxy F04 | Dr.fone
- How To Bypass iCloud By Checkra1n Even On Apple iPhone 15 Pro Max If Youve Tried Everything
- Strategies for Apps That Wont Download From Play Store On Xiaomi 14 Ultra | Dr.fone
- Title: New In 2024, 13 Free Music Production Software for Windows/Mac/Online
- Author: Ella
- Created at : 2024-05-05 02:30:28
- Updated at : 2024-05-06 02:30:28
- Link: https://sound-optimizing.techidaily.com/new-in-2024-13-free-music-production-software-for-windowsmaconline/
- License: This work is licensed under CC BY-NC-SA 4.0.
