

New Optimize Your Streaming Quality with These Top 4 Video Boosters
Optimize Your Streaming Quality with These Top 4 Video Boosters
There are times when we download certain videos online and when we play the videos, the volume seems to be very low. Naturally, watching such videos is never going to be comfortable because you have to strain your attention to listen to the dialogues. Besides, the background sound effects will not be prominent which will make the video watching experience underwhelming. That is where an audio booster online tool is useful.
There is no need to download any video volume booster software or app as you will need such a tool occasionally. That is why a video volume booster online tool is more effective. You need to upload your video whichever has low volume and adjust the volume as per requirement. Thereafter, you can export the modified video to save it on your device storage. Here is the list of the top 4 sound booster online for videos.
2. VideoLouder
VideoLouder is free to use audio volume booster online tool. You can increase the volume of any video file that you have downloaded on your hard drive. The online tool supports video file size up to 500 MB. If you want, you can also decrease the volume of the video file. You can directly go to the website and upload the video to increase or decrease the volume. You can even select the number of decibels of sound you want to adjust. Here are the key features of VideoLouder volume booster tool.

- Increase or decrease volume for free.
- Supports different video file formats like AVI, MP4, MPEG, MOV.
- Allows setting the decibels for increase or decrease.
- Allows video file size up to 500 MB which is quite generous.
How to boost video volume online with VideoLouder?
Step 1: From your device web browser, visit <www.videolouder.com>.
Step 2: You will have to click on ‘Browse’ button and select the video file from your device storage whose volume you want to increase or decrease.
Step 3: You will have to click on Select Action and choose the option of the ‘Increase Volume’ or ‘Decrease Volume’ as per requirements.
Step 4: There is the option of ‘How many decibels (dB)?’ where you have to choose the decibel of your preference for increasing or decreasing that much decibel value of sound.
Step 5: Finally, you will have to click on ‘Upload File’ and wait patiently for the video file to get uploaded and volume to get boosted as per your settings.
Thereafter, you can save the file on your device storage and listen to the changes.
3. FileConverto
This is another legitimate MP4 volume booster online to adjust the volume of your video files. Not just MP4 files, you can upload different file formats including AVI and MOV. It is absolutely free to use and has an easy and simple user interface. However, just like other online volume boosters, it also lets you import video having a maximum size of 500 MB. Even FileConverto allows you to customize the decibels freely. Here are the features of FileConverto online tool.

- Can increase as well as decrease volume of video files.
- Ability to customize sound as per decibel requirements.
- Supports multiple video file formats apart from MP4.
- Does not require the setting up of any account.
How to Boost Video Volume Online with FileConverto?
Step 1**:** From your web browser, visit fileconverto.com/boost-video-volume
Step 2: Now click on Browse to select the video file from your device storage.
Step 3: From ‘Select desired action’ option, you will have to select ‘Increase Volume’ or ‘Decrease Volume’.
Step 4: You can set the dB accordingly from ‘How many decibels? option.
Step 5: Finally, click on Submit Now button and wait for the file to upload and volume to get adjusted.
4. Online Video Cutter Volume Booster
There is a wide collection of video editing tools available under Online Video Cutter. Volume Booster is specifically designed to increase the volume of video files. The user interface is better than most other video volume booster online tools. You can drag and drop your video file instantly on its user interface. In fact, you can even select video files from Google Drive and DropBox.
Moreover, you can also paste the URL of the video file such as from YouTube and boost its volume and thereafter, download the video file. You can also check its MP3 volume booster online for increasing or decreasing audio file volume. Here are the key features of Online Video Cutter Volume Booster tool.

- Drag and drop video file instantly.
- Upload video file from Google Drive and DropBox.
- Supports MP4, FLV, AVI, MOV, 3GP, MKV, WM and more file formats.
- Change video speed and preview the changes before downloading.
How to Boost Video Volume Online with Online Video Cutter Volume Booster**?**
Step 1: From your web browser, visit online-video-cutter.com/volume.
Step 2: Drag and drop your video file on the web interface.
Step 3: After the file is uploaded, click on Volume option. Adjust the slider at the bottom as per your requirement.
Step 4: Once done, click on Save button to save the modified video.
Bonus: Video Volume Booster Software
If you are looking for a dedicated software to boost the volume of your videos, we recommend Wondershare Filmora. A standalone software is useful when you have to boost the volume of multiple large video files. Uploading large video files online is a time-consuming as well as a heavy data-consumption process.
With Filmora, you can not only adjust the volume but also optimize various parameters of the audio in a video file. Filmora is a professional video editor and you can ever capture video through webcam as well as capture your screen video with system sound and mic audio. You can add video effects as well as audio effects during the editing phase and export the edited video files in different file formats.
Here are the steps to boost volume in Filmora.
Step 1: Download and install Filmora on your computer. Open the software and click on New Project.
For Win 7 or later (64-bit)
For macOS 10.12 or later
Step 2: Drag and drop your video file on the primary window. Thereafter, drag the video file on Video Timeline.

Step 3: Double-click on the video file to open Editing Panel. Go to Audio tab and adjust the volume and audio parameters to boost the overall volume. When done, click on Ok button.
Step 4: After adjusting, you can play the video to listen to the boosted volume. Finally, click on Export and save the edited video file to your hard drive.
The Bottom Line
Increasing the volume of a video to make the dialogues sound properly and amplify the background music is no more an issue. We have picked the best audio volume booster online where you can adjust video volume instantly. We have also recommended a professional sound booster software named Wondershare Filmora if you want to edit video volume on your computer.
How to boost video volume online with VideoLouder?
Step 1: From your device web browser, visit <www.videolouder.com>.
Step 2: You will have to click on ‘Browse’ button and select the video file from your device storage whose volume you want to increase or decrease.
Step 3: You will have to click on Select Action and choose the option of the ‘Increase Volume’ or ‘Decrease Volume’ as per requirements.
Step 4: There is the option of ‘How many decibels (dB)?’ where you have to choose the decibel of your preference for increasing or decreasing that much decibel value of sound.
Step 5: Finally, you will have to click on ‘Upload File’ and wait patiently for the video file to get uploaded and volume to get boosted as per your settings.
Thereafter, you can save the file on your device storage and listen to the changes.
3. FileConverto
This is another legitimate MP4 volume booster online to adjust the volume of your video files. Not just MP4 files, you can upload different file formats including AVI and MOV. It is absolutely free to use and has an easy and simple user interface. However, just like other online volume boosters, it also lets you import video having a maximum size of 500 MB. Even FileConverto allows you to customize the decibels freely. Here are the features of FileConverto online tool.
- Can increase as well as decrease volume of video files.
- Ability to customize sound as per decibel requirements.
- Supports multiple video file formats apart from MP4.
- Does not require the setting up of any account.
How to Boost Video Volume Online with FileConverto?
Step 1**:** From your web browser, visit fileconverto.com/boost-video-volume
Step 2: Now click on Browse to select the video file from your device storage.
Step 3: From ‘Select desired action’ option, you will have to select ‘Increase Volume’ or ‘Decrease Volume’.
Step 4: You can set the dB accordingly from ‘How many decibels? option.
Step 5: Finally, click on Submit Now button and wait for the file to upload and volume to get adjusted.
4. Online Video Cutter Volume Booster
There is a wide collection of video editing tools available under Online Video Cutter. Volume Booster is specifically designed to increase the volume of video files. The user interface is better than most other video volume booster online tools. You can drag and drop your video file instantly on its user interface. In fact, you can even select video files from Google Drive and DropBox.
Moreover, you can also paste the URL of the video file such as from YouTube and boost its volume and thereafter, download the video file. You can also check its MP3 volume booster online for increasing or decreasing audio file volume. Here are the key features of Online Video Cutter Volume Booster tool.
- Drag and drop video file instantly.
- Upload video file from Google Drive and DropBox.
- Supports MP4, FLV, AVI, MOV, 3GP, MKV, WM and more file formats.
- Change video speed and preview the changes before downloading.
How to Boost Video Volume Online with Online Video Cutter Volume Booster**?**
Step 1: From your web browser, visit online-video-cutter.com/volume.
Step 2: Drag and drop your video file on the web interface.
Step 3: After the file is uploaded, click on Volume option. Adjust the slider at the bottom as per your requirement.
Step 4: Once done, click on Save button to save the modified video.
Bonus: Video Volume Booster Software
If you are looking for a dedicated software to boost the volume of your videos, we recommend Wondershare Filmora. A standalone software is useful when you have to boost the volume of multiple large video files. Uploading large video files online is a time-consuming as well as a heavy data-consumption process.
With Filmora, you can not only adjust the volume but also optimize various parameters of the audio in a video file. Filmora is a professional video editor and you can ever capture video through webcam as well as capture your screen video with system sound and mic audio. You can add video effects as well as audio effects during the editing phase and export the edited video files in different file formats.
Here are the steps to boost volume in Filmora.
Step 1: Download and install Filmora on your computer. Open the software and click on New Project.
For Win 7 or later (64-bit)
For macOS 10.12 or later
Step 2: Drag and drop your video file on the primary window. Thereafter, drag the video file on Video Timeline.
Step 3: Double-click on the video file to open Editing Panel. Go to Audio tab and adjust the volume and audio parameters to boost the overall volume. When done, click on Ok button.
Step 4: After adjusting, you can play the video to listen to the boosted volume. Finally, click on Export and save the edited video file to your hard drive.
The Bottom Line
Increasing the volume of a video to make the dialogues sound properly and amplify the background music is no more an issue. We have picked the best audio volume booster online where you can adjust video volume instantly. We have also recommended a professional sound booster software named Wondershare Filmora if you want to edit video volume on your computer.
Leveraging Your Microphone with PowerPoint: Techniques for Efficient Audio Recording (Windows & macOS)
Pandemic times have bought us very close to technology and the computerized world. We used various tools and software, we also learned about much new software in this time. We even came across some amazing features of tools that we have been using since our childhood. One best example of this scenario is PowerPoint.
We have been working on PowerPoint, making slides for a long time, but we recently came across the PowerPoint record audio feature. This is the most helpful feature one could imagine. When you cannot express yourself and your point in words, then the use of this PowerPoint voice recording feature jumps in. Stay with us to learn more about audio recording on PowerPoint.
In this article
01 How to Record Audio on PowerPoint in Windows?
02 How to Record Audio on PowerPoint in Mac?
03 7 PowerPoint Presentation Tips to Make Creative Slideshows
Part 1: How to Record Audio on PowerPoint in Windows?
Powerpoint is a presentation-based program. The Microsoft Office product is available for both Windows and macOS. PowerPoint is mostly used in offices for demonstration purposes. It is widely used by teachers to deliver their lectures. With record voice-over PowerPoint, its users can make better presentations.
A question arises here that how to record audio in PowerPoint presentations? If this same question is riding on your mind, then the wait is over. Let us share the steps that should be followed to record audio on PowerPoint in Windows.
Step 1: Firstly, you should open PowerPoint and add a blank slide to record voice-over PowerPoint. You can also record any old presentation by opening the slide where you plan to record audio.

Step 2: then, from the top menu bar, you are requested to head over to the ‘Insert’ section. From the Insert section, select the ‘Media’ option visible at the extreme right side.

Step 3: The Media offers 3 further options. Among those options, you have to hit the ‘Audio’ option. This will open a drop-down from where you have to click on ‘Record Audio.’

Step 4: Now, a small window for Record Sound will show up. Here, set a name for your recording and hit the Record button to start the recording.

Step 5: Once you have completed the recording, click on the Stop button to end the recording and then hit the ‘Ok’ button to exit the recording window.

Step 6: At the end, a speaker icon will appear on the screen. When you hover on that icon, it will show the option to play the recording. You can adjust the speaker icon on the slide, and lastly, save your changes to PowerPoint.

Part 2: How to Record Audio on PowerPoint in Mac?
As mentioned earlier, PowerPoint is available for both Windows and macOS, so how can we forget about Mac users? This section of the article will be talking about how to record audio on a PowerPoint Mac. If you are a Mac user and you plan to learn about this, then the following section is for you. By following the steps below, you can record audio on Powerpoint in Mac.
Step 1: Firstly, open PowerPoint and create a new presentation to record voice-over PowerPoint in Mac. You can also import any file from your Mac to PowerPoint for audio recording.

Step 2: After that, you have to open the slide where you want to record the audio. Then from the menu bar at the top, navigate to the ‘Insert’ section. In the Insert section, there will be an ‘Audio’ tab. Tap on it and then select the ‘Record Audio’ option.

Step 3: At this point, a Record Audio panel will show up on the right side of the screen. From that panel, click on the ‘Record’ button to start the recording.

Step 4: After you have completed the recording, hit the ‘Stop’ button. Now, PowerPoint will ask you to either Insert or Discard the audio. Upon clicking on ‘Insert,’ a speaker icon will pop up on the screen. You can listen to your recording from that speaker icon.

Part 3: 7 PowerPoint Presentation Tips to Make Creative Slideshows
Now that all the Windows and Mac users are satisfied after learning about PowerPoint voice recording, it’s the perfect time to share some very useful tips. In the coming part, we are going to share 7 tips that will aid in making creative slideshows.
1. Minimalism
The most crucial tip when it comes to making creative slides is the amount of information. It is said that ‘Less is More.’ While making your slides, you should always add less information to the slides, and you should speak more.
The slides must contain minimal data. Too many wordy slides look boring, and they can never sustain your audiences’ interest. So, it is best suggested to add less and make your slides neat and spacious.
2. Use Design Elements
Adding stock images and background images is a very common trend for making slides. A tip that will make your slides unique and equally attractive is design elements. Choosing a bold color for the background and then adding elements to it makes them shine. The elements dominate on a strong colored background. Images can never be this dominating or expressive.
Also, changing the common trends will make your presentation different and classic as compared to regularly designed slides.
3. One Story at a Time
A very common mistake that people generally make because they are unaware of it is the content. The best practice for quality presentation slides is to add and discuss one story per slide. You should never confuse your audience by sharing multiple things from the same slide.
If you plan to discuss various things, then make separate slides for each story. This way, the audience gets sufficient time to digest and understand one story before moving on to another.
4. Alignment and Symmetry
While making your slides, one key factor that can either make or break your presentation is consistency and alignment. You should never present a rough slide. Always align the text, images, and headings of your slides. Symmetry and consistency are also very important. Follow the same consistent pattern in all slides.
5. Formatting and Settings
Making your slides creative doesn’t mean making them like a rainbow. Simplicity has its own magic and grace. The more your slide is simple and clean, the more readable it is. You should always keep simple colors for text and headings.
Playing with different fonts and styles for headings might also disturb your presentation visually. Selecting the correct font size, style with appropriate colors is essential.
6. Add and Adjust
Always follow the ‘Add and Adjust’ policy. You should never throw data and elements on the slides and present them. The best practice is to add the content, the images and then adjust everything. You should always arrange the text in bullets with proper headings.
For the case of an image, you should add it, inspect it and if needed, crop it. Adding things with perfection makes your presentation stand out and shine differently.
7. Animation
Static slides are too mainstream for today’s fast world. The last tip to make creative slides that can retain your audiences’ attention is animation. By adding a few animated elements to your presentation makes it look classy and quirky. With animation, you can also maintain the interest of your audience.
Last Words
The article has discussed in detail that how someone could record a voice-over PowerPoint. A complete step-by-step guideline has been shared for both Mac and Windows users on audio recording with PowerPoint. We also talked about 7 tips that will surely improve the quality of your slides.
By using the right and effective tool, you can still make creative slides without bothering to follow any tips. Such a tool is Filmora by Wondershare. This is an all-in-one video editing software. With Filmora, you can make the perfect video slideshow by adding multiple images.
You can collectively import images from your device to Filmora, or else you can also take things from its stock library. Filmora also has a wide range of editing effects, filters, and transitions that can make your content aesthetic and perfect.
Versatile Video Editor - Wondershare Filmora
An easy yet powerful editor
Numerous effects to choose from
Detailed tutorials provided by the official channel
02 How to Record Audio on PowerPoint in Mac?
03 7 PowerPoint Presentation Tips to Make Creative Slideshows
Part 1: How to Record Audio on PowerPoint in Windows?
Powerpoint is a presentation-based program. The Microsoft Office product is available for both Windows and macOS. PowerPoint is mostly used in offices for demonstration purposes. It is widely used by teachers to deliver their lectures. With record voice-over PowerPoint, its users can make better presentations.
A question arises here that how to record audio in PowerPoint presentations? If this same question is riding on your mind, then the wait is over. Let us share the steps that should be followed to record audio on PowerPoint in Windows.
Step 1: Firstly, you should open PowerPoint and add a blank slide to record voice-over PowerPoint. You can also record any old presentation by opening the slide where you plan to record audio.
Step 2: then, from the top menu bar, you are requested to head over to the ‘Insert’ section. From the Insert section, select the ‘Media’ option visible at the extreme right side.
Step 3: The Media offers 3 further options. Among those options, you have to hit the ‘Audio’ option. This will open a drop-down from where you have to click on ‘Record Audio.’
Step 4: Now, a small window for Record Sound will show up. Here, set a name for your recording and hit the Record button to start the recording.
Step 5: Once you have completed the recording, click on the Stop button to end the recording and then hit the ‘Ok’ button to exit the recording window.
Step 6: At the end, a speaker icon will appear on the screen. When you hover on that icon, it will show the option to play the recording. You can adjust the speaker icon on the slide, and lastly, save your changes to PowerPoint.
Part 2: How to Record Audio on PowerPoint in Mac?
As mentioned earlier, PowerPoint is available for both Windows and macOS, so how can we forget about Mac users? This section of the article will be talking about how to record audio on a PowerPoint Mac. If you are a Mac user and you plan to learn about this, then the following section is for you. By following the steps below, you can record audio on Powerpoint in Mac.
Step 1: Firstly, open PowerPoint and create a new presentation to record voice-over PowerPoint in Mac. You can also import any file from your Mac to PowerPoint for audio recording.
Step 2: After that, you have to open the slide where you want to record the audio. Then from the menu bar at the top, navigate to the ‘Insert’ section. In the Insert section, there will be an ‘Audio’ tab. Tap on it and then select the ‘Record Audio’ option.
Step 3: At this point, a Record Audio panel will show up on the right side of the screen. From that panel, click on the ‘Record’ button to start the recording.
Step 4: After you have completed the recording, hit the ‘Stop’ button. Now, PowerPoint will ask you to either Insert or Discard the audio. Upon clicking on ‘Insert,’ a speaker icon will pop up on the screen. You can listen to your recording from that speaker icon.
Part 3: 7 PowerPoint Presentation Tips to Make Creative Slideshows
Now that all the Windows and Mac users are satisfied after learning about PowerPoint voice recording, it’s the perfect time to share some very useful tips. In the coming part, we are going to share 7 tips that will aid in making creative slideshows.
1. Minimalism
The most crucial tip when it comes to making creative slides is the amount of information. It is said that ‘Less is More.’ While making your slides, you should always add less information to the slides, and you should speak more.
The slides must contain minimal data. Too many wordy slides look boring, and they can never sustain your audiences’ interest. So, it is best suggested to add less and make your slides neat and spacious.
2. Use Design Elements
Adding stock images and background images is a very common trend for making slides. A tip that will make your slides unique and equally attractive is design elements. Choosing a bold color for the background and then adding elements to it makes them shine. The elements dominate on a strong colored background. Images can never be this dominating or expressive.
Also, changing the common trends will make your presentation different and classic as compared to regularly designed slides.
3. One Story at a Time
A very common mistake that people generally make because they are unaware of it is the content. The best practice for quality presentation slides is to add and discuss one story per slide. You should never confuse your audience by sharing multiple things from the same slide.
If you plan to discuss various things, then make separate slides for each story. This way, the audience gets sufficient time to digest and understand one story before moving on to another.
4. Alignment and Symmetry
While making your slides, one key factor that can either make or break your presentation is consistency and alignment. You should never present a rough slide. Always align the text, images, and headings of your slides. Symmetry and consistency are also very important. Follow the same consistent pattern in all slides.
5. Formatting and Settings
Making your slides creative doesn’t mean making them like a rainbow. Simplicity has its own magic and grace. The more your slide is simple and clean, the more readable it is. You should always keep simple colors for text and headings.
Playing with different fonts and styles for headings might also disturb your presentation visually. Selecting the correct font size, style with appropriate colors is essential.
6. Add and Adjust
Always follow the ‘Add and Adjust’ policy. You should never throw data and elements on the slides and present them. The best practice is to add the content, the images and then adjust everything. You should always arrange the text in bullets with proper headings.
For the case of an image, you should add it, inspect it and if needed, crop it. Adding things with perfection makes your presentation stand out and shine differently.
7. Animation
Static slides are too mainstream for today’s fast world. The last tip to make creative slides that can retain your audiences’ attention is animation. By adding a few animated elements to your presentation makes it look classy and quirky. With animation, you can also maintain the interest of your audience.
Last Words
The article has discussed in detail that how someone could record a voice-over PowerPoint. A complete step-by-step guideline has been shared for both Mac and Windows users on audio recording with PowerPoint. We also talked about 7 tips that will surely improve the quality of your slides.
By using the right and effective tool, you can still make creative slides without bothering to follow any tips. Such a tool is Filmora by Wondershare. This is an all-in-one video editing software. With Filmora, you can make the perfect video slideshow by adding multiple images.
You can collectively import images from your device to Filmora, or else you can also take things from its stock library. Filmora also has a wide range of editing effects, filters, and transitions that can make your content aesthetic and perfect.
Versatile Video Editor - Wondershare Filmora
An easy yet powerful editor
Numerous effects to choose from
Detailed tutorials provided by the official channel
Essential Audio Software for Musicians: A Comprehensive List of Best Free & Paid Options 2023
FREE 10 Best Online Music Makers

Benjamin Arango
Apr 26, 2024• Proven solutions


Expressing ideas through music was never easy, and even today in the age of powerful digital audio stations like Ableton Live or FruityLoops , producing original music requires a certain set of skills. However, online content producers often need music for their videos, but they neither have the time or the budget to hire a professional musician to create a soundtrack for their project in studio conditions. If you are looking for a quick way to make your own music online, then you should keep reading, because in this article we are going to take you through the ten best online music makers you should check out in 2021.
10 Best Online Music Makers in 2021
The music-making platforms that are currently available online are still not as nearly as powerful as professional software products for music producers. Nonetheless, this doesn’t mean that you can’t use them to create the music you like or just have fun with them. Here are the ten best online music makers in 2019.
1. Typeatone
Price: Free
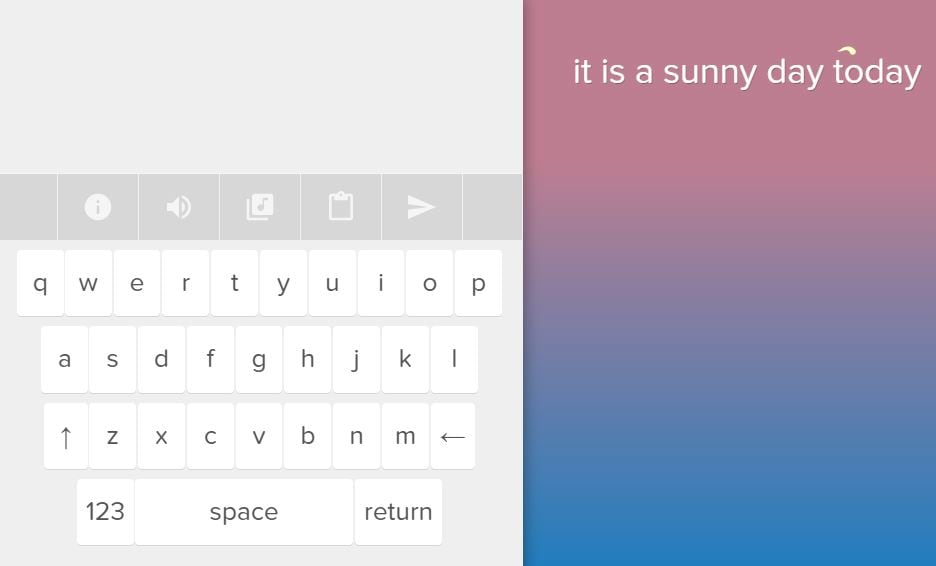
Image from Internet
Have you ever wondered what your words would sound like if they were turned into music? Head over to the Typeatone platform if you want to find out since all you have to do in order to start creating your own music is type in the text. As you type, the platform will automatically start playing your words and once you’re done, you’ll be able to hear your new song. You can also choose between different instruments to make the process of creating music with Typeatone even more entertaining. You can share all of your creations with your friends on social media.
![]()
A cross-platform for making videos anywhere for all creators

Why your video editing isn’t good enough? How about some creative inspo?
- 100 Million+ Users
- 150+ Countries and Regions
- 4 Million+ Social Media Followers
- 5 Million+ Stock Media for Use
* Secure Download

2. Audiotool
Price: Free
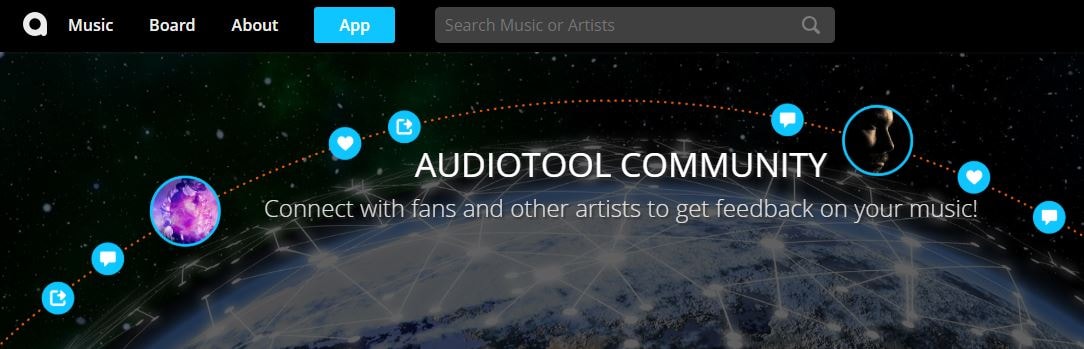
Image from Internet
Electronic music producers who often use synthesizers like Roland TB-303 or Roland TR-909 are going to love the features this online collaborative platform offers. Audiotool hosts a huge music library, you can explore even if you are not a registered user. In order to access the platform’s music studio, you first have to create an account and make sure that you are signed in. Audiotool is also a community of like-minded people where you can meet artists whose work you appreciate or hear what others think about your work. The only downside is that Audiotool’s abundance of features can be overwhelming for the newcomers to the world of electronic music production.
3. AudioSauna
Price: Free
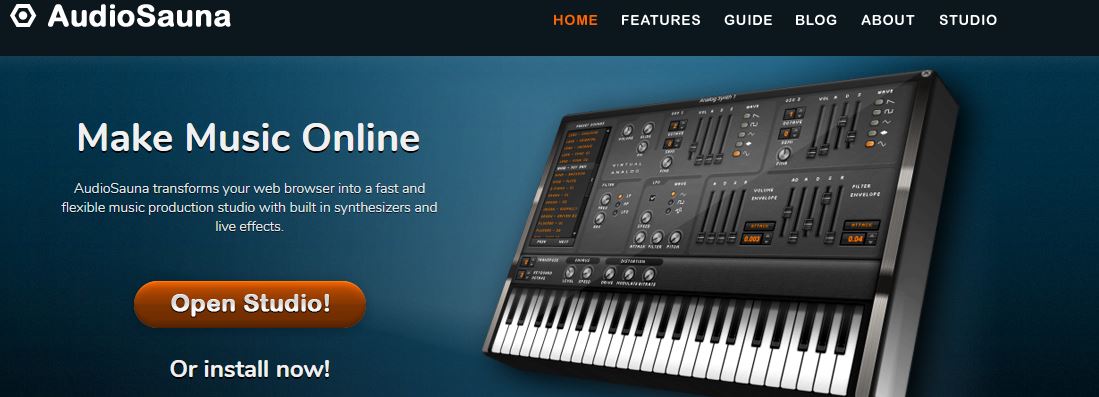
Image from Internet
AudioSauna seems to offer everything its users need to create inspiring music because it is equipped with frequency modulation synth, virtual analog synth and a sampler that provides layering features. Moreover, its intuitive interface makes the process of arranging the song structure or changing several note values simultaneously much easier. Creating an account on AudioSauna will enable to record all your projects and export them as audio files that can be uploaded to SoundCloud or any other audio distribution platform. AudioSauna is a perfect tool for skilled producers who want to create their music online.
4. Soundtrap
Price: Free trial available, subscription plans start at $3.99 per month

Image from Internet
Soundtrap offers a long list of features that enable professional musicians to create their music online. All you have to do is create an account and you will get access to the Sountrap’s studio that let you create new beat patterns, use a synthesizer or even invite friends to make music together. The platform also offers the possibility to connect your own instruments to the Soundtrap’s studio, so that you can record your music as you play it. This online platform also has an Education section where you can share your knowledge with others or learn valuable music lessons.
5. PatternSketch
Price: Free
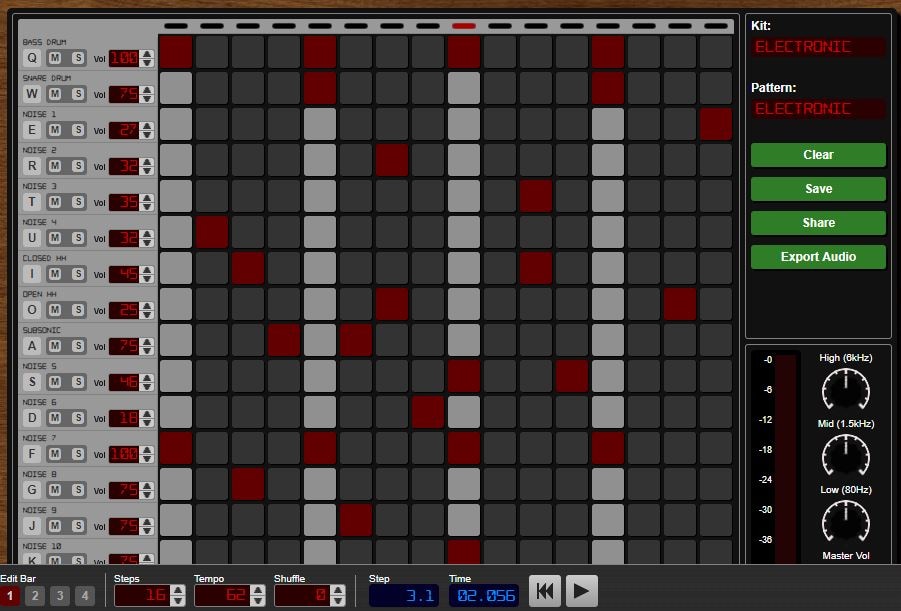
Image from Internet
This basic and yet effective drum machine can help you generate amazing beats for the songs you’re working on. Once you sign up, you will be able to choose from a number of different kits and patterns that are fully customizable or create your own original beats. After you create a pattern you like, you can save it with a single click or send it to your friends via email. Optionally, you can export all of your creations from PatternSketch and save them as wav, mp3 or ogg files, although in some cases mp3 audio files may not loop properly.
6. Soundation
Price: Free version available, pricing plans start at $1.99 per month

Image from Internet
If you choose to create music with the free version of Soundation, you’ll be able to work on up to ten projects, try out over 700 audio effects and loops, and export all your music in low quality. Purchasing the Intro pricing plan will enable you to work on an unlimited number of projects, make live audio recordings, import audio files smaller than 100MB or use an external midi controller. Moreover, opting for any of the annual or monthly subscription plans will allow you to export entire projects and audio files in high resolution from Soundation.
7. Text to Speech
Price: Free

online-music-maker-Text to Speech.jpg
Vocals are often overlooked in contemporary electronic music, but there are so many ways they can be used creatively. The platform lets you turn up to 50000 characters into speech at once, and it also offers several different voices you can choose from. Before you create an audio file you can determine how fast the text is going to be vocalized, so you should try different options and see which one fits your project the best. Text to Speech platform can be used during the process of creating a new song, but the tools it offers are not enough to make an entire song.
8. Looplabs
Price: Free
Music enthusiasts who would like to produce different genres of music online should definitely get familiar with Looplabs, as this online music maker lets its users remix songs or make music from scratch. Besides being one of the best places on the Internet to record music, Looplabs is also a community where you can meet people who like your music or discover artists whose work you admire. The Looplab’s studio features samples for a broad range of music genres and musical instruments, and you can use it to make Electro or Funk music equally effectively.
9. Online Sequencer
Price: Free
This is a perfect tool for developing an idea for a song, as you can create a sequence in just a few minutes. You can choose from Piano, Drums and Guitar categories of instruments or browse through a huge collection of fully customizable preset sequences that is updated on a daily basis. The platform also lets you import MIDI files and work on projects you’ve already started developing or you can export your sequences as MIDI files from the Online Sequencer and edit them with your DAW. Even though Online Sequencer is a useful tool for making music, the features it offers can’t really be compared with those on Soundation or AudioSauna.
10. Autochords
Price: Free
Finding new ideas for songs is often more difficult than it sounds, and if you ever face a creative block you should simply head over to Autochords. This platform suggests chord progressions based on the parameters you set, so you just have to select an instrument and the name of the song to set the feel, and the platform will show you the main progression and its alternatives. Rather than being an online music maker, Autochords is more a tool that helps piano and guitar players understand chord progressions better. iPhone and iPad users can download the Autochords app from the App Store for free.
Read More to Get : Best Free DAW for Windows and Mac for Beginners >>
Conclusion
You don’t have to be a professional musician in order to start making music online, you just have to love music, and an online music maker of your choice will take care of the rest. Do you use online music makers for entertainment or to express your creativity? Leave a comment below and share your opinions with us.
Benjamin Arango
Benjamin Arango is a writer and a lover of all things video.
Follow @Benjamin Arango
Benjamin Arango
Apr 26, 2024• Proven solutions
Expressing ideas through music was never easy, and even today in the age of powerful digital audio stations like Ableton Live or FruityLoops , producing original music requires a certain set of skills. However, online content producers often need music for their videos, but they neither have the time or the budget to hire a professional musician to create a soundtrack for their project in studio conditions. If you are looking for a quick way to make your own music online, then you should keep reading, because in this article we are going to take you through the ten best online music makers you should check out in 2021.
10 Best Online Music Makers in 2021
The music-making platforms that are currently available online are still not as nearly as powerful as professional software products for music producers. Nonetheless, this doesn’t mean that you can’t use them to create the music you like or just have fun with them. Here are the ten best online music makers in 2019.
1. Typeatone
Price: Free
Image from Internet
Have you ever wondered what your words would sound like if they were turned into music? Head over to the Typeatone platform if you want to find out since all you have to do in order to start creating your own music is type in the text. As you type, the platform will automatically start playing your words and once you’re done, you’ll be able to hear your new song. You can also choose between different instruments to make the process of creating music with Typeatone even more entertaining. You can share all of your creations with your friends on social media.
![]()
A cross-platform for making videos anywhere for all creators
Why your video editing isn’t good enough? How about some creative inspo?
- 100 Million+ Users
- 150+ Countries and Regions
- 4 Million+ Social Media Followers
- 5 Million+ Stock Media for Use
* Secure Download
2. Audiotool
Price: Free
Image from Internet
Electronic music producers who often use synthesizers like Roland TB-303 or Roland TR-909 are going to love the features this online collaborative platform offers. Audiotool hosts a huge music library, you can explore even if you are not a registered user. In order to access the platform’s music studio, you first have to create an account and make sure that you are signed in. Audiotool is also a community of like-minded people where you can meet artists whose work you appreciate or hear what others think about your work. The only downside is that Audiotool’s abundance of features can be overwhelming for the newcomers to the world of electronic music production.
3. AudioSauna
Price: Free
Image from Internet
AudioSauna seems to offer everything its users need to create inspiring music because it is equipped with frequency modulation synth, virtual analog synth and a sampler that provides layering features. Moreover, its intuitive interface makes the process of arranging the song structure or changing several note values simultaneously much easier. Creating an account on AudioSauna will enable to record all your projects and export them as audio files that can be uploaded to SoundCloud or any other audio distribution platform. AudioSauna is a perfect tool for skilled producers who want to create their music online.
4. Soundtrap
Price: Free trial available, subscription plans start at $3.99 per month
Image from Internet
Soundtrap offers a long list of features that enable professional musicians to create their music online. All you have to do is create an account and you will get access to the Sountrap’s studio that let you create new beat patterns, use a synthesizer or even invite friends to make music together. The platform also offers the possibility to connect your own instruments to the Soundtrap’s studio, so that you can record your music as you play it. This online platform also has an Education section where you can share your knowledge with others or learn valuable music lessons.
5. PatternSketch
Price: Free
Image from Internet
This basic and yet effective drum machine can help you generate amazing beats for the songs you’re working on. Once you sign up, you will be able to choose from a number of different kits and patterns that are fully customizable or create your own original beats. After you create a pattern you like, you can save it with a single click or send it to your friends via email. Optionally, you can export all of your creations from PatternSketch and save them as wav, mp3 or ogg files, although in some cases mp3 audio files may not loop properly.
6. Soundation
Price: Free version available, pricing plans start at $1.99 per month
Image from Internet
If you choose to create music with the free version of Soundation, you’ll be able to work on up to ten projects, try out over 700 audio effects and loops, and export all your music in low quality. Purchasing the Intro pricing plan will enable you to work on an unlimited number of projects, make live audio recordings, import audio files smaller than 100MB or use an external midi controller. Moreover, opting for any of the annual or monthly subscription plans will allow you to export entire projects and audio files in high resolution from Soundation.
7. Text to Speech
Price: Free

online-music-maker-Text to Speech.jpg
Vocals are often overlooked in contemporary electronic music, but there are so many ways they can be used creatively. The platform lets you turn up to 50000 characters into speech at once, and it also offers several different voices you can choose from. Before you create an audio file you can determine how fast the text is going to be vocalized, so you should try different options and see which one fits your project the best. Text to Speech platform can be used during the process of creating a new song, but the tools it offers are not enough to make an entire song.
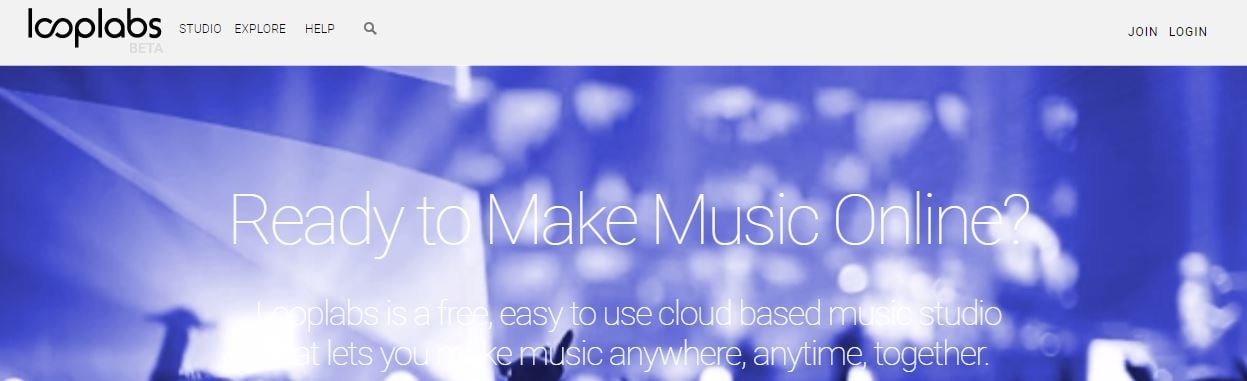
8. Looplabs
Price: Free
Music enthusiasts who would like to produce different genres of music online should definitely get familiar with Looplabs, as this online music maker lets its users remix songs or make music from scratch. Besides being one of the best places on the Internet to record music, Looplabs is also a community where you can meet people who like your music or discover artists whose work you admire. The Looplab’s studio features samples for a broad range of music genres and musical instruments, and you can use it to make Electro or Funk music equally effectively.
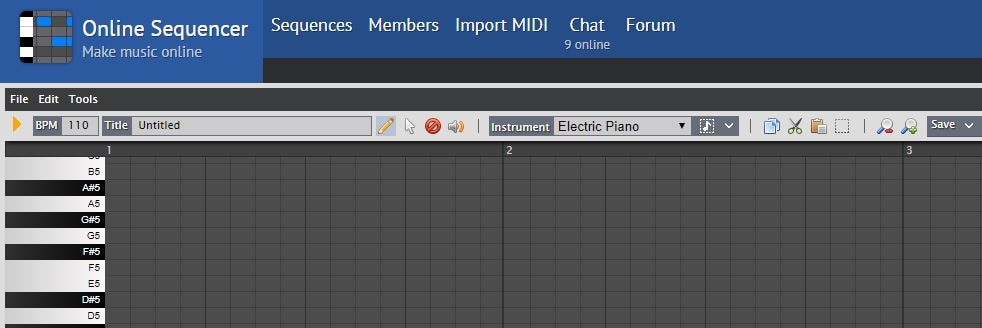
9. Online Sequencer
Price: Free
This is a perfect tool for developing an idea for a song, as you can create a sequence in just a few minutes. You can choose from Piano, Drums and Guitar categories of instruments or browse through a huge collection of fully customizable preset sequences that is updated on a daily basis. The platform also lets you import MIDI files and work on projects you’ve already started developing or you can export your sequences as MIDI files from the Online Sequencer and edit them with your DAW. Even though Online Sequencer is a useful tool for making music, the features it offers can’t really be compared with those on Soundation or AudioSauna.
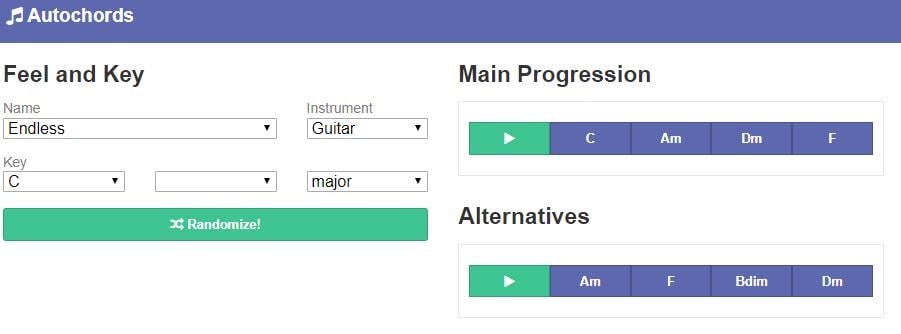
10. Autochords
Price: Free
Finding new ideas for songs is often more difficult than it sounds, and if you ever face a creative block you should simply head over to Autochords. This platform suggests chord progressions based on the parameters you set, so you just have to select an instrument and the name of the song to set the feel, and the platform will show you the main progression and its alternatives. Rather than being an online music maker, Autochords is more a tool that helps piano and guitar players understand chord progressions better. iPhone and iPad users can download the Autochords app from the App Store for free.
Read More to Get : Best Free DAW for Windows and Mac for Beginners >>
Conclusion
You don’t have to be a professional musician in order to start making music online, you just have to love music, and an online music maker of your choice will take care of the rest. Do you use online music makers for entertainment or to express your creativity? Leave a comment below and share your opinions with us.
Benjamin Arango
Benjamin Arango is a writer and a lover of all things video.
Follow @Benjamin Arango
Benjamin Arango
Apr 26, 2024• Proven solutions
Expressing ideas through music was never easy, and even today in the age of powerful digital audio stations like Ableton Live or FruityLoops , producing original music requires a certain set of skills. However, online content producers often need music for their videos, but they neither have the time or the budget to hire a professional musician to create a soundtrack for their project in studio conditions. If you are looking for a quick way to make your own music online, then you should keep reading, because in this article we are going to take you through the ten best online music makers you should check out in 2021.
10 Best Online Music Makers in 2021
The music-making platforms that are currently available online are still not as nearly as powerful as professional software products for music producers. Nonetheless, this doesn’t mean that you can’t use them to create the music you like or just have fun with them. Here are the ten best online music makers in 2019.
1. Typeatone
Price: Free
Image from Internet
Have you ever wondered what your words would sound like if they were turned into music? Head over to the Typeatone platform if you want to find out since all you have to do in order to start creating your own music is type in the text. As you type, the platform will automatically start playing your words and once you’re done, you’ll be able to hear your new song. You can also choose between different instruments to make the process of creating music with Typeatone even more entertaining. You can share all of your creations with your friends on social media.
![]()
A cross-platform for making videos anywhere for all creators
Why your video editing isn’t good enough? How about some creative inspo?
- 100 Million+ Users
- 150+ Countries and Regions
- 4 Million+ Social Media Followers
- 5 Million+ Stock Media for Use
* Secure Download
2. Audiotool
Price: Free
Image from Internet
Electronic music producers who often use synthesizers like Roland TB-303 or Roland TR-909 are going to love the features this online collaborative platform offers. Audiotool hosts a huge music library, you can explore even if you are not a registered user. In order to access the platform’s music studio, you first have to create an account and make sure that you are signed in. Audiotool is also a community of like-minded people where you can meet artists whose work you appreciate or hear what others think about your work. The only downside is that Audiotool’s abundance of features can be overwhelming for the newcomers to the world of electronic music production.
3. AudioSauna
Price: Free
Image from Internet
AudioSauna seems to offer everything its users need to create inspiring music because it is equipped with frequency modulation synth, virtual analog synth and a sampler that provides layering features. Moreover, its intuitive interface makes the process of arranging the song structure or changing several note values simultaneously much easier. Creating an account on AudioSauna will enable to record all your projects and export them as audio files that can be uploaded to SoundCloud or any other audio distribution platform. AudioSauna is a perfect tool for skilled producers who want to create their music online.
4. Soundtrap
Price: Free trial available, subscription plans start at $3.99 per month
Image from Internet
Soundtrap offers a long list of features that enable professional musicians to create their music online. All you have to do is create an account and you will get access to the Sountrap’s studio that let you create new beat patterns, use a synthesizer or even invite friends to make music together. The platform also offers the possibility to connect your own instruments to the Soundtrap’s studio, so that you can record your music as you play it. This online platform also has an Education section where you can share your knowledge with others or learn valuable music lessons.
5. PatternSketch
Price: Free
Image from Internet
This basic and yet effective drum machine can help you generate amazing beats for the songs you’re working on. Once you sign up, you will be able to choose from a number of different kits and patterns that are fully customizable or create your own original beats. After you create a pattern you like, you can save it with a single click or send it to your friends via email. Optionally, you can export all of your creations from PatternSketch and save them as wav, mp3 or ogg files, although in some cases mp3 audio files may not loop properly.
6. Soundation
Price: Free version available, pricing plans start at $1.99 per month
Image from Internet
If you choose to create music with the free version of Soundation, you’ll be able to work on up to ten projects, try out over 700 audio effects and loops, and export all your music in low quality. Purchasing the Intro pricing plan will enable you to work on an unlimited number of projects, make live audio recordings, import audio files smaller than 100MB or use an external midi controller. Moreover, opting for any of the annual or monthly subscription plans will allow you to export entire projects and audio files in high resolution from Soundation.
7. Text to Speech
Price: Free

online-music-maker-Text to Speech.jpg
Vocals are often overlooked in contemporary electronic music, but there are so many ways they can be used creatively. The platform lets you turn up to 50000 characters into speech at once, and it also offers several different voices you can choose from. Before you create an audio file you can determine how fast the text is going to be vocalized, so you should try different options and see which one fits your project the best. Text to Speech platform can be used during the process of creating a new song, but the tools it offers are not enough to make an entire song.
8. Looplabs
Price: Free
Music enthusiasts who would like to produce different genres of music online should definitely get familiar with Looplabs, as this online music maker lets its users remix songs or make music from scratch. Besides being one of the best places on the Internet to record music, Looplabs is also a community where you can meet people who like your music or discover artists whose work you admire. The Looplab’s studio features samples for a broad range of music genres and musical instruments, and you can use it to make Electro or Funk music equally effectively.
9. Online Sequencer
Price: Free
This is a perfect tool for developing an idea for a song, as you can create a sequence in just a few minutes. You can choose from Piano, Drums and Guitar categories of instruments or browse through a huge collection of fully customizable preset sequences that is updated on a daily basis. The platform also lets you import MIDI files and work on projects you’ve already started developing or you can export your sequences as MIDI files from the Online Sequencer and edit them with your DAW. Even though Online Sequencer is a useful tool for making music, the features it offers can’t really be compared with those on Soundation or AudioSauna.
10. Autochords
Price: Free
Finding new ideas for songs is often more difficult than it sounds, and if you ever face a creative block you should simply head over to Autochords. This platform suggests chord progressions based on the parameters you set, so you just have to select an instrument and the name of the song to set the feel, and the platform will show you the main progression and its alternatives. Rather than being an online music maker, Autochords is more a tool that helps piano and guitar players understand chord progressions better. iPhone and iPad users can download the Autochords app from the App Store for free.
Read More to Get : Best Free DAW for Windows and Mac for Beginners >>
Conclusion
You don’t have to be a professional musician in order to start making music online, you just have to love music, and an online music maker of your choice will take care of the rest. Do you use online music makers for entertainment or to express your creativity? Leave a comment below and share your opinions with us.
Benjamin Arango
Benjamin Arango is a writer and a lover of all things video.
Follow @Benjamin Arango
Also read:
- Updated In 2024, Ultimate Guided Audio Level Adjustment Software
- New In 2024, Audiovisual Beat Engineering Taking Audio Separates for Creative Endeavors
- New Perfecting Your Digital Identity Step-by-Step for the Voxal Voice Changer
- New QuickConversion Accessible, Cost-Free Online Services to Convert MP3 Files Into Textual Data - Compatible with Adobe Audition Pro
- 2024 Approved Mastering Your Music Production The Best Windows and Mac DAWs of the Year 2023
- Exploring the Peaks of MAGIX Samplitude A Comprehensive Review for 2024
- Updated 2024 Approved Merge Tune With GIF Rendering in Windows Environment
- 2024 Approved Efficient Methods to Use the Recording App on Samsung S10/S9 Phones
- 2024 Approved Essential Free Music Library for Editors
- 2024 Approved Step-by-Step An Essential Tutorial on Editing Your First Podcast
- 2024 Approved Auditory Excellence Guide Discovering the Finest Audio Editing Software with a Comprehensive Look at Benefits & Challenges
- Crafting the Perfect Track? Heres Our Selection of the Best 8 Chrome OS-Compatible DAWs Musicians for 2024
- 2024 Approved Audio Anonymization in Multimedia A Step-by-Step Approach (Updated)
- Updated 2024 Approved Elite Selection of 4 High-Definition Online Video Volume Enhancers
- Updated 2024 Approved Mastering Audio Clarity Techniques for Eliminating Resonance with Accuracy
- New 2024 Approved Uncovering Effects Mimicking Vocalized Metal Flutes
- Maximizing Your Devices Audio Quality Top 10 Improvement Software for iPhones & Tablets
- Updated How to Use Suspense Music to Master Film Score for 2024
- Updated How to Select Superb Instrumental Tracks for Enhanced Video Vibes for 2024
- New In 2024, Your Ultimate Resource for Score-Free VST Upgrades, Updated Annually
- Updated 2024 Approved FREE Top 10 Best Websites to Download Sound Clips for Videos
- New 2024 Approved Finding High-Quality Wolf Howl Noises for Projects
- The Path to a New Sonic Presence Innovative Approaches to Vocal Adaptation for 2024
- New Upgrade Your Call Game with These Top 6 Android & iOS Voice-Changing Tools for 2024
- Updated In 2024, Zoom Talks with a Twist Select 6 Vocal Enhancement Tools to Spice Up Video Calls and Evoke Laughter
- New 2024 Approved Free & Value-Oriented Mac Audio Editing Suite
- Updated The Real Deal with DAWs Separating Fact From Fiction in Audio Production for 2024
- Updated 2024 Approved Searching for High-Quality Vocal Noise Sounds
- Updated Audio File Transformation MP3 to MP4 Format Conversion Explained
- Updated In 2024, 5 Prime Destinations for Finding and Downloading Legal Funny Tunes Online
- Crafting an Impressive Visual Saga Your In-Depth Tutorial on Podcast Cover Artistry
- Updated 2024 Approved Unveiling the Purpose and Capabilities of Google Podcast App
- Top Choices for Downloading Lofi Design Elements & Ambient Melodies for 2024
- Updated Enumeration of Global Podcast Listings Aggregators for 2024
- Quietude in Quarter Notes Advanced Methods for Drum Ditching in Digital Music
- 2024 Approved Changing Dynamics of Auditory Experience in the Newest Adobe Rush Release
- In 2024, Android Audio Alteration Navigating Through the Most Trendy 7 Apps
- Updated Visualizing the Vibes The Crème De La Crème of Music Animation Experiences
- New Advanced Sound Sanitation on Windows Identifying Top Audio Noise Filtration Software
- New 2024 Approved Essential Websites & Applications for Supercharging Your Videography with Captivating Audio Tracks Pros, Cons, and More
- New 2024 Approved Unlock Better Communication Navigating Through the Top 7 Android Voice Enhancement Software
- New In 2024, Identify Stomach Gas Acoustics Recording
- Updated Mastering Audio Cut and Mix A Comprehensive Guide to Using Avidemux
- Updated 2024 Approved Exploring the Finest Free, Web-Integrated Digital Audio Workstations
- Updated 2024 Approved Top 5 Free Hits of Humorous Background Music for Video Productions
- New In 2024, 4 Best Video Volume Booster Online
- Jazz 101 Key Elements You Must Understand for 2024
- Symphony in Reverse A Guide to State-of-the-Art Audio Reversal Applications for 2024
- Unveiling the Rhythm Discovering Song Titles via iPhones Sound Analysis
- In 2024, How to Mirror PC Screen to Samsung Galaxy XCover 7 Phones? | Dr.fone
- In 2024, Which Pokémon can Evolve with a Moon Stone For Oppo Reno 10 5G? | Dr.fone
- How to turn off the screen lock on my Yuva 3
- In 2024, 9 Best Phone Monitoring Apps for Apple iPhone 11 Pro | Dr.fone
- In 2024, Life360 Circle Everything You Need to Know On Realme C51 | Dr.fone
- Recover your music after Huawei Nova Y91 has been deleted
- Complete Guide on Unlocking iPhone 15 with a Broken Screen?
- Updated 2024 Approved Windows Movie Maker Is Easily Available for Users. To Download Windows Movie Maker, You Need to Review Its Full Compatibility and the Window Movie Maker Installation Process Afterwards. Refer to This Guide to Learn More
- How To Remove Phone Number From Your Apple ID on Your iPhone 13 mini?
- How do you play MKV files on Motorola Edge+ (2023)?
- In 2024, Complete Review & Guide to Techeligible FRP Bypass and More For Vivo X Fold 2
- Updated In 2024, Discover the Secret to Downloading High-Quality YouTube Audio
- In 2024, How to Unlock Apple iPhone 7 Passcode without Computer? | Dr.fone
- New In 2024, Top-Rated 4K/8K Video Editors Expert Picks
- Realme Messages Recovery - Recover Deleted Messages from Realme
- In 2024, 5 Techniques to Transfer Data from OnePlus Nord CE 3 5G to iPhone 15/14/13/12 | Dr.fone
- In 2024, Split Screen Video Makers The Ultimate Guide for iOS and Android Users
- In 2024, How to Transfer Data from Honor Play 8T to BlackBerry | Dr.fone
- In 2024, 5 Ways To Teach You To Transfer Files from Poco X5 Pro to Other Android Devices Easily | Dr.fone
- Will Pokémon Go Ban the Account if You Use PGSharp On Asus ROG Phone 7 Ultimate | Dr.fone
- 2024 Approved Get Your Favorite YouTube Tracks as MP3s A Guide
- Rootjunky APK To Bypass Google FRP Lock For Xiaomi Redmi Note 12 Pro 5G
- Get Creative with Free Video Invitations The Best Online Makers
- Full Guide to Bypass OnePlus Ace 3 FRP
- Pokemon Go No GPS Signal? Heres Every Possible Solution On Honor Magic Vs 2 | Dr.fone
- How to Fix Unfortunately, Contacts Has Stopped Error on Poco M6 Pro 5G | Dr.fone
- In 2024, How to Unlock iCloud Activation Lock and iCloud Account On iPhone 6s Plus?
- How to Learn Cartoon Characters Sketch Quickly
- New What Is MOV Format and How to Edit MOV Video Better for 2024
- In 2024, Ultimate Video Editing Software Roundup Top Picks for All Platforms
- How to Unlock Realme 11X 5G Phone Password Without Factory Reset?
- In 2024, How To Change Your Apple ID Password On your Apple iPhone SE
- Best 8K Video Editing Software
- In 2024, Best Online GIF to Image (PNG/JPG) Converter
- How To Transfer Data From Apple iPhone 11 To Other iPhone 12 Pro Max devices? | Dr.fone
- Discover 8 Top-Rated Video and Photo Merger Tools for Desktop, Mobile, and Online Use. Elevate Your Media Game and Create Stunning Visuals with Ease for 2024
- How To Bypass FRP on Xiaomi
- In 2024, Top 4 SIM Location Trackers To Easily Find Your Lost Poco M6 5G Device
- 2024 Approved Make Your Memories Shine The Best Photo Slideshow Video Software
- Title: New Optimize Your Streaming Quality with These Top 4 Video Boosters
- Author: Ella
- Created at : 2024-06-24 00:02:45
- Updated at : 2024-06-25 00:02:45
- Link: https://sound-optimizing.techidaily.com/new-optimize-your-streaming-quality-with-these-top-4-video-boosters/
- License: This work is licensed under CC BY-NC-SA 4.0.
