
:max_bytes(150000):strip_icc():format(webp)/patch-tuesday-2625783-d6bcf232b3c64fc5958037ad31299bd9.png)
The Ultimate Methods for Crafting Lifelike AI Speech Patterns for 2024
The Ultimate Methods for Crafting Lifelike AI Speech Patterns
How to Clone Voice in 2 Ways-Create AI Voices

Richard Bennett
Mar 27, 2024• Proven solutions
Artificial intelligence has given us a lot of new creations in this digital world. Voice cloning is another creation that uses deep-learning algorithms to generate synthetic speech and clone voice that is nearly impossible for any human to recognize between the real and the fake voice.
Voice cloning can be used for numerous reasons, such as narrating audiobooks to catch an audience and increase the listening experience. It can be used for making digital videos and dubbing celebrity voices. Moreover, it can be used to help communicate with disabled and visually impaired people.
In this article, we are going to talk about 2 ways to clone voice and the steps to produce real-time voice cloning.
- Method 1: Clone Voice Online with Resemble.ai
- Method 2: Clone Voice with Respeecher Software
- Bonus Tip: How to Change Voice in Video Editing - [Video Tutorial]
Finding a Way of Changing Voice while Making Video? Try This Out!
Filmora Voice Changer offers multiple sound effects for voice changing. You can easily turn your voice to another character, or easily switch your voice between female and male. What’s more, it offers various video and audio effects to bring your video more fun! Watch a video tutorial first to see how it works!
Changing Voice in Video Changing Voice in Video Changing Voice in Video Learn More >
Method 1: Clone Voice Online with Resemble.ai
Resemble.ai is a free voice clone software that uses artificial intelligence technology for real-time voice cloning as well as generating synthetic voice from text-to-speech generators. You can create your own custom brand voices for Alexa and Google Assistant. Besides that, you can even integrate your synthetic voice in various games, but some of these features are accessible for the paid version. It also provides instant dubbing in any language. It is effortless to use as you just need to write the text and select your desired voice or can even just upload your own raw voice and acquire real-time voice cloning instantly.
STEP 1: Signup and get to the home screen
Open https://www.resemble.ai/ on your browser, select an option to clone your voice.

STEP 2: Enter your project name and text
Now enter your project name and the desired text and click the play button to get instant and real-time voice cloning.

STEP 3: Select the voice option to add your own voice
Go to the left-hand menu and select the voices option to record your own raw voice to use as a text-to-speech generation.

Method 2: Clone Voice with Respeecher Software
Respeecher is an online tool that applies deep learning and artificial intelligence technology for real-time voice cloning from the speaker’s voice into a famous person. This technology can be very effective for Filmmakers, game developers, and for organization’s advertisement purposes. It works perfectly and gives and high-quality result with passing on human emotion in the speech. This voice clone software works on speech-to-speech technology. This real-time voice cloning software is very professional and keeps its sensitive data secure so that it cannot be breached and used for negative purposes. Some steps of using this voice clone software are:
Step 1: For cloning or dubbing a voice, the client needs special permission from the individual whose voice is going to be targeted.
Step 2: After getting permission, some high-quality voice recording of the target is required.
Step 3: Next is to record the same lines as the target to collect source data with more accuracy.
Step 4: Voice clone software will apply artificial intelligence to get models ready to clone voice.
Step 5: Now, just use the microphone to record your voice, and we will perform a real-time voice clone and will return a high-quality cloned voice.
Bonus Tip: How to Change Voice with Filmora
Filmora is one of the best video and audio editing software that allows you to change the voice of audio/video or recorded voice-over. It is very easy to use and does not add any watermark like some of the other software. Users such as digital content creators use Filmora for their video and audio editing.
For Win 7 or later (64-bit)
 Secure Download
For macOS 10.14 or later
Secure Download
To change your voice, follow the steps below:
Step 1: You need to import the audio or recorded voice-over file, or you can even record your voice. Filmora also has the option to change the pitch of the voice. There are four different options for changing the speed of your desired voice.
Step 2: After you are finished editing your video or audio, you can save it in multiple videos and MP3 audio format and can also export the file to your computer.
An additional feature of Filmora is that it allows you to upload to social media in high quality and can compress the videos to different Android and iOS devices.
Final Thoughts
With all the advancements in the field of technology, artificial intelligence has given rise to a lot of creations, such as real-time voice cloning and making the original voice sound like someone else’s. It aims to help and contribute to the community by several means, like assisting disabled persons and increasing audience visibility and reach. You can clone your voice or can convert your text-to-speech into another person’s voice of your choice easily with some of the best voice clone software available. So stop wasting time and try these real-time voice cloning software according to your needs.
Also, try giving a shot to Filmora Video Voice Changer, and who knows, it might be your perfect fit.
Richard Bennett
Richard Bennett is a writer and a lover of all things video.
Follow @Richard Bennett
Richard Bennett
Mar 27, 2024• Proven solutions
Artificial intelligence has given us a lot of new creations in this digital world. Voice cloning is another creation that uses deep-learning algorithms to generate synthetic speech and clone voice that is nearly impossible for any human to recognize between the real and the fake voice.
Voice cloning can be used for numerous reasons, such as narrating audiobooks to catch an audience and increase the listening experience. It can be used for making digital videos and dubbing celebrity voices. Moreover, it can be used to help communicate with disabled and visually impaired people.
In this article, we are going to talk about 2 ways to clone voice and the steps to produce real-time voice cloning.
- Method 1: Clone Voice Online with Resemble.ai
- Method 2: Clone Voice with Respeecher Software
- Bonus Tip: How to Change Voice in Video Editing - [Video Tutorial]
Finding a Way of Changing Voice while Making Video? Try This Out!
Filmora Voice Changer offers multiple sound effects for voice changing. You can easily turn your voice to another character, or easily switch your voice between female and male. What’s more, it offers various video and audio effects to bring your video more fun! Watch a video tutorial first to see how it works!
Changing Voice in Video Changing Voice in Video Changing Voice in Video Learn More >
Method 1: Clone Voice Online with Resemble.ai
Resemble.ai is a free voice clone software that uses artificial intelligence technology for real-time voice cloning as well as generating synthetic voice from text-to-speech generators. You can create your own custom brand voices for Alexa and Google Assistant. Besides that, you can even integrate your synthetic voice in various games, but some of these features are accessible for the paid version. It also provides instant dubbing in any language. It is effortless to use as you just need to write the text and select your desired voice or can even just upload your own raw voice and acquire real-time voice cloning instantly.
STEP 1: Signup and get to the home screen
Open https://www.resemble.ai/ on your browser, select an option to clone your voice.
STEP 2: Enter your project name and text
Now enter your project name and the desired text and click the play button to get instant and real-time voice cloning.
STEP 3: Select the voice option to add your own voice
Go to the left-hand menu and select the voices option to record your own raw voice to use as a text-to-speech generation.
Method 2: Clone Voice with Respeecher Software
Respeecher is an online tool that applies deep learning and artificial intelligence technology for real-time voice cloning from the speaker’s voice into a famous person. This technology can be very effective for Filmmakers, game developers, and for organization’s advertisement purposes. It works perfectly and gives and high-quality result with passing on human emotion in the speech. This voice clone software works on speech-to-speech technology. This real-time voice cloning software is very professional and keeps its sensitive data secure so that it cannot be breached and used for negative purposes. Some steps of using this voice clone software are:
Step 1: For cloning or dubbing a voice, the client needs special permission from the individual whose voice is going to be targeted.
Step 2: After getting permission, some high-quality voice recording of the target is required.
Step 3: Next is to record the same lines as the target to collect source data with more accuracy.
Step 4: Voice clone software will apply artificial intelligence to get models ready to clone voice.
Step 5: Now, just use the microphone to record your voice, and we will perform a real-time voice clone and will return a high-quality cloned voice.
Bonus Tip: How to Change Voice with Filmora
Filmora is one of the best video and audio editing software that allows you to change the voice of audio/video or recorded voice-over. It is very easy to use and does not add any watermark like some of the other software. Users such as digital content creators use Filmora for their video and audio editing.
For Win 7 or later (64-bit)
Secure Download
For macOS 10.14 or later
Secure Download
To change your voice, follow the steps below:
Step 1: You need to import the audio or recorded voice-over file, or you can even record your voice. Filmora also has the option to change the pitch of the voice. There are four different options for changing the speed of your desired voice.
Step 2: After you are finished editing your video or audio, you can save it in multiple videos and MP3 audio format and can also export the file to your computer.
An additional feature of Filmora is that it allows you to upload to social media in high quality and can compress the videos to different Android and iOS devices.
Final Thoughts
With all the advancements in the field of technology, artificial intelligence has given rise to a lot of creations, such as real-time voice cloning and making the original voice sound like someone else’s. It aims to help and contribute to the community by several means, like assisting disabled persons and increasing audience visibility and reach. You can clone your voice or can convert your text-to-speech into another person’s voice of your choice easily with some of the best voice clone software available. So stop wasting time and try these real-time voice cloning software according to your needs.
Also, try giving a shot to Filmora Video Voice Changer, and who knows, it might be your perfect fit.
Richard Bennett
Richard Bennett is a writer and a lover of all things video.
Follow @Richard Bennett
How to Increase or Decrease Audio Volume in Audacity?
Audacity is a free, open access, cross-platform sound editing and recording tool. It is compatible with Windows, Mac OS X, Linux, and various other operating systems. All of these aspects have contributed to Audacity’s worldwide popularity. Audacity features an amplified effect that alters the loudness of your chosen audio and other practical tools that can change the sound in different ways.
As a result, Audacity can not only assist you in modifying the level of an audio file, but it can also help you equalize, reduce, normalize, and so on.
Yes, you have heard it right, Audacity increase volume, but the primary question is how? But don’t worry, you will get the answer after reading the article. This article will explain how you can increase or decrease the volume of a whole and a specific segment of the audio file. Let’s get started.
In this article
01 How to Increase or Decrease Volume Without Distortion and Clipping in Audacity
02 How to Increase Volume of Multiple Files in Audacity?
03 How to Increase Volume in Certain Parts of Track?
04 What’s the Difference between Normalize and Amplify?
Part 1: How to Increase or Decrease Volume Without Distortion and Clipping in Audacity
Audio clipping occurs when the audio input becomes too loud for an amplifier to produce, and the surplus signal creates distortion. When editing, you cannot add additional volume to your audio clip forever because this would result in clipping. In this case, you can use the Audacity application to emphasize your material by turning the volume up or down without distortion and clipping on a track or recording.
Learn how Audacity increase volume without distortion by following the procedure described below:
Step 1: First, download and install the Audacity software on your computer.
Step 2: Select the File from the menu above and click Open to open the audio file.

Step 3: Choose the audio track, go to the Effect menu and pick the Amplify option from the drop-down menu.

Note: You can increase or decrease the volume by double-clicking the track and using the slider under the Gain title.
Step 4: Increase or decrease the volume by sliding the slider or typing the amplification value in the text box next to it in the Amplify window as needed.

Note: Ensure that the Allow Clipping checkbox remains unchecked to avoid clipping. Moreover, keep in mind that increasing the volume to a greater extent can result in distortion.
Related: How to Change Audio Volume in Filmora
Part 2: How to Increase Volume of Multiple Files in Audacity?
Audacity is an open-source audio editing tool. It is used for various purposes, like audio recording, music creation, and audio file editing. It also allows you to increase and decrease the volume of audio files.
You may also apply the modifications to multiple files at once, rather than one at a time. Check out the instructions below to learn how to change the volume of multiple audio files:
Step 1: Select the Import option from the File menu, and then pick the Audio option. Browse to your audio files, choose all of them, and then click the Open option.

Step 2: To select all the files, press Ctrl + A, click on the Effect option in the menu bar and pick Amplify.

Step 3: Now, either enter the value in the text box next to the Amplification Decibels tab or use the slider under it. To verify the operation of increasing the volume, check the allow clipping checkbox. When you’re through with the options, click the Ok button.

Step 4: Amplification will be applied to all the tracks. Go to the File option from the above menu to export the files and then select the Export option.

If you’re running Audacity on macOS computer, you can watch the video tutorial below to apply effects to multiple files.
Part 3: How to Increase Volume in Certain Parts of Track?
The audacity software also allows you to alter a specific section of an audio file. The selection tool can assist in locating a particular area of the track. After you’ve chosen a section of the audio file, you may utilize the amplification effect to increase its loudness. Check out the instructions below to learn how you can achieve it:
Step 1: Launch the Audacity software on the computer. To open the audio file, go to the File menu and select Open. You may also open the file by dragging it.
Step 2: Ensure that the Selection tool is active now. Click and hold the mouse left-click to move from one spot on the track to another.

Step 3: After picking the part, go to the Effect option from the menu and select Amplify.

Step 4: Now, for that specific region, modify the amplification and click OK. This will only change the volume for the area you have selected.

Part 4: What’s the Difference between Normalize and Amplify?
Amplify and Normalize are two essential features of the Audacity tool. Many people think they are the same thing, they are right up to some extent, but there exists a big difference between both the features. Before discussing the differences, you need to know what the terms Normalize and Amplify imply.
Amplify
It is the quickest approach to comprehend the effect’s name if you want to know precisely what impacts are. The frequency of the vibration is enhanced to increase the amplification effect. As previously said, it raises a tiny sound.
Furthermore, because this amplification is extended to all frequencies and amplitude, the noise increases. If you choose ten sources and magnify them by ten decibels, each source will be ten decibels louder than your present sound.

Normalize
The meaning of normalizing is standardized, which is also a feature of its name. Whenever you pick an audio input and use the normalize feature, the level is adjusted automatically according to the previously indicated average volume size in Oda City.
As a result, when one sound source is normalized, there is no discernible difference between it and the amplification mechanism. Still, the effect is evident when several sound sources are performed concurrently.
By pressing Ctrl + A and selecting all ten various audio sources, you may compute the required standard of every sound source, enhance the audio input that is smaller than the normal, and create the audio signal more significant than the standard. Shrink the size of each noise source, such as the name, and normalize the sound.

Related: Best Audio Normalizers for Windows
Differences
To differentiate the meaning and impact precisely, amplification means increasing or reducing the sound, whereas normalizing means equalizing the sound. Simply defined, if you magnify ten sources by ten decibels, each of the shorter and louder noises equals ten decibels in their actual loudness.
When the ten sources are normalized, the louder sounds grow louder, conforming to the standard sound source size. Because the amplifying is done regardless, the little noises are going insane during this procedure.
Conclusion
All in all, Audacity does an excellent job at audio editing. If you simply need to modify an audio file, Audacity is a great option. For increasing and decreasing the volume of single and multiple audio files, Audacity is still one of the best bets in the market. We hope that now know how Audacity increase volume of the audio files after reading this article.
02 How to Increase Volume of Multiple Files in Audacity?
03 How to Increase Volume in Certain Parts of Track?
04 What’s the Difference between Normalize and Amplify?
Part 1: How to Increase or Decrease Volume Without Distortion and Clipping in Audacity
Audio clipping occurs when the audio input becomes too loud for an amplifier to produce, and the surplus signal creates distortion. When editing, you cannot add additional volume to your audio clip forever because this would result in clipping. In this case, you can use the Audacity application to emphasize your material by turning the volume up or down without distortion and clipping on a track or recording.
Learn how Audacity increase volume without distortion by following the procedure described below:
Step 1: First, download and install the Audacity software on your computer.
Step 2: Select the File from the menu above and click Open to open the audio file.
Step 3: Choose the audio track, go to the Effect menu and pick the Amplify option from the drop-down menu.
Note: You can increase or decrease the volume by double-clicking the track and using the slider under the Gain title.
Step 4: Increase or decrease the volume by sliding the slider or typing the amplification value in the text box next to it in the Amplify window as needed.
Note: Ensure that the Allow Clipping checkbox remains unchecked to avoid clipping. Moreover, keep in mind that increasing the volume to a greater extent can result in distortion.
Related: How to Change Audio Volume in Filmora
Part 2: How to Increase Volume of Multiple Files in Audacity?
Audacity is an open-source audio editing tool. It is used for various purposes, like audio recording, music creation, and audio file editing. It also allows you to increase and decrease the volume of audio files.
You may also apply the modifications to multiple files at once, rather than one at a time. Check out the instructions below to learn how to change the volume of multiple audio files:
Step 1: Select the Import option from the File menu, and then pick the Audio option. Browse to your audio files, choose all of them, and then click the Open option.
Step 2: To select all the files, press Ctrl + A, click on the Effect option in the menu bar and pick Amplify.
Step 3: Now, either enter the value in the text box next to the Amplification Decibels tab or use the slider under it. To verify the operation of increasing the volume, check the allow clipping checkbox. When you’re through with the options, click the Ok button.
Step 4: Amplification will be applied to all the tracks. Go to the File option from the above menu to export the files and then select the Export option.
If you’re running Audacity on macOS computer, you can watch the video tutorial below to apply effects to multiple files.
Part 3: How to Increase Volume in Certain Parts of Track?
The audacity software also allows you to alter a specific section of an audio file. The selection tool can assist in locating a particular area of the track. After you’ve chosen a section of the audio file, you may utilize the amplification effect to increase its loudness. Check out the instructions below to learn how you can achieve it:
Step 1: Launch the Audacity software on the computer. To open the audio file, go to the File menu and select Open. You may also open the file by dragging it.
Step 2: Ensure that the Selection tool is active now. Click and hold the mouse left-click to move from one spot on the track to another.
Step 3: After picking the part, go to the Effect option from the menu and select Amplify.
Step 4: Now, for that specific region, modify the amplification and click OK. This will only change the volume for the area you have selected.
Part 4: What’s the Difference between Normalize and Amplify?
Amplify and Normalize are two essential features of the Audacity tool. Many people think they are the same thing, they are right up to some extent, but there exists a big difference between both the features. Before discussing the differences, you need to know what the terms Normalize and Amplify imply.
Amplify
It is the quickest approach to comprehend the effect’s name if you want to know precisely what impacts are. The frequency of the vibration is enhanced to increase the amplification effect. As previously said, it raises a tiny sound.
Furthermore, because this amplification is extended to all frequencies and amplitude, the noise increases. If you choose ten sources and magnify them by ten decibels, each source will be ten decibels louder than your present sound.
Normalize
The meaning of normalizing is standardized, which is also a feature of its name. Whenever you pick an audio input and use the normalize feature, the level is adjusted automatically according to the previously indicated average volume size in Oda City.
As a result, when one sound source is normalized, there is no discernible difference between it and the amplification mechanism. Still, the effect is evident when several sound sources are performed concurrently.
By pressing Ctrl + A and selecting all ten various audio sources, you may compute the required standard of every sound source, enhance the audio input that is smaller than the normal, and create the audio signal more significant than the standard. Shrink the size of each noise source, such as the name, and normalize the sound.
Related: Best Audio Normalizers for Windows
Differences
To differentiate the meaning and impact precisely, amplification means increasing or reducing the sound, whereas normalizing means equalizing the sound. Simply defined, if you magnify ten sources by ten decibels, each of the shorter and louder noises equals ten decibels in their actual loudness.
When the ten sources are normalized, the louder sounds grow louder, conforming to the standard sound source size. Because the amplifying is done regardless, the little noises are going insane during this procedure.
Conclusion
All in all, Audacity does an excellent job at audio editing. If you simply need to modify an audio file, Audacity is a great option. For increasing and decreasing the volume of single and multiple audio files, Audacity is still one of the best bets in the market. We hope that now know how Audacity increase volume of the audio files after reading this article.
10 Best Nature Sounds Apps for iOS and Android
Best Nature Sounds Apps for iOS and Android

Benjamin Arango
Apr 26, 2024• Proven solutions
In today’s challenging times, when stress and anxiety has become inevitable for a majority of population, there is a constant search for solutions that will enable people to live a peaceful and pleasant life. Here, the technology comes to their rescue with nature sound effects app.
These applications provide multiple sounds related to the Nature. The users just need to download any of these programs, and select the desired tone according to their choice. Such mobile software also offer numerous relaxing audios that assist in achieving a deeper level of concentration during the meditation.
10 Best Nature Sounds Apps
1. YouTube
YouTube is also one of the important apps for nature sounds where one can get almost any kind of relaxing sounds related to the Nature.
Binaural beats videos, where two different frequencies of sounds are combined to create a new frequency tone are getting highly popular among people. These are believed to help in lowering stress, anxiety and depression and increase concentration, attention, and efficiency of an individual.
It can also be helpful in attaining mental peace and serenity. The app even contains peaceful meditation sounds that ease the ability to focus and remain relaxed during the whole process. It is highly a user-friendly app and is absolutely free to download on the Android Smartphones.
2. Atmosphere: Relaxing Sounds
Compatible with Android 5.0 or up , and iOS 10.0 or later

Atmosphere is one of the best apps for nature sounds. It is custom-made to help people relieve stress and relax their mind.
The key feature of this application is that it allows users to import their personalized audios and mix them with various default acoustics available within the app itself.
The soothing sounds available here are divided into 8 different environments such as Beach, City, Park, Countryside, Home, Underwater, Forest and Oriental. Users can also mix and match the sounds between environments to produce a tailored theme.
3. Rainy Mood
Compatible with both iOS and Android OS 5.0 and up

Rainy Mood provides the most genuine rain, thunderstorm, and lightening sounds available online.
It not only relieves tension and anxiety but also helps users suffering from insomnia.
This app even contains natural white noise facility that helps in getting rid of any unwanted sounds around us.
The various rain sounds are available here in different environments such as heavy rain, tropical rain, umbrella, rain on tent, rain on porch etc. The best thing about this app is that it can work in offline mode, i.e. without any Internet connection. This eventually results in less power consumption.
4. Animal Sounds
Compatible with Android 4.1 and up
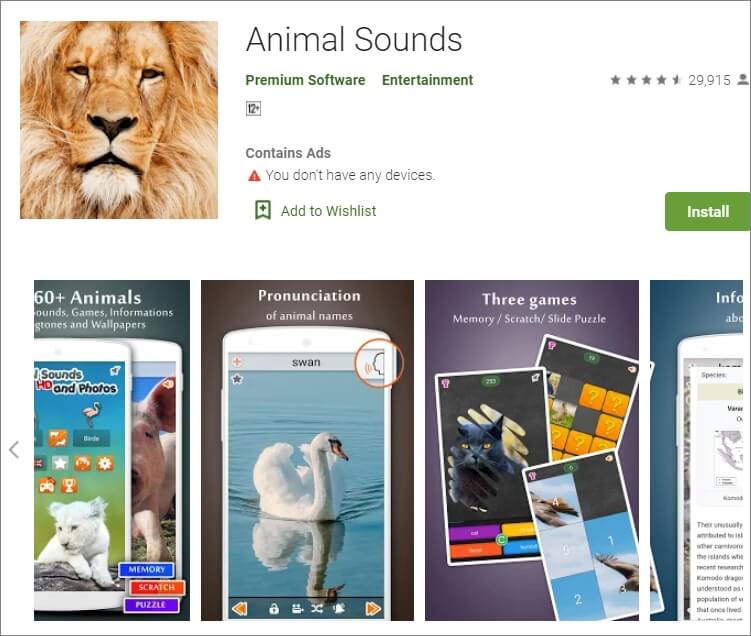
Animal Sounds is a one-stop destination for all animal lovers. The program provides the most detailed information about animals, and also contains hundreds of animal sounds and photographs from all over the globe.
The quality of audios and pictures is remarkably high and clear. The sounds here are categorized under pet animals, mammals, farm animals, bird sounds, wild animals, reptiles and amphibians.
The application also provides the facility of customized ringtones and wallpapers to its users.
5. Sleep Sounds
Compatible with Android 4.4 or later
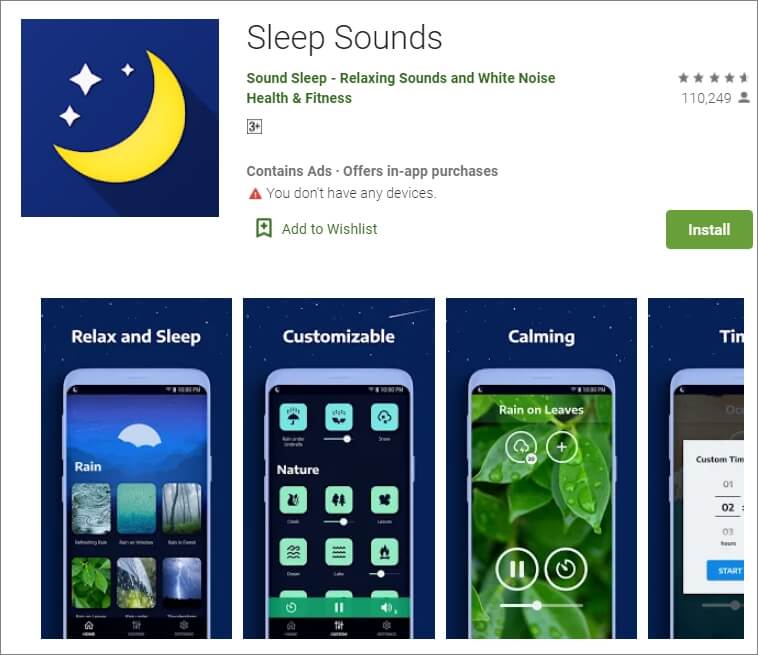
Sleep Sounds is one of the top trending apps nowadays owing to the increasing problems of insomnia and irregular sleep patterns among people. It is very helpful for an uninterrupted quality sleep.
The calm and soft music gradually tranquilizes the mind and the user eases into a good sleep. Its interface is user-friendly with beautiful images in the background.
The sounds here are categorized under rain, nature, relax, transport, noise, and white noise classes. This app also works without an Internet connection.
6.Calm
Compatible with Android and iOS 10.0 and watchOS 6.0 or later
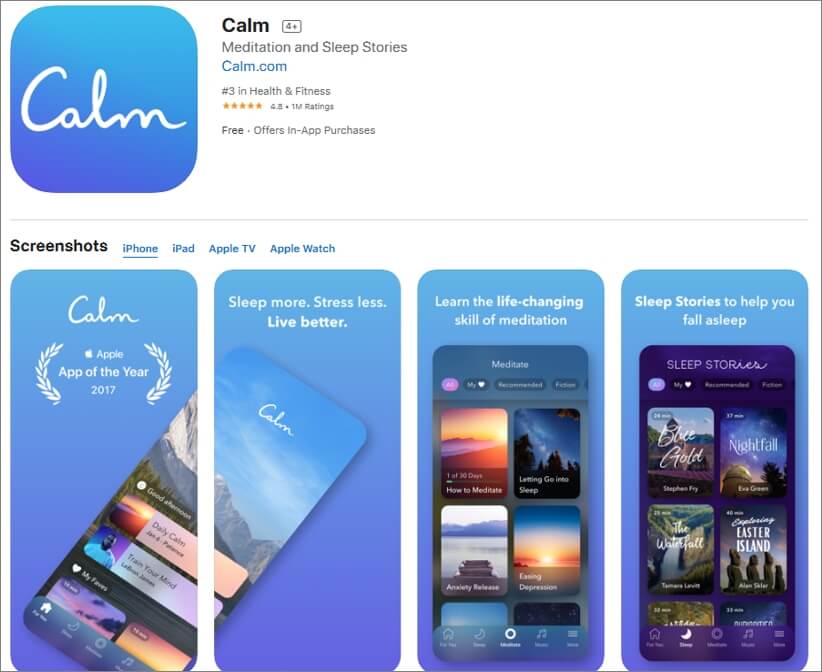
Calm is best suitable for the people who practice meditation on a daily basis. It is available for free and can be used by the beginners as well as experienced users.
The main features include guided meditation programs, breathing sessions, adult bed-time stories, masterclasses by the international coaches, etc.
Here, one can choose a personalized guide for meditation from several topics such as relationships, self-esteem, breaking habits, forgiveness, mindfulness, etc. Users can even track their daily progress on the basis of time spent by them on the app.
7. Ambience – Nature sounds: sleep and meditation
Compatible with Android 4.2 and up .
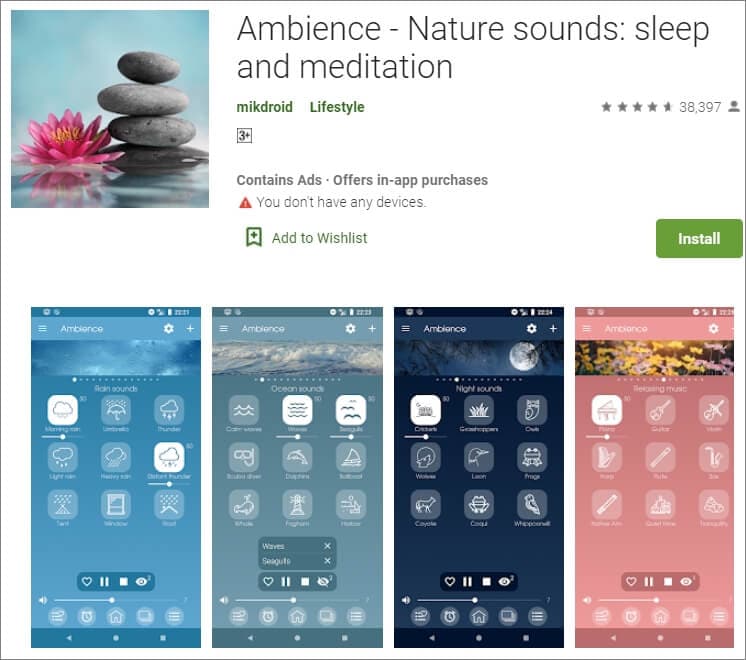
Ambience is another one of the most popular apps for nature sounds providing peace and serenity to its users through relaxing and soothing tones.
It has a very simple and clean user interface which makes it a highly demanding program. The main features include the facility of mixing maximum 10 sounds at the same time. Along with various preset mixtures of audios that are available here, users can also save their customized combinations for future use.
8. Naturespace: Sleep Relax Focus
Compatible with Android 4.0 or up and iOS 9.0 or later
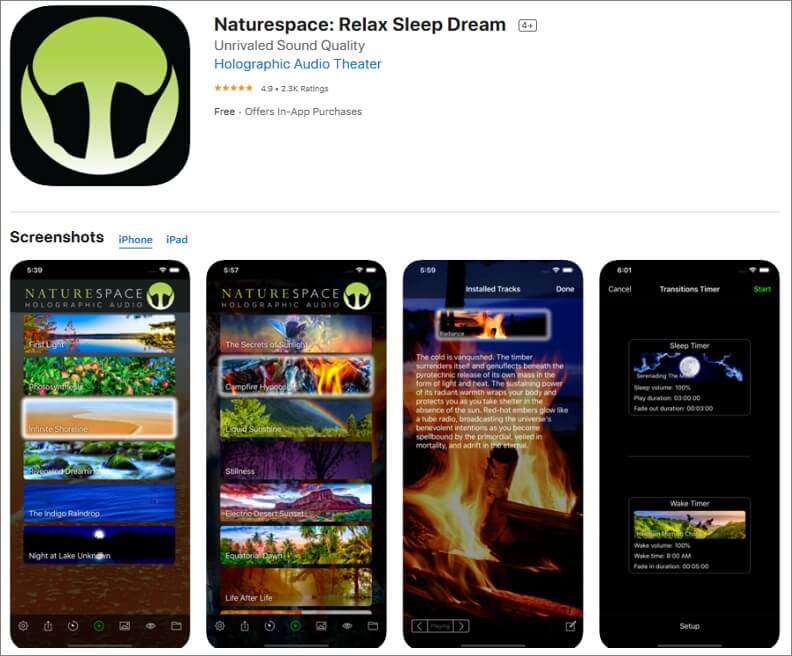
Naturespace is a unique app containing real time 3D recordings of natural places such as forests, deserts, mountains, etc. The equipment used in the program for recording the sounds are of extremely high quality, and as a result, the listening experience is out of this world.
The clarity of the sound surpasses almost every other application available in this genre of nature sound apps. It also provides the facility of sleep and wake timer to its users. The simple user interface along with earbud optimisation facility makes the software highly efficient and popular among people.
9. SimplyNoise – Free White Noise
Compatible with iOS 8.0 or later and Android
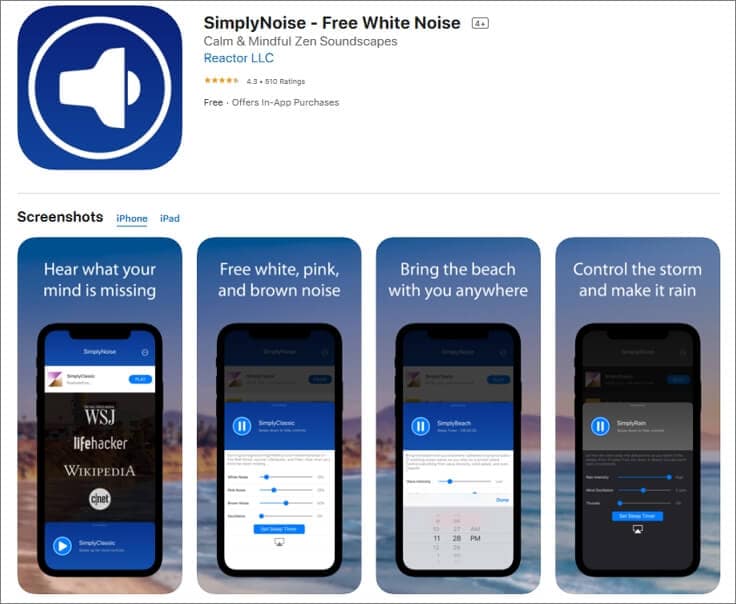
Simply Noise is one of the most basic apps for nature sounds as it provides only one acoustic without any background noises. As there are no such complexities involved, it can also be used by people who are not tech-savvy.
The categorization of sounds is done here as white noise, pink noise, and brown noise. Users can select any of these according to their requirement.
This app is best suitable for people who are unable to concentrate on a particular thing, or suffer from sleeping disorder. Sleep-timer option is also available here.
10. aSleep
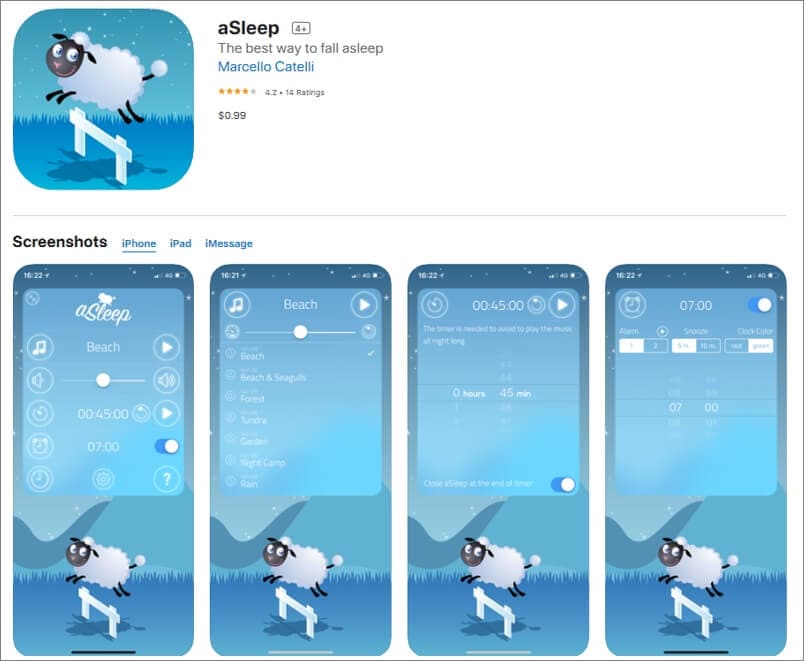
Available for iOS devices like iPhone and iPad, aSleep offers around 64 realistic stereo nature sounds to help you relax your mind and fall asleep almost instantaneously. With the built-in Timer feature, the music can be programmed to stop automatically after a certain amount of time to save your device’s battery.
Furthermore, the also works as an alarm clock that wakes you up with nature sounds at your predefined hour. The application is also good for kids as it can be used to play lullabies to help them get a tight sleep at night. And the program does all this without collecting any data from your iDevice.
What Is the Best Rain Sound App?
Among various rain sound applications available online, Rainy Mood is the most popular one that enjoys high star rating. When it comes to rain sounds, there is no match to it. It mainly includes 4 rain scenes namely Classic, Ocean, Countryside and Cafe. These genres can be customized according to different tastes and preferences.
What Are the Different Sounds of Nature?
The nature is made up of 5 basic elements which include Air, Water, Fire, Earth and Space. These components constitute various natural acoustics. Some examples are music of the rain, thunderstorm or a waterfall, wind blows, sounds of leaves and water streams, chirping of birds or grasshoppers, stridulation of insects like crickets, etc. All these sounds are beautifully incorporated in nature sound effects app.
In case that you want to add some nature sound to your video clip, you can try Wondershare Filmora, which features an audio library containing different nature sound effects as well. Download the free trial version of Filmora and have a try.


Besides adding sound to video, you can also add some elemental 2D visual effects to videos to make it cooler.
Benjamin Arango
Benjamin Arango is a writer and a lover of all things video.
Follow @Benjamin Arango
Benjamin Arango
Apr 26, 2024• Proven solutions
In today’s challenging times, when stress and anxiety has become inevitable for a majority of population, there is a constant search for solutions that will enable people to live a peaceful and pleasant life. Here, the technology comes to their rescue with nature sound effects app.
These applications provide multiple sounds related to the Nature. The users just need to download any of these programs, and select the desired tone according to their choice. Such mobile software also offer numerous relaxing audios that assist in achieving a deeper level of concentration during the meditation.
10 Best Nature Sounds Apps
1. YouTube
YouTube is also one of the important apps for nature sounds where one can get almost any kind of relaxing sounds related to the Nature.
Binaural beats videos, where two different frequencies of sounds are combined to create a new frequency tone are getting highly popular among people. These are believed to help in lowering stress, anxiety and depression and increase concentration, attention, and efficiency of an individual.
It can also be helpful in attaining mental peace and serenity. The app even contains peaceful meditation sounds that ease the ability to focus and remain relaxed during the whole process. It is highly a user-friendly app and is absolutely free to download on the Android Smartphones.
2. Atmosphere: Relaxing Sounds
Compatible with Android 5.0 or up , and iOS 10.0 or later
Atmosphere is one of the best apps for nature sounds. It is custom-made to help people relieve stress and relax their mind.
The key feature of this application is that it allows users to import their personalized audios and mix them with various default acoustics available within the app itself.
The soothing sounds available here are divided into 8 different environments such as Beach, City, Park, Countryside, Home, Underwater, Forest and Oriental. Users can also mix and match the sounds between environments to produce a tailored theme.
3. Rainy Mood
Compatible with both iOS and Android OS 5.0 and up
Rainy Mood provides the most genuine rain, thunderstorm, and lightening sounds available online.
It not only relieves tension and anxiety but also helps users suffering from insomnia.
This app even contains natural white noise facility that helps in getting rid of any unwanted sounds around us.
The various rain sounds are available here in different environments such as heavy rain, tropical rain, umbrella, rain on tent, rain on porch etc. The best thing about this app is that it can work in offline mode, i.e. without any Internet connection. This eventually results in less power consumption.
4. Animal Sounds
Compatible with Android 4.1 and up
Animal Sounds is a one-stop destination for all animal lovers. The program provides the most detailed information about animals, and also contains hundreds of animal sounds and photographs from all over the globe.
The quality of audios and pictures is remarkably high and clear. The sounds here are categorized under pet animals, mammals, farm animals, bird sounds, wild animals, reptiles and amphibians.
The application also provides the facility of customized ringtones and wallpapers to its users.
5. Sleep Sounds
Compatible with Android 4.4 or later
Sleep Sounds is one of the top trending apps nowadays owing to the increasing problems of insomnia and irregular sleep patterns among people. It is very helpful for an uninterrupted quality sleep.
The calm and soft music gradually tranquilizes the mind and the user eases into a good sleep. Its interface is user-friendly with beautiful images in the background.
The sounds here are categorized under rain, nature, relax, transport, noise, and white noise classes. This app also works without an Internet connection.
6.Calm
Compatible with Android and iOS 10.0 and watchOS 6.0 or later
Calm is best suitable for the people who practice meditation on a daily basis. It is available for free and can be used by the beginners as well as experienced users.
The main features include guided meditation programs, breathing sessions, adult bed-time stories, masterclasses by the international coaches, etc.
Here, one can choose a personalized guide for meditation from several topics such as relationships, self-esteem, breaking habits, forgiveness, mindfulness, etc. Users can even track their daily progress on the basis of time spent by them on the app.
7. Ambience – Nature sounds: sleep and meditation
Compatible with Android 4.2 and up .
Ambience is another one of the most popular apps for nature sounds providing peace and serenity to its users through relaxing and soothing tones.
It has a very simple and clean user interface which makes it a highly demanding program. The main features include the facility of mixing maximum 10 sounds at the same time. Along with various preset mixtures of audios that are available here, users can also save their customized combinations for future use.
8. Naturespace: Sleep Relax Focus
Compatible with Android 4.0 or up and iOS 9.0 or later
Naturespace is a unique app containing real time 3D recordings of natural places such as forests, deserts, mountains, etc. The equipment used in the program for recording the sounds are of extremely high quality, and as a result, the listening experience is out of this world.
The clarity of the sound surpasses almost every other application available in this genre of nature sound apps. It also provides the facility of sleep and wake timer to its users. The simple user interface along with earbud optimisation facility makes the software highly efficient and popular among people.
9. SimplyNoise – Free White Noise
Compatible with iOS 8.0 or later and Android
Simply Noise is one of the most basic apps for nature sounds as it provides only one acoustic without any background noises. As there are no such complexities involved, it can also be used by people who are not tech-savvy.
The categorization of sounds is done here as white noise, pink noise, and brown noise. Users can select any of these according to their requirement.
This app is best suitable for people who are unable to concentrate on a particular thing, or suffer from sleeping disorder. Sleep-timer option is also available here.
10. aSleep
Available for iOS devices like iPhone and iPad, aSleep offers around 64 realistic stereo nature sounds to help you relax your mind and fall asleep almost instantaneously. With the built-in Timer feature, the music can be programmed to stop automatically after a certain amount of time to save your device’s battery.
Furthermore, the also works as an alarm clock that wakes you up with nature sounds at your predefined hour. The application is also good for kids as it can be used to play lullabies to help them get a tight sleep at night. And the program does all this without collecting any data from your iDevice.
What Is the Best Rain Sound App?
Among various rain sound applications available online, Rainy Mood is the most popular one that enjoys high star rating. When it comes to rain sounds, there is no match to it. It mainly includes 4 rain scenes namely Classic, Ocean, Countryside and Cafe. These genres can be customized according to different tastes and preferences.
What Are the Different Sounds of Nature?
The nature is made up of 5 basic elements which include Air, Water, Fire, Earth and Space. These components constitute various natural acoustics. Some examples are music of the rain, thunderstorm or a waterfall, wind blows, sounds of leaves and water streams, chirping of birds or grasshoppers, stridulation of insects like crickets, etc. All these sounds are beautifully incorporated in nature sound effects app.
In case that you want to add some nature sound to your video clip, you can try Wondershare Filmora, which features an audio library containing different nature sound effects as well. Download the free trial version of Filmora and have a try.
Besides adding sound to video, you can also add some elemental 2D visual effects to videos to make it cooler.
Benjamin Arango
Benjamin Arango is a writer and a lover of all things video.
Follow @Benjamin Arango
Also read:
- New In 2024, Mastering iPhone Disabling Dynamic Volume Adjustment
- The Ultimate List of Free-to-Download Montage Music Sites for 2024
- New Supercharge Your Windows PCs Sound Output with These Top 10 Volumetric Enhancers
- Updated Top 5 Essential Audio Editing Apps for Android Devices Unmissable for 2024
- Updated In 2024, Unleash Your Creative Potential with These 5 In-Demand Android Audio Editors
- New 2024 Approved Exhaustive Vimeo Film Metrics Including Aspect Ratio Details
- Updated 2024 Approved Enhancing Audacitys Functionality Adding the Latest Lame Encoder
- New Useful Tips How to Use Voxal Voice Changer on Discord, In 2024
- New The Comprehensive Checklist 8 Superior Internet-Accessible, Cost-Free Recording Solutions
- 2024 Approved Enhance Communication The Leading 5 Mobile Applications to Modify Call Voices
- Building a Gradual Audio Fade-Out Feature in Multimedia Projects for 2024
- New In 2024, 5 Amazing Voice Changer for Google Meet
- In 2024, The Complete Guide to Podcast Editing with Audacity
- Top-Tier Guidelines for Mastering Music Videos
- Updated Top 8 Best DAW Apps for Android to Accelerate Your Music Production for 2024
- In 2024, Windows 10 Sound Sensation A Step-by-Step Audio Capture Tutorial
- New 2024 Approved The Ultimate Guide to 5 Exceptional MP3 Merger Applications on Mac Devices
- The Step-by-Step Guide to Personalizing Mobile Notifications
- New In 2024, 5 Interesting Voice Changer to Make Your Calls Funnier
- Updated Linux Listens Well The Best Free Software and Practices for Capturing Exceptional Soundtracks for 2024
- New 2024 Approved The Essential Playlist of Audio-Enhancing Technology Top 15 Apps and Websites for Music in Media
- New In 2024, Discovering Top 10 Budget-Friendly Online Digital Audio Workstations (DAWs)
- In 2024, Premier AIFF to MP3 Utility Accelerate File Conversion with Precision
- Updated Top 5 Free Hits of Humorous Background Music for Video Productions
- Updated Ethereal Soundscapes Review Analyzing Best-in-Class Audio Editors and Their Pros, Cons, and Alternatives for 2024
- Updated Applications for Adding Audio to Video in Android for 2024
- Updated Exploring the Premier 8 Voice-Activated Applications for PCs & MACs
- Expert Gaming Intro Makers Top Picks for 2024
- Full Guide to Bypass Nokia 130 Music FRP
- How To Unbrick a Dead Realme C53 | Dr.fone
- How to Change Tecno Camon 20 Pro 5G Location on Skout | Dr.fone
- New In 2024, Top 8 Stop Motion Animation Software for Mac and PC
- In 2024, Tips And Tricks To Tell if Your Apple iPhone 15 Pro Is Unlocked
- How to Download Windows Movie Maker 2012 Version for 2024
- Top 10 Password Cracking Tools For Infinix Note 30 5G
- Full Guide to Hard Reset Your Xiaomi Civi 3 Disney 100th Anniversary Edition | Dr.fone
- How To Fix Unresponsive Touch Screen on Honor 90 Pro | Dr.fone
- Title: The Ultimate Methods for Crafting Lifelike AI Speech Patterns for 2024
- Author: Ella
- Created at : 2024-05-19 06:26:37
- Updated at : 2024-05-20 06:26:37
- Link: https://sound-optimizing.techidaily.com/the-ultimate-methods-for-crafting-lifelike-ai-speech-patterns-for-2024/
- License: This work is licensed under CC BY-NC-SA 4.0.
