

Updated 2024 Approved 2023 Compilation of Top Free Music Software Produce, Edit & Record with Zero Cost Windows and macOS
“2023 Compilation of Top Free Music Software: Produce, Edit & Record with Zero Cost [Windows and macOS]”
13 Free Music Production Software for Windows/Mac/Online

Benjamin Arango
Mar 27, 2024• Proven solutions
13 Free Music Production Software for Windows/Mac/Online
Technology advances have spread through all fields of human activity, including music recording and development. The invention of music development tools has made it simpler for people engaged in the creation of music in one form or another.
Numerous applications for music development are on the market, and some are meant for musicians, and others are for educators and teachers. There is also a need to direct prospective customers to the right free music production software.
A comprehensive analysis of some of the best music development tools has been conducted to help you make the correct decision while you’re ready to purchase the app. This comprehensive Music Production Software Guide will provide solutions to many of your unanswered questions relating to the purchase of music production software.
- Part 1: Free Music Production Software for Windows
- Part 2: Free Music Production Software for Mac
- Part 3: Free Music Production Software Online
Part 1: Free Music Production Software for Windows
1. Audacity
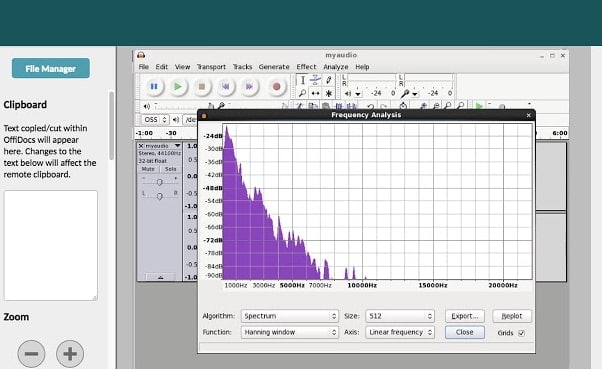
The system for music development is not complete without an audio editor. Audacity is the best free music creation software available on the market. Audacity is open-source and extensive and provides a wide range of tools and effects for performing all audio editing and recording activities. It is created by a community of volunteers and provides regular notifications almost every month. It’s lightweight, safe, and intuitive enough to be used by novice music makers.
Pros
- It is open-source
- It can load VST plugins
Cons
- Only 32-bit plugins are allowed
- Limited features
2. Ardour
Ardour is a highly integrated program of music production that allows users to record and edit on Mac, Linux, and Windows operating systems. Ardour Music Production Software was created by integrating the efforts of the world’s skilled team, such as recording technicians, programmers, and musicians. Such experienced technicians make their concerted and thorough efforts to build the program. Ardour is one of the few applications in music production that respects honesty. The accessibility of this program allows app developers to concentrate on functionality that matters to consumers rather than to construct compelling apps for advertising purposes. This is a system that should be celebrated for its user-focused functionality.
Pros
- It has excellent user-friendliness
- It is available on Mac, Linux, and Windows
Cons
- It lacks a few integral features
- It is difficult to operate for people new to audio editing

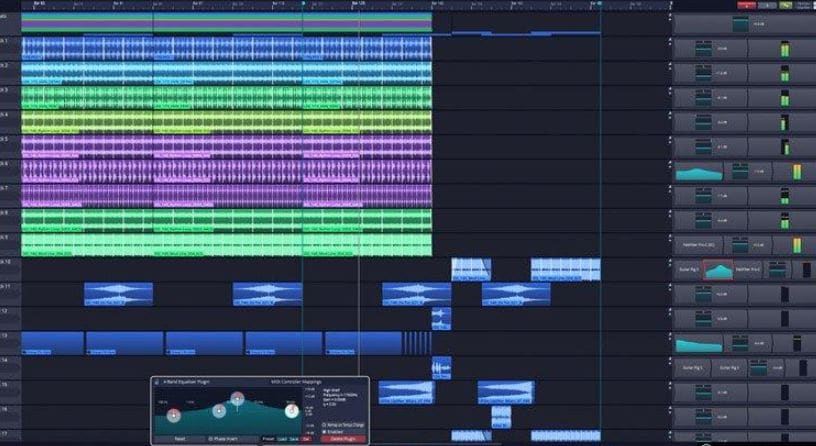
3. Tracktion T7
The people at Tracktion seem to have reached a reasonably canny business model by launching older DAW versions for free and without anything removed.
The convention appears to make it possible to access the edition without charge of two iterations before the new one. You will not be provided with all new functionality, but you will receive an update every time the company updates its flagship DAW, which it does nearly every year.
The growing section is adjustable to match the workflow, and the bottom panel adjusts so that any parameters anywhere on the screen can be seen.
Pros
- It features an unlimited number of audio and MIDI tracks
- It is able to host multiple plugin formats
Cons
- It doesn’t provide all the features at once
- It does not support many plugins
4. LMMS
LMMS is a fully free music production software for windows for music development. It is an open-source and also a project platform for the community. LMMS is a cross-platform device app. It makes it easier to manufacture beats, particularly when many music production professionals have to manufacture quality music with their computers.
Thanks to the powerful sample, beat and melody design, mixing and synthetic sound processes, and many other features, the LMMS music production software provides high-quality audio output. The product also features playback tools, plugins, and samples to produce powerful, high-quality sound.
Pros
- It is compatible with Linux, Windows, and Mac
- Hydrogen project files and MIDI can be imported easily for editing
Cons
- It eats a lot of memory and requires a high-end device to support it
- Some users complained that understanding its working is difficult

5. Cakewalk
This is an exciting app for music production to purchase. It is a fantastic tech to invest in music production. Cakewalk Sonar Artist Software is one of Cakewalk Sonar Artist ‘s great productions. Cakewalk is known for an excellent GUI, an excellent mixing console, an excellent commercial radio system, and limitless MIDI tracks.
A good device to use as part of your instruments for the development of music is the Cakewalk Sonar Artist Music Production program. It stands out as a program packed with excellent features amongst its counterparts. And the app is unmatched in the area of apps.
Pros
- You can share music compilation directly to social media
- You can easily add effects to your tracks
Cons
- It is priced, very high
- One window interface makes it hectic

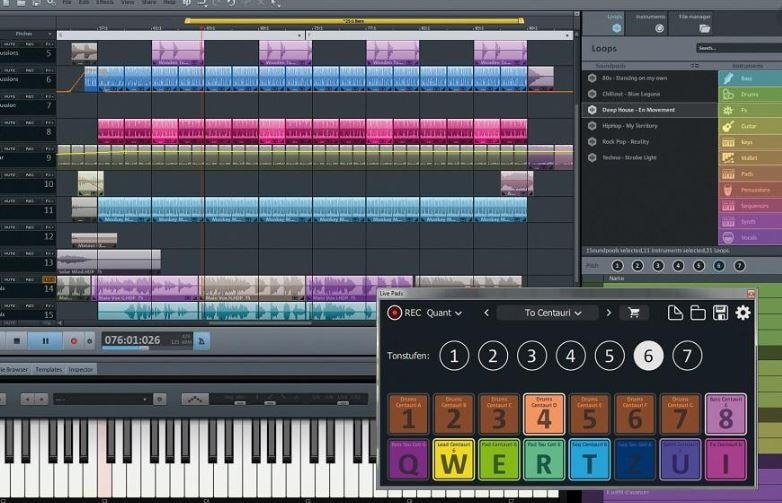
6. Music Maker by Magix
This app is a special program for sound engineers, skilled musicians, and accomplished music producers, developed by US Magix Entertainment. It offers an excellent forum for creative music development in music production professionals.
In reality, the software for music production is excellent software for the Music Maker by Magix. In the field of music post-production and music mastering, mixing and arrangement, recording, and more, the software achieved remarkable breakthroughs. Thanks to the successful combination of a technical device and highly flexible workflow, the Music Maker by Magix has achieved this groundbreaking success.
With creative algorithm and superb plugin effects, the Music Maker by Magix program enables music manufacturers to develop their ideas in line with the highest quality in this industry.
Pros
- It is great for EDM producers
Cons
- It is not suitable for newbies
- The GUI feels a bit cluttered
Part 2: Free Music Production Software for Mac
7. Garageband
This is a music development studio app that is designed to function on Mac. It is a great free music production software for Mac. This software has a full sound collection, which includes virtual instruments, voice, and guitar preset.
GarageBand is a well-known app for music development and is an excellent tool for music beginners. Many people have chosen GarageBand because it does not match the ease and ease of use for recording purposes in particular.
The user-friendly interface makes you easy to create music with a more unobstructed view of what you’re recording. Apps from GarageBand captured the attention of others because of their ease-to-use and user-friendliness.
Pros
- The software offers some nicely packaged preset for vocal and guitar recording
- Productive workflow
Cons
- It has limited plugins
- It is only supported for Mac platforms

8. Ableton Live
The Ableton Live 10 Suite is a dynamic and comprehensive program for the creation and performance of musical recordings.
An essential feature of this software is that it allows you to work on your time-based workflow without affecting the live session. This means that the software gives you a rare chance to get involved with the workflow without stopping live performance.
The Multitrack Recording Technology of Ableton Live10 Suite allows music producers to adjust the speed and pacing of any audio during the recording. To make these adjustments, you don’t have to pause the recording. This is one of the striking characteristics which makes this product a good option for all.
Pros
- Adjusting the speed and pace of audio is a delight
- Sophisticated MIDI/audio routing capabilities
Cons
- It has a traditional design
- Not enough updates to fix the buggy features

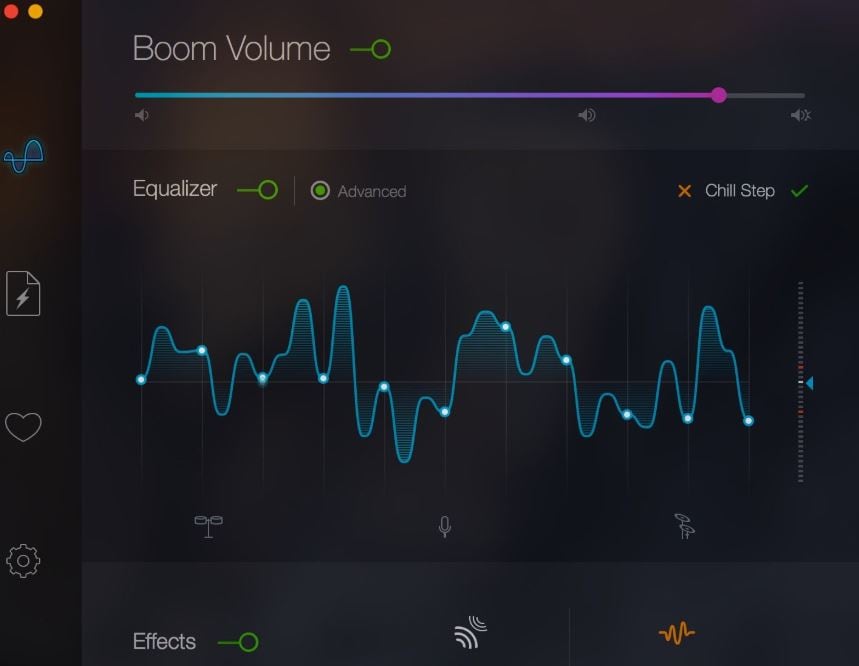
9. Boom 3D
Boom 3D for Mac & Windows is an award-winning pro sound improvement software designed to play your media content on any and all of your devices, phones, or streaming services with amazing 3D effects. No costly headphones or sound boosters will be needed to make your music feel like it! Designed in a new immersive 3D surround sound technology, Boom 3D redefines how people listen to music, watch films, or play games with some headphones on their devices. 3D sound provides the option to check the LFE (subwoofer), and the audio intensity of each Virtual 3D Surround audio system speaker.
Pros
- It comes with loads of content
- Audio quality can be enhanced
Cons
- The design is not suitable for everybody
- It does not have a Linux version
10. Mixxx
For beginners, Mixxx is just another great device. This is also one of the best free music production software downloads for your music. This software supports all Mac, Windows, and Linux platforms.
The application provides you with a DJ-mixing environment and supports all standard formats such as Mp3 and many other formats.
Pros
- It is a great app for beginners
- Supported by Mac, Windows, and Linux
Cons
- It doesn’t support many plugins
- GUI isn’t that great

Part 3: Free Music Production Software Online
11. Soundation
Soundation is a platform that provides free music production software online only capabilities. The free version and three paid versions are offered. You can use this to build your tracks unless you have the resources to do so if you need a web-based music maker and editor.
If you pay, even after you have made your music, you can always cancel. Remember first to save them to your hard drive. If you need paid characteristics, pay for the monthly plan again through PayPal, and you have to use it for a month.
Pros
- Great SSL-modelled mixer
- You can use its devices as a plugin
Cons
- It works only online

12. Audiotool
Audiotool is a popular app for music production hosted online and can be used without installation from inside your browser. It uses a cloud-based network to store all your music and files wherever you are. It is also confirmed that you will share music and tracks directly with YouTube, SoundCloud, and Facebook on its own publishing site. They have premium releases from Loopmasters and some fantastic online VSTs, for example, Heisenberg, Machiniste, Bassline, and Beatbox 8 & 9.
Pros
- No installation needed
- You can directly share it to your social media
Cons
- It works only online
- No upgrades

13. Soundtrap
Soundtrap is not only an online music studio but a training site for students and instructors. The STEAM Curriculum is an online learning resource that helps students to follow music and podcasts, incorporated into the Web app. As we mentioned earlier, in addition to the online Web App, you can also use it on different devices, share it with other users, and work in innovative projects for your music.
The interface is simple, easy to use, and easy to understand. It is simply an instrument for innovation; you don’t have to learn how to apply VST or any other technical elements to music creation. You can also record your MIDI instruments directly from your machine or device’s mic.
Pros
- It provides a great platform for teachers to teach their students
- It is very easy to use
Cons
- It only has a limited number of plugins
- It cannot be used professionally

Conclusion
If you make music on a computer, the most important resource in your artistic arsenal is your DAW; in your home recording system, you ‘re probably going to have the MIDI keyboard, audio interface, studio monitor speakers, and maybe a microphone or two. But your program is at the core of it all. Not everyone can afford expensive DAWs, but one must not worry as free music production software are present to aid us.
It is important to have a DAW with which you are pleased and, perhaps more importantly, a DAW, which allows you to turn your ideas into music as quickly and painlessly as possible. So make sure you choose the best one for you according to your needs. Hopefully, this guide will aid you!


Benjamin Arango
Benjamin Arango is a writer and a lover of all things video.
Follow @Benjamin Arango
Benjamin Arango
Mar 27, 2024• Proven solutions
13 Free Music Production Software for Windows/Mac/Online
Technology advances have spread through all fields of human activity, including music recording and development. The invention of music development tools has made it simpler for people engaged in the creation of music in one form or another.
Numerous applications for music development are on the market, and some are meant for musicians, and others are for educators and teachers. There is also a need to direct prospective customers to the right free music production software.
A comprehensive analysis of some of the best music development tools has been conducted to help you make the correct decision while you’re ready to purchase the app. This comprehensive Music Production Software Guide will provide solutions to many of your unanswered questions relating to the purchase of music production software.
- Part 1: Free Music Production Software for Windows
- Part 2: Free Music Production Software for Mac
- Part 3: Free Music Production Software Online
Part 1: Free Music Production Software for Windows
1. Audacity
The system for music development is not complete without an audio editor. Audacity is the best free music creation software available on the market. Audacity is open-source and extensive and provides a wide range of tools and effects for performing all audio editing and recording activities. It is created by a community of volunteers and provides regular notifications almost every month. It’s lightweight, safe, and intuitive enough to be used by novice music makers.
Pros
- It is open-source
- It can load VST plugins
Cons
- Only 32-bit plugins are allowed
- Limited features
2. Ardour
Ardour is a highly integrated program of music production that allows users to record and edit on Mac, Linux, and Windows operating systems. Ardour Music Production Software was created by integrating the efforts of the world’s skilled team, such as recording technicians, programmers, and musicians. Such experienced technicians make their concerted and thorough efforts to build the program. Ardour is one of the few applications in music production that respects honesty. The accessibility of this program allows app developers to concentrate on functionality that matters to consumers rather than to construct compelling apps for advertising purposes. This is a system that should be celebrated for its user-focused functionality.
Pros
- It has excellent user-friendliness
- It is available on Mac, Linux, and Windows
Cons
- It lacks a few integral features
- It is difficult to operate for people new to audio editing
3. Tracktion T7
The people at Tracktion seem to have reached a reasonably canny business model by launching older DAW versions for free and without anything removed.
The convention appears to make it possible to access the edition without charge of two iterations before the new one. You will not be provided with all new functionality, but you will receive an update every time the company updates its flagship DAW, which it does nearly every year.
The growing section is adjustable to match the workflow, and the bottom panel adjusts so that any parameters anywhere on the screen can be seen.
Pros
- It features an unlimited number of audio and MIDI tracks
- It is able to host multiple plugin formats
Cons
- It doesn’t provide all the features at once
- It does not support many plugins
4. LMMS
LMMS is a fully free music production software for windows for music development. It is an open-source and also a project platform for the community. LMMS is a cross-platform device app. It makes it easier to manufacture beats, particularly when many music production professionals have to manufacture quality music with their computers.
Thanks to the powerful sample, beat and melody design, mixing and synthetic sound processes, and many other features, the LMMS music production software provides high-quality audio output. The product also features playback tools, plugins, and samples to produce powerful, high-quality sound.
Pros
- It is compatible with Linux, Windows, and Mac
- Hydrogen project files and MIDI can be imported easily for editing
Cons
- It eats a lot of memory and requires a high-end device to support it
- Some users complained that understanding its working is difficult
5. Cakewalk
This is an exciting app for music production to purchase. It is a fantastic tech to invest in music production. Cakewalk Sonar Artist Software is one of Cakewalk Sonar Artist ‘s great productions. Cakewalk is known for an excellent GUI, an excellent mixing console, an excellent commercial radio system, and limitless MIDI tracks.
A good device to use as part of your instruments for the development of music is the Cakewalk Sonar Artist Music Production program. It stands out as a program packed with excellent features amongst its counterparts. And the app is unmatched in the area of apps.
Pros
- You can share music compilation directly to social media
- You can easily add effects to your tracks
Cons
- It is priced, very high
- One window interface makes it hectic
6. Music Maker by Magix
This app is a special program for sound engineers, skilled musicians, and accomplished music producers, developed by US Magix Entertainment. It offers an excellent forum for creative music development in music production professionals.
In reality, the software for music production is excellent software for the Music Maker by Magix. In the field of music post-production and music mastering, mixing and arrangement, recording, and more, the software achieved remarkable breakthroughs. Thanks to the successful combination of a technical device and highly flexible workflow, the Music Maker by Magix has achieved this groundbreaking success.
With creative algorithm and superb plugin effects, the Music Maker by Magix program enables music manufacturers to develop their ideas in line with the highest quality in this industry.
Pros
- It is great for EDM producers
Cons
- It is not suitable for newbies
- The GUI feels a bit cluttered
Part 2: Free Music Production Software for Mac
7. Garageband
This is a music development studio app that is designed to function on Mac. It is a great free music production software for Mac. This software has a full sound collection, which includes virtual instruments, voice, and guitar preset.
GarageBand is a well-known app for music development and is an excellent tool for music beginners. Many people have chosen GarageBand because it does not match the ease and ease of use for recording purposes in particular.
The user-friendly interface makes you easy to create music with a more unobstructed view of what you’re recording. Apps from GarageBand captured the attention of others because of their ease-to-use and user-friendliness.
Pros
- The software offers some nicely packaged preset for vocal and guitar recording
- Productive workflow
Cons
- It has limited plugins
- It is only supported for Mac platforms
8. Ableton Live
The Ableton Live 10 Suite is a dynamic and comprehensive program for the creation and performance of musical recordings.
An essential feature of this software is that it allows you to work on your time-based workflow without affecting the live session. This means that the software gives you a rare chance to get involved with the workflow without stopping live performance.
The Multitrack Recording Technology of Ableton Live10 Suite allows music producers to adjust the speed and pacing of any audio during the recording. To make these adjustments, you don’t have to pause the recording. This is one of the striking characteristics which makes this product a good option for all.
Pros
- Adjusting the speed and pace of audio is a delight
- Sophisticated MIDI/audio routing capabilities
Cons
- It has a traditional design
- Not enough updates to fix the buggy features
9. Boom 3D
Boom 3D for Mac & Windows is an award-winning pro sound improvement software designed to play your media content on any and all of your devices, phones, or streaming services with amazing 3D effects. No costly headphones or sound boosters will be needed to make your music feel like it! Designed in a new immersive 3D surround sound technology, Boom 3D redefines how people listen to music, watch films, or play games with some headphones on their devices. 3D sound provides the option to check the LFE (subwoofer), and the audio intensity of each Virtual 3D Surround audio system speaker.
Pros
- It comes with loads of content
- Audio quality can be enhanced
Cons
- The design is not suitable for everybody
- It does not have a Linux version
10. Mixxx
For beginners, Mixxx is just another great device. This is also one of the best free music production software downloads for your music. This software supports all Mac, Windows, and Linux platforms.
The application provides you with a DJ-mixing environment and supports all standard formats such as Mp3 and many other formats.
Pros
- It is a great app for beginners
- Supported by Mac, Windows, and Linux
Cons
- It doesn’t support many plugins
- GUI isn’t that great
Part 3: Free Music Production Software Online
11. Soundation
Soundation is a platform that provides free music production software online only capabilities. The free version and three paid versions are offered. You can use this to build your tracks unless you have the resources to do so if you need a web-based music maker and editor.
If you pay, even after you have made your music, you can always cancel. Remember first to save them to your hard drive. If you need paid characteristics, pay for the monthly plan again through PayPal, and you have to use it for a month.
Pros
- Great SSL-modelled mixer
- You can use its devices as a plugin
Cons
- It works only online
12. Audiotool
Audiotool is a popular app for music production hosted online and can be used without installation from inside your browser. It uses a cloud-based network to store all your music and files wherever you are. It is also confirmed that you will share music and tracks directly with YouTube, SoundCloud, and Facebook on its own publishing site. They have premium releases from Loopmasters and some fantastic online VSTs, for example, Heisenberg, Machiniste, Bassline, and Beatbox 8 & 9.
Pros
- No installation needed
- You can directly share it to your social media
Cons
- It works only online
- No upgrades
13. Soundtrap
Soundtrap is not only an online music studio but a training site for students and instructors. The STEAM Curriculum is an online learning resource that helps students to follow music and podcasts, incorporated into the Web app. As we mentioned earlier, in addition to the online Web App, you can also use it on different devices, share it with other users, and work in innovative projects for your music.
The interface is simple, easy to use, and easy to understand. It is simply an instrument for innovation; you don’t have to learn how to apply VST or any other technical elements to music creation. You can also record your MIDI instruments directly from your machine or device’s mic.
Pros
- It provides a great platform for teachers to teach their students
- It is very easy to use
Cons
- It only has a limited number of plugins
- It cannot be used professionally
Conclusion
If you make music on a computer, the most important resource in your artistic arsenal is your DAW; in your home recording system, you ‘re probably going to have the MIDI keyboard, audio interface, studio monitor speakers, and maybe a microphone or two. But your program is at the core of it all. Not everyone can afford expensive DAWs, but one must not worry as free music production software are present to aid us.
It is important to have a DAW with which you are pleased and, perhaps more importantly, a DAW, which allows you to turn your ideas into music as quickly and painlessly as possible. So make sure you choose the best one for you according to your needs. Hopefully, this guide will aid you!
Benjamin Arango
Benjamin Arango is a writer and a lover of all things video.
Follow @Benjamin Arango
“Exploring the Cost-Free Synergy of Sound and Video on the Internet”
How to Add Music to a Video Online for Free

Liza Brown
Mar 27, 2024• Proven solutions
Creating a soundtrack for a video is one of the most overlooked steps of thevideo editing process . Music can make any video more dynamic and more entertaining to watch. Exporting a video without background music or voiceover included is generally considered a bad practice.
Adding music to video online is a good choice because you don’t need to install any video editing software on your computer. Sometimes, if the desktop video editing app installed doesn’t have a library of royalty-free music , you have to uninstall and try other software. With online solutions, you won’t worry about this. There are several online video editors you can use to add music to a video for free. In this article, I’ll share with you about how to add music to video online.
How to Add Music to a Video Online for Free [7 Ways]
Editing videos online has its downsides, since some platforms have video size limitations, while others offer only a basic set of video editing tools. Even so, adding music to a video online is a straightforward process that doesn’t require you to have advanced video editing skills. So, let’s take a look at different ways of adding music to videos online for free.
1. Add Music and Sound Effect to Videos in YouTube Studio
A few years ago, YouTube launched YouTube Studio that enables YouTubers to edit their videos after they’ve uploaded them to channels. The YouTube Studio currently doesn’t offer audio editing tools, although it features both music and audio effects libraries.
There are two different ways to add music to a video with a YouTube studio. After you upload a video file to your channel, unlisted it and then open the Creator Studio Classic tab which is located in the lower-left side of the page. You should select the Videos option under the Video Manager menu.

Select Audio Option
Click on the Edit drop-down menu next to the video to which you would like to add music and choose the Audio option. Start browsing through YouTube’s collection of royalty-free music and click on the ADD TO VIDEO button once you find a song that matches your video. You can use the Audio Saturation slider to decide if you want to favor the original sound of the video or the song you just added. Click on the Save Changes button when you are done and YouTube Studio will add the music to your video.
You can check the detailed information about how to add music to YouTube video here .

YouTube Audio Library Interface
Optionally you can also download music and audio effects from YouTube Studio’s Audio Library first, and then add the downloaded music to videos with the video editor you have installed on your computer.
3. Use Veed.io to Add Music to Videos
Adding music to a video file with Veed.io is a straightforward process that takes a minimum amount of effort. You should simply select if you want to upload a file from your computer, a camera, your Dropbox account or via a link and wait for your video to be uploaded. Keep in mind that you cannot upload video files larger than 50mb if you are using the free version of the platform.

Veed.io audio uploading and editing interface
After the upload of the video is completed you should click on the Audio icon that is located on the toolbar. You’ll be prompted to upload an audio file stored on your computer and once the upload process is completed you can adjust the volume level, set the start time for the song or trim the audio file so that it matches the length of the video file. Moreover, you can click on the Clean button if you would like to clean the video’s audio before downloading the file to your computer or share it online.

Veed.io video downloading page
Pros
- You can add to music to video without going through the registration process
- Trimming audio files is easy
- Adjusting volume or choosing the song’s start time requires minimum effort
Cons
- All videos you edit with the free version of Veed.io are watermarked
4. Add Music to Videos in Kapwing
Kapwing is probably one of the best online video editing platforms you can use to trim, resize or loop videos. That is why it is not surprising that adding music to videos in Kapwing is a simple three-step process.

Kapwing adding audio to video page
You cannot upload video files that are larger than 500mb to Kapwing from your computer or via URL, which is why you have to choose a file that doesn’t exceed the platform’s size limit. A new window will open as soon as the upload is completed where you can choose to record a voiceover or add an audio file to your video.
Once you upload an audio file to Kapwing, you can adjust the volume, trim the audio and set the point in the video at which the song should start. When done, click on the Create button, wait for the platform to add music to your video and then choose if you want to download the video or share it on social media.
Pros
- You can record voiceovers with Kapwing
- Trimming an audio file or adjusting its volume isn’t difficult
- You can loop music with Kapwing
Cons
- Editing video and audio from the same window is not an option
5. Merge Audio and Video Files with Online Converter
Even though this is primarily a file conversion platform that lets you convert video files, compress audio files or resize images, Online Converter can also be used to add music to videos. There is nothing complicated about combining an audio and a video file on this platform since you just have to select the files you want to merge. However, both files must be under 200mb in order to meet the Online Converter’s size limit.

Add Audio to Video with Online Converter
Afterward, you should click on the Options drop-down menu and choose if you want to replace audio in video or keep audio in the video. The Volume drop-down menu lets you increase or decrease the audio volume, so you just have to select by how much you would like to turn up or turn down the volume and then click on the Add button.
Pros
- You need an Internet connection to add music to a video for free
- No registration is required
Cons
- Offers only basic audio and video editing tools
- Online Converter needs a lot of time to combine audio and video files
6. Use voice2v.com to Add Music to Videos
If you are looking for a quick and easy way to add music to a video, then this is the right platform for you. You just have to select the video file from a folder on your computer, and then proceed to upload an audio file. As soon as you do this, voice2v.com will start merging the two files you selected and display the results on the screen once the process is completed.

Add Audio to Video with Voice2V Online Tool
After the platform merges the audio and video files, you can decide if you want to download the video you created or make another video.
Pros
- A quick way to combine audio and video files
Cons
- The music is added to videos automatically
7. Add Background Music to Videos on pixiko.com
In order to add music to a video with pixiko.com you just have to upload audio and video files to the platform. This process may take a while even though the platform limits the maximum size of the media files you can edit with it, which means that their duration cannot be too long. After the files are uploaded you should click on the Merge icon, and then click on the Merge button on the left side of the screen. The platform will automatically combine the two files so you just have to click on the Done button to complete the process.

Add Audio to Video with Pixiko Online Editor
Pros
- Offers a free way to add music to a video
Cons
- Outdated and confusing interface
- The upload process is slow
Conclusion
Music can help you set the atmosphere of a video and draw the viewer’s attention to it. However, it isn’t always possible to use video editing software that lets you manipulate audio files with ease. Online video editing platforms like Kapwing or Online Converter offer a quick solution to this problem, although with considerable limitations. Are you adding music to videos online? Which video editing platform are you using? Leave a comment below and share your opinions with us.
Liza Brown
Liza Brown is a writer and a lover of all things video.
Follow @Liza Brown
Liza Brown
Mar 27, 2024• Proven solutions
Creating a soundtrack for a video is one of the most overlooked steps of thevideo editing process . Music can make any video more dynamic and more entertaining to watch. Exporting a video without background music or voiceover included is generally considered a bad practice.
Adding music to video online is a good choice because you don’t need to install any video editing software on your computer. Sometimes, if the desktop video editing app installed doesn’t have a library of royalty-free music , you have to uninstall and try other software. With online solutions, you won’t worry about this. There are several online video editors you can use to add music to a video for free. In this article, I’ll share with you about how to add music to video online.
How to Add Music to a Video Online for Free [7 Ways]
Editing videos online has its downsides, since some platforms have video size limitations, while others offer only a basic set of video editing tools. Even so, adding music to a video online is a straightforward process that doesn’t require you to have advanced video editing skills. So, let’s take a look at different ways of adding music to videos online for free.
1. Add Music and Sound Effect to Videos in YouTube Studio
A few years ago, YouTube launched YouTube Studio that enables YouTubers to edit their videos after they’ve uploaded them to channels. The YouTube Studio currently doesn’t offer audio editing tools, although it features both music and audio effects libraries.
There are two different ways to add music to a video with a YouTube studio. After you upload a video file to your channel, unlisted it and then open the Creator Studio Classic tab which is located in the lower-left side of the page. You should select the Videos option under the Video Manager menu.
Select Audio Option
Click on the Edit drop-down menu next to the video to which you would like to add music and choose the Audio option. Start browsing through YouTube’s collection of royalty-free music and click on the ADD TO VIDEO button once you find a song that matches your video. You can use the Audio Saturation slider to decide if you want to favor the original sound of the video or the song you just added. Click on the Save Changes button when you are done and YouTube Studio will add the music to your video.
You can check the detailed information about how to add music to YouTube video here .
YouTube Audio Library Interface
Optionally you can also download music and audio effects from YouTube Studio’s Audio Library first, and then add the downloaded music to videos with the video editor you have installed on your computer.
3. Use Veed.io to Add Music to Videos
Adding music to a video file with Veed.io is a straightforward process that takes a minimum amount of effort. You should simply select if you want to upload a file from your computer, a camera, your Dropbox account or via a link and wait for your video to be uploaded. Keep in mind that you cannot upload video files larger than 50mb if you are using the free version of the platform.
Veed.io audio uploading and editing interface
After the upload of the video is completed you should click on the Audio icon that is located on the toolbar. You’ll be prompted to upload an audio file stored on your computer and once the upload process is completed you can adjust the volume level, set the start time for the song or trim the audio file so that it matches the length of the video file. Moreover, you can click on the Clean button if you would like to clean the video’s audio before downloading the file to your computer or share it online.
Veed.io video downloading page
Pros
- You can add to music to video without going through the registration process
- Trimming audio files is easy
- Adjusting volume or choosing the song’s start time requires minimum effort
Cons
- All videos you edit with the free version of Veed.io are watermarked
4. Add Music to Videos in Kapwing
Kapwing is probably one of the best online video editing platforms you can use to trim, resize or loop videos. That is why it is not surprising that adding music to videos in Kapwing is a simple three-step process.
Kapwing adding audio to video page
You cannot upload video files that are larger than 500mb to Kapwing from your computer or via URL, which is why you have to choose a file that doesn’t exceed the platform’s size limit. A new window will open as soon as the upload is completed where you can choose to record a voiceover or add an audio file to your video.
Once you upload an audio file to Kapwing, you can adjust the volume, trim the audio and set the point in the video at which the song should start. When done, click on the Create button, wait for the platform to add music to your video and then choose if you want to download the video or share it on social media.
Pros
- You can record voiceovers with Kapwing
- Trimming an audio file or adjusting its volume isn’t difficult
- You can loop music with Kapwing
Cons
- Editing video and audio from the same window is not an option
5. Merge Audio and Video Files with Online Converter
Even though this is primarily a file conversion platform that lets you convert video files, compress audio files or resize images, Online Converter can also be used to add music to videos. There is nothing complicated about combining an audio and a video file on this platform since you just have to select the files you want to merge. However, both files must be under 200mb in order to meet the Online Converter’s size limit.
Add Audio to Video with Online Converter
Afterward, you should click on the Options drop-down menu and choose if you want to replace audio in video or keep audio in the video. The Volume drop-down menu lets you increase or decrease the audio volume, so you just have to select by how much you would like to turn up or turn down the volume and then click on the Add button.
Pros
- You need an Internet connection to add music to a video for free
- No registration is required
Cons
- Offers only basic audio and video editing tools
- Online Converter needs a lot of time to combine audio and video files
6. Use voice2v.com to Add Music to Videos
If you are looking for a quick and easy way to add music to a video, then this is the right platform for you. You just have to select the video file from a folder on your computer, and then proceed to upload an audio file. As soon as you do this, voice2v.com will start merging the two files you selected and display the results on the screen once the process is completed.
Add Audio to Video with Voice2V Online Tool
After the platform merges the audio and video files, you can decide if you want to download the video you created or make another video.
Pros
- A quick way to combine audio and video files
Cons
- The music is added to videos automatically
7. Add Background Music to Videos on pixiko.com
In order to add music to a video with pixiko.com you just have to upload audio and video files to the platform. This process may take a while even though the platform limits the maximum size of the media files you can edit with it, which means that their duration cannot be too long. After the files are uploaded you should click on the Merge icon, and then click on the Merge button on the left side of the screen. The platform will automatically combine the two files so you just have to click on the Done button to complete the process.
Add Audio to Video with Pixiko Online Editor
Pros
- Offers a free way to add music to a video
Cons
- Outdated and confusing interface
- The upload process is slow
Conclusion
Music can help you set the atmosphere of a video and draw the viewer’s attention to it. However, it isn’t always possible to use video editing software that lets you manipulate audio files with ease. Online video editing platforms like Kapwing or Online Converter offer a quick solution to this problem, although with considerable limitations. Are you adding music to videos online? Which video editing platform are you using? Leave a comment below and share your opinions with us.
Liza Brown
Liza Brown is a writer and a lover of all things video.
Follow @Liza Brown
Mastering Frequency Adjustment in Audacity Without Compromising Sound Fidelity
You may raise or lower the pitch of a pre-recorded song. Likewise, you may apply the pitch-changing effect in real-time sound recording. Change in pitch affects your noise in certain ways. For instance, it can help you sound younger. Similarly, it can convert the male voice into a female voice. Another notable use of the pitch-changing technique is that you can produce sounds like cartoons. So, changing pitch can add a unique touch to your voice. You can also change pitch when recording in Audacity. The following article covers details about the Audacity change pitch feature. Let’s get started.
In this article
01 What is pitch, and how does it work?
02 How to Change Pitch in Audacity?
Part 1: What is pitch, and how does it work?
Not all sounds are the same. Some vary in terms of amplitude, which makes them loud or quiet. In contrast, others vary in terms of pitch, which makes them high or low. Pitch is used to differentiate between the acute and flat notes in a sound wave. High-pitched sounds are likely to be shrilling, whereas the lower-pitched will be bassy. Pitch depends upon the frequency of the sound waves producing them. In short, notes at a higher frequency are high-pitched.
On the contrary, notes at lower frequencies are low-pitched. Changing a pitch of noise from low to high or vice versa is an art. Thus, sound recording and editing applications like Audacity come with the in-built effect that enables you to change the pitch of a sound.
Part 2: How to Change Pitch in Audacity?
Sound editing is becoming increasingly popular in music and other relevant industries. Several applications offer sound editing tools to serve the needs of the people. Pitch-changing is one of the common tools that people look for in sound editors.
Audacity is one of the notable software that allows users to change the pitch of the voice. It comes with an Audacity pitch shift mechanism to facilitate users. So, if you are editing sound in Audacity, changing the pitch is just a matter of a few clicks. Are you still wondering how you can apply the Audacity change pitch technique when editing? Here’s how you can do it in simple steps.
Step 1: Select the audio portion
Launch Audacity and add sound recordings you want to edit. Click on the timeline and drag to select the portion of the sound.
Note: Only the portion whose pitch you want to change.

Step 2: Open Effect menu
Click on the Effect tab at the top right of the screen next to Generate. Select Pitch Change from the drop-down menu.
Note: You can also make other changes, such as Change Speed and Change Tempo option will let you alter the speed of the sound. So, the pitch can also be altered using this process.

Step 3: Adjust pitch
Drag the slider to alter the pitch of the sound and press the OK button to apply changes.
Note: To increase pitch, slide towards the right. Similarly, slide towards the left to a lower pitch. In addition, the pitch can also be changed by configuring From and To parameters.

Bonus Section: How to Adjust Sound Louder in Audacity?
Volume in an audio file may or may not be ideal for use. Sometimes, the sound is too loud or low. Audacity can help you in such a situation. So, if you are editing sound recordings in Audacity, you can also fix the volume of the sound. The good thing to note is that you can adjust the sound in both directions, which implies you can easily amplify or reduce the volume in these open-source applications. Are you interested in knowing about the volume adjustment process in Audacity? If yes, we have summarized the process in simple steps. Let’s take a look.
Step 1: Add an audio file
Launch the software and click on File. Select Open and select the desired audio.
Note: It is not recommended to change the volume through the playback volume knob at the top right corner of the screen, as this will only increase the volume in your device. However, the actual volume of the audio will remain unchanged.

Step 2: Increase/Decrease audio gain
Change the gain of the audio at the left-hand side of the screen. Move the slider to adjust the volume to the desired level.

Note: Alternatively, you may also increase or increase the volume through the amplification process. To use this method, select the audio portion, access Effect, and tap Amplify. Tick allow clipping box and move the slider to set the volume of the sound.
Conclusion
There are high chances of audio sound not being in the required pitch or volume. Plus, you may also need to change the sound characteristics of an audio file for specific use. So, if this is the case, the Audacity change pitch technique is all you need to learn. Thus, we have summarized the process of changing pitch and volume in a step-by-step guide in this article. Hopefully, all your concerns will have been addressed.
02 How to Change Pitch in Audacity?
Part 1: What is pitch, and how does it work?
Not all sounds are the same. Some vary in terms of amplitude, which makes them loud or quiet. In contrast, others vary in terms of pitch, which makes them high or low. Pitch is used to differentiate between the acute and flat notes in a sound wave. High-pitched sounds are likely to be shrilling, whereas the lower-pitched will be bassy. Pitch depends upon the frequency of the sound waves producing them. In short, notes at a higher frequency are high-pitched.
On the contrary, notes at lower frequencies are low-pitched. Changing a pitch of noise from low to high or vice versa is an art. Thus, sound recording and editing applications like Audacity come with the in-built effect that enables you to change the pitch of a sound.
Part 2: How to Change Pitch in Audacity?
Sound editing is becoming increasingly popular in music and other relevant industries. Several applications offer sound editing tools to serve the needs of the people. Pitch-changing is one of the common tools that people look for in sound editors.
Audacity is one of the notable software that allows users to change the pitch of the voice. It comes with an Audacity pitch shift mechanism to facilitate users. So, if you are editing sound in Audacity, changing the pitch is just a matter of a few clicks. Are you still wondering how you can apply the Audacity change pitch technique when editing? Here’s how you can do it in simple steps.
Step 1: Select the audio portion
Launch Audacity and add sound recordings you want to edit. Click on the timeline and drag to select the portion of the sound.
Note: Only the portion whose pitch you want to change.
Step 2: Open Effect menu
Click on the Effect tab at the top right of the screen next to Generate. Select Pitch Change from the drop-down menu.
Note: You can also make other changes, such as Change Speed and Change Tempo option will let you alter the speed of the sound. So, the pitch can also be altered using this process.
Step 3: Adjust pitch
Drag the slider to alter the pitch of the sound and press the OK button to apply changes.
Note: To increase pitch, slide towards the right. Similarly, slide towards the left to a lower pitch. In addition, the pitch can also be changed by configuring From and To parameters.
Bonus Section: How to Adjust Sound Louder in Audacity?
Volume in an audio file may or may not be ideal for use. Sometimes, the sound is too loud or low. Audacity can help you in such a situation. So, if you are editing sound recordings in Audacity, you can also fix the volume of the sound. The good thing to note is that you can adjust the sound in both directions, which implies you can easily amplify or reduce the volume in these open-source applications. Are you interested in knowing about the volume adjustment process in Audacity? If yes, we have summarized the process in simple steps. Let’s take a look.
Step 1: Add an audio file
Launch the software and click on File. Select Open and select the desired audio.
Note: It is not recommended to change the volume through the playback volume knob at the top right corner of the screen, as this will only increase the volume in your device. However, the actual volume of the audio will remain unchanged.
Step 2: Increase/Decrease audio gain
Change the gain of the audio at the left-hand side of the screen. Move the slider to adjust the volume to the desired level.
Note: Alternatively, you may also increase or increase the volume through the amplification process. To use this method, select the audio portion, access Effect, and tap Amplify. Tick allow clipping box and move the slider to set the volume of the sound.
Conclusion
There are high chances of audio sound not being in the required pitch or volume. Plus, you may also need to change the sound characteristics of an audio file for specific use. So, if this is the case, the Audacity change pitch technique is all you need to learn. Thus, we have summarized the process of changing pitch and volume in a step-by-step guide in this article. Hopefully, all your concerns will have been addressed.
Also read:
- In 2024, Inverted Soundscapes The Premier Backwards Music Videos
- Updated Best Song Identifiers Online for 2024
- New Selecting Excellent Audio Mixers Specifically Designed for Mac Platforms
- 2024 Approved Free Audio-to-Text Conversion The Top Three Techniques
- Updated From Silence to Symphony Practical Steps for Reducing Unintentional Auditory Background
- New Procuring Immersive Dragon Roar Soundscape for 2024
- Updated 2024 Approved Simplified Steps to Effortlessly Capture Your Ideas in a Podcast Format
- Navigating Through the Top Choices for Mac MP3 Metadata Manipulators
- Updated Enhancing Video Soundtracks Overcoming the Challenges of Auditory Aberrations
- 2024 Approved 6 Best Audio Mixers For Enhancing Your Streaming
- The Premier Roundup of Win-Compatible DAWs Evaluating Free and Paid Software Options
- 2024 Approved The Ultimate Guide to Audio Treasures for Podcast Production
- Mass Momentum Surge Phenomenon for 2024
- In 2024, AuraTalk Cutting-Edge Voice Modification for Immersive Skype Experiences
- New Illuminating Soundscapes with Imagery Techniques for Photographic Audio Amalgamation 2023 Art & Technology Insights for 2024
- Updated Seek Out the Bell Echo Simulation Soundtrack for 2024
- Updated In 2024, The Contemporary Guide to Achieving Perfect Audio Gradual Decline
- New In 2024, The Comprehensive User Manual for Adobe Audition Tools, Tutorials and Trends
- Updated 2024 Approved Unlocking Sound The Top Six Free Techniques for Transforming Videos Into Audio (Coming Soon!)
- Updated The Windows Waveform Guide A Step-by-Step on Incorporating Echo Effects Into Your Music Productions
- Rapping Rhythms A Starters Manual for Selecting Beat Drops and Beats for 2024
- 2024 Approved The Home Editors Guide to Costless Enhancements of Audio in Video Content
- Updated 15 Best Rock Songs That You Should Know
- In 2024, How to Mute Zoom Audio on Desktop and Mobile Phone?
- In 2024, Guidelines for Incorporating Music Into Videos at No Cost
- Updated Soundscape Quest Discovering Buttons Auditory Palette
- Updated Techniques for Optimizing the File Size of Broadcast Content
- New Pinpointing Audible Whistle Phenomena for 2024
- Essential Websites for Accessing Lofi Artwork and Soundtracks
- New 2024 Approved Mastering the Art of De-Echoing Audio Simple, Proven Techniques
- Updated Elevating Soundtracks on Mobile The Top 8 Android Apps Redefining Music Production
- New Convert Videos Into High-Quality Audio - The 10 Best Tools at Your Fingertips (Free)
- How to Enhance Your MKV-2023 File with Audio Content for 2024
- Updated An Android Users Journey to Flawless Audio-Visual Integration for 2024
- 2024 Approved The Ultimate Compilation of Nero WaveEdit Capabilities, Updated
- New 2024 Approved An Ode to Open Source Audio Selecting Tunes for Captivating Montage Videos
- Updated Smartphone Speech-to-Text Solutions Compiling the Best Android and iPhone Apps
- Demystifying Jazz Understanding Its Core Concepts and Styles for 2024
- Tutorial on Audio Ducking in Adobe Premiere Pro on Mac
- Linux Audio Cutting-Edge Software Roundup Free & Paid Options for 2024
- New Navigating Through Various Audio Recorders From Apowersoft Alternatives to Best Practices for 2024
- New 2024 Approved Ultimate 11 Handy Apps for On-the-Go Music Mixing
- In 2024, How to Unlock iPhone 6 Plus With an Apple Watch & What to Do if It Doesnt Work
- In 2024, Top 5 Car Locator Apps for Apple iPhone 12 | Dr.fone
- How to Remove Forgotten PIN Of Your Vivo X100
- In 2024, How to Transfer Data from Poco C65 to Other Android Devices? | Dr.fone
- In 2024, How To Remove Flashlight From Apple iPhone 6 Lock Screen
- A Detailed Guide on Faking Your Location in Mozilla Firefox On Lava Yuva 3 Pro | Dr.fone
- Top 10 Best Spy Watches For your Oppo Reno 10 5G | Dr.fone
- Easy steps to recover deleted videos from Xiaomi Redmi A2
- Updated 2024 Approved Choosing the Perfect Green Screen Tool for Mac Users
- New Before You Learn 3D Animation Things You Should Know
- Best Methods for Vivo X90S Wont Turn On | Dr.fone
- How to play AVCHD MTS files on Samsung Galaxy A15 5G?
- Updated In 2024, Best 10 Emoji Makers to Create Your Own Emojis PC/Online/Android/iPhone
- In 2024, How to Detect and Remove Spyware on HTC U23? | Dr.fone
- The way to recover deleted pictures on A79 5G without backup.
- In 2024, Network Locked SIM Card Inserted On Your Motorola Edge+ (2023) Phone? Unlock It Now
- In 2024, How To Bypass Honor FRP In 3 Different Ways
- Three Solutions to Hard Reset Xiaomi Redmi 12 5G? | Dr.fone
- How To Unlink Apple ID From Apple iPhone X
- 2024 Approved Free Video Splitter Tools Online and Offline Editors Compared
- In 2024, 5 Tutorials on How to Transfer Photos From Apple iPhone 13 to New iPhone | Dr.fone
- Bypass/Reset Infinix Phone Screen Passcode/Pattern/Pin
- New In 2024, Capture Life in High Definition 1080P Video Editing Software Guide
- New 2024 Approved Free Divx Video Trimming Software Top Picks
- In 2024, 6 Ways To Transfer Contacts From Realme 12 Pro+ 5G to iPhone | Dr.fone
- How to Unlock Samsung Galaxy Z Flip 5 Phone without Any Data Loss
- In 2024, How Can We Unlock Our Realme Narzo 60 5G Phone Screen?
- Updated How to Create Funny Talking Avatars Using Oddcast Text to Speech
- 3 Methods to Mirror Realme 12 Pro+ 5G to Roku | Dr.fone
- 10 Fake GPS Location Apps on Android Of your Infinix Hot 40 Pro | Dr.fone
- How to Spy on Text Messages from Computer & Apple iPhone 6 Plus | Dr.fone
- Updated 2024 Approved The Ultimate Viewing Experience Amazon Prime Video Aspect Ratio Guide
- In 2024, How To Remove Screen Lock PIN On Vivo Y77t Like A Pro 5 Easy Ways
- Updated In 2024, Expert-Recommended Video Editors for Easy Reframing
- How To Import and Adjust the Video Clips on Wondershare Filmora?
- Is pgsharp legal when you are playing pokemon On Samsung Galaxy F14 5G? | Dr.fone
- Lock Your Oppo A79 5G Phone in Style The Top 5 Gesture Lock Screen Apps
- Slow Down with the Best Top 10 Video Players for 2024
- Top Claymation Shows That Make Your Memories Unforgettable
- Title: Updated 2024 Approved 2023 Compilation of Top Free Music Software Produce, Edit & Record with Zero Cost Windows and macOS
- Author: Ella
- Created at : 2024-06-08 07:09:12
- Updated at : 2024-06-09 07:09:12
- Link: https://sound-optimizing.techidaily.com/updated-2024-approved-2023-compilation-of-top-free-music-software-produce-edit-and-record-with-zero-cost-windows-and-macos/
- License: This work is licensed under CC BY-NC-SA 4.0.
