
:max_bytes(150000):strip_icc():format(webp)/GettyImages-475157855-5b24021b04d1cf00369d7e11-5c66f1c04cedfd00010a2553.jpg)
Updated 2024 Approved Enhancing Project Focus Extracting Audio From Video in iMovie on Mac
Enhancing Project Focus: Extracting Audio From Video in iMovie on Mac
How to Separate Audio from Video in iMovie on Mac?

Liza Brown
Oct 26, 2023• Proven solutions
Apple’s video editing program, iMovie, is a popular choice. By removing background noise and raising audio levels of quiet clips, iMovie may likewise modify and enhance the audio of a project.
iMovie gives you the basic, no-frills editing tools you need to make a movie out of a collection of video clips. Without using videotape, you can easily browse from scene to scene and save your edits and changes in digital format. The end product is a high-quality digital video movie that you can save as a QuickTime file or dump back to digital videotape.
Now let’s look at how to separate audio from video in iMovie on Mac.
- Part 1. How to Separate/Detach/Split Audio from Video in iMovie on Mac
- Part 2. Separate Audio from Video on Mac with the Best Alternative to iMovie
- Part 3. FAQs about Separating Audio from Video in iMovie
Part 1. How to Separate/Detach/Split Audio from Video in iMovie on Mac
The iMovie program is capable of producing high-quality movies and videos. If you’re dealing with a video that includes both sound and pictures, you may want to split the two at some point.
To separate audio from video in iMovie on Mac, just open the video and follow the steps below.
Step 1. Remove the audio clip from the video
In your iMovie timeline, find the clip that contains both video and audio.
Right-click the clip or hold Control and click it. You can also go to the menu bar and choose Detach Audio.
The audio from that clip will then show as its own “clip” in green below the video. The little line on the left, however, confirms that the video and audio are still connected. This implies that if you delete the video, you’ll lose the audio as well. As a result, you’ll either need to move the audio clip somewhere else in your video or place it in the Background Music Well at the bottom of the timeline.
Simply select, drag, and drop the green audio clip where you want it. It will be in the background of all other noises in your movie if you set it in the Background Music Well.
Step 2. Get rid of the video
You can remove the video by clicking it and utilizing one of these techniques after you disconnect the audio and unlink it from the video.
Select Delete from the shortcut menu by right-clicking.
Or hold Control while clicking and selecting Delete.
Part 2. Separate Audio from Video on Mac with the Best Alternative to iMovie
Want to extract the music file from a video clip’s audio and visual tracks? Or do you want to add another audio file to the video frame? In this part, you’ll learn how to easily separate audio from video and create your own MP3s with iMovie’s alternative - Wondershare Filmora. It’s a powerful video editing software available on both Mac and Windows.


You can make your own MP3 file of the amazing piece of music for enjoyment on the move, whether it’s from a music video, TV show, or concert footage. To separate your audio from your video, follow the steps outlined below.
Step 1. Import your media files into Filmora
To enter the editing mode, run the software and select the 16:9 or 4:3 ratio that best suits your demands. Then select Import to import video clips, audio, or photographs from your computer’s file folder.
It’s worth noting that this tool is highly compatible with a variety of formats, allowing you to edit them frame by frame while maintaining the original quality. Drag and drop videos onto the timeline after they’ve been imported. All files in the timeline are combined without any gaps by default.
Step 2. Separate the audio and video with a single click
Select “Detach Audio” from the context menu of the video file from which you wish to extract the audio track. You’ll see an audio file appearing on the audio track right away. Yes, this is the source video’s actual audio file.
You’ve successfully detached the audio track from the video file.
Step 3. Save the video or audio that has been split
Because the audio and video tracks have been split, you may simply delete the audio or video track you don’t need and replace it with the new one. Then press “Export” to save the audio track as an MP3 file, or go straight to the “iPod” preset to listen on the move.
You should first save the split video frame or audio track to a project file on your hard disk if you wish to save it separately in a new file. Reload the project file that contains the video frame after you’ve finished exporting the audio track, and then export it to a new video file.
Part 3. FAQs about Separating Audio from Video in iMovie
To learn more about separating audio from video in iMovie, you can check the FAQs below.
1. Is it possible to split audio and video in iMovie?
Yes, you certainly can. Select the video clip you want to separate after you’ve imported it into iMovie. Select “Detach Audio” from the context menu by right-clicking. You can now remove one of the tracks (audio or video), relocate it to a different location in the movie timeline, or alter it.
2. In iMovie, what does “detach audio” do?
The video clip’s audio is deleted, and an audio-only clip (with a green bar) is inserted below the video clip. The audio clip can now be linked to any other clip in your movie, or it can be relocated to the background music section.
3. How can I remove the original audio (from the camera) and lock the new audio to the video so that I don’t have to deal with two different parts (video and audio) when editing?
Make a movie in iMovie that simply mixes all the audio and visuals. You can align the video by listening to it or looking at the waveforms. After it’s all lined up, go into the clip inspector and turn off the video track’s volume. To maintain as much quality as feasible, SHARE/EXPORT using QuickTime and choose Apple Intermediate Codec as your codec. This will link the secondary audio and video tracks together. Now, into an Event, import the movie you just made in iMovie. You may now combine audio and video editing.
4. Is it feasible to simply take the video’s audio and save it as a sound file?
If you have other clips in the timeline, you can detach the audio and copy and paste it around, but if you want all the audio from a clip or set of clips, put them in a project and make a custom QT export and export “Sound to AIFF file”. Drag that into another movie clip or import it as an audio track in iTunes.
5. How do I get the audio from the clip to detach so that I may remove it and record fresh audio over it?
Only in the project timeline, not in the event pane, can you disconnect audio from a clip.
6. In iMovie for Mac, how can I mute a video?
Click the Create New button in iMovie to start a new project. From the resulting dropdown menu, pick Movie. Select the video you wish to mute by clicking the Import Media option. Drag and drop the video onto the timeline once it’s been imported. Right-click on the video in the timeline and choose Detach Audio from the dropdown menu.
The audio and video will be separated or detached as a result of this. Remove the audio from the video that you separated or disconnected in the previous step. The audio file (or layer) is located just beneath the video file on your timeline. Then you can either delete it by right-clicking on it and selecting Delete from the dropdown menu, or by simply clicking on it. It will be highlighted in yellow to indicate that it has been selected. And then press the delete key.
7. How do I view and download a preview?
By clicking the play button next to the Share button, you may see a preview of the video. The video can then be downloaded to your computer by selecting Download Video from the dropdown menu after hitting the Publish button.
Alternatively, you can share it directly from the app to other social media platforms. Apart from removing audio from videos, Animaker also includes other video editing tools that you’ll need to modify your videos for social media and your website.
Wrap Up
As seen in this instructional article, iMovie has countless amazing features as a video editor on Mac . Separating audio from a video is one of those interesting features on iMovie.
If a video has music, sounds, or voices that you’d like to separate from the video, following the above-listed steps is an easy way to do just that. One thing to always remember is to keep the app open while exporting.
And if iMovie can’t meet your need, don’t worry. Wondershare Filmora can be your better choice.
Liza Brown
Liza Brown is a writer and a lover of all things video.
Follow @Liza Brown
Liza Brown
Oct 26, 2023• Proven solutions
Apple’s video editing program, iMovie, is a popular choice. By removing background noise and raising audio levels of quiet clips, iMovie may likewise modify and enhance the audio of a project.
iMovie gives you the basic, no-frills editing tools you need to make a movie out of a collection of video clips. Without using videotape, you can easily browse from scene to scene and save your edits and changes in digital format. The end product is a high-quality digital video movie that you can save as a QuickTime file or dump back to digital videotape.
Now let’s look at how to separate audio from video in iMovie on Mac.
- Part 1. How to Separate/Detach/Split Audio from Video in iMovie on Mac
- Part 2. Separate Audio from Video on Mac with the Best Alternative to iMovie
- Part 3. FAQs about Separating Audio from Video in iMovie
Part 1. How to Separate/Detach/Split Audio from Video in iMovie on Mac
The iMovie program is capable of producing high-quality movies and videos. If you’re dealing with a video that includes both sound and pictures, you may want to split the two at some point.
To separate audio from video in iMovie on Mac, just open the video and follow the steps below.
Step 1. Remove the audio clip from the video
In your iMovie timeline, find the clip that contains both video and audio.
Right-click the clip or hold Control and click it. You can also go to the menu bar and choose Detach Audio.
The audio from that clip will then show as its own “clip” in green below the video. The little line on the left, however, confirms that the video and audio are still connected. This implies that if you delete the video, you’ll lose the audio as well. As a result, you’ll either need to move the audio clip somewhere else in your video or place it in the Background Music Well at the bottom of the timeline.
Simply select, drag, and drop the green audio clip where you want it. It will be in the background of all other noises in your movie if you set it in the Background Music Well.
Step 2. Get rid of the video
You can remove the video by clicking it and utilizing one of these techniques after you disconnect the audio and unlink it from the video.
Select Delete from the shortcut menu by right-clicking.
Or hold Control while clicking and selecting Delete.
Part 2. Separate Audio from Video on Mac with the Best Alternative to iMovie
Want to extract the music file from a video clip’s audio and visual tracks? Or do you want to add another audio file to the video frame? In this part, you’ll learn how to easily separate audio from video and create your own MP3s with iMovie’s alternative - Wondershare Filmora. It’s a powerful video editing software available on both Mac and Windows.
You can make your own MP3 file of the amazing piece of music for enjoyment on the move, whether it’s from a music video, TV show, or concert footage. To separate your audio from your video, follow the steps outlined below.
Step 1. Import your media files into Filmora
To enter the editing mode, run the software and select the 16:9 or 4:3 ratio that best suits your demands. Then select Import to import video clips, audio, or photographs from your computer’s file folder.
It’s worth noting that this tool is highly compatible with a variety of formats, allowing you to edit them frame by frame while maintaining the original quality. Drag and drop videos onto the timeline after they’ve been imported. All files in the timeline are combined without any gaps by default.
Step 2. Separate the audio and video with a single click
Select “Detach Audio” from the context menu of the video file from which you wish to extract the audio track. You’ll see an audio file appearing on the audio track right away. Yes, this is the source video’s actual audio file.
You’ve successfully detached the audio track from the video file.
Step 3. Save the video or audio that has been split
Because the audio and video tracks have been split, you may simply delete the audio or video track you don’t need and replace it with the new one. Then press “Export” to save the audio track as an MP3 file, or go straight to the “iPod” preset to listen on the move.
You should first save the split video frame or audio track to a project file on your hard disk if you wish to save it separately in a new file. Reload the project file that contains the video frame after you’ve finished exporting the audio track, and then export it to a new video file.
Part 3. FAQs about Separating Audio from Video in iMovie
To learn more about separating audio from video in iMovie, you can check the FAQs below.
1. Is it possible to split audio and video in iMovie?
Yes, you certainly can. Select the video clip you want to separate after you’ve imported it into iMovie. Select “Detach Audio” from the context menu by right-clicking. You can now remove one of the tracks (audio or video), relocate it to a different location in the movie timeline, or alter it.
2. In iMovie, what does “detach audio” do?
The video clip’s audio is deleted, and an audio-only clip (with a green bar) is inserted below the video clip. The audio clip can now be linked to any other clip in your movie, or it can be relocated to the background music section.
3. How can I remove the original audio (from the camera) and lock the new audio to the video so that I don’t have to deal with two different parts (video and audio) when editing?
Make a movie in iMovie that simply mixes all the audio and visuals. You can align the video by listening to it or looking at the waveforms. After it’s all lined up, go into the clip inspector and turn off the video track’s volume. To maintain as much quality as feasible, SHARE/EXPORT using QuickTime and choose Apple Intermediate Codec as your codec. This will link the secondary audio and video tracks together. Now, into an Event, import the movie you just made in iMovie. You may now combine audio and video editing.
4. Is it feasible to simply take the video’s audio and save it as a sound file?
If you have other clips in the timeline, you can detach the audio and copy and paste it around, but if you want all the audio from a clip or set of clips, put them in a project and make a custom QT export and export “Sound to AIFF file”. Drag that into another movie clip or import it as an audio track in iTunes.
5. How do I get the audio from the clip to detach so that I may remove it and record fresh audio over it?
Only in the project timeline, not in the event pane, can you disconnect audio from a clip.
6. In iMovie for Mac, how can I mute a video?
Click the Create New button in iMovie to start a new project. From the resulting dropdown menu, pick Movie. Select the video you wish to mute by clicking the Import Media option. Drag and drop the video onto the timeline once it’s been imported. Right-click on the video in the timeline and choose Detach Audio from the dropdown menu.
The audio and video will be separated or detached as a result of this. Remove the audio from the video that you separated or disconnected in the previous step. The audio file (or layer) is located just beneath the video file on your timeline. Then you can either delete it by right-clicking on it and selecting Delete from the dropdown menu, or by simply clicking on it. It will be highlighted in yellow to indicate that it has been selected. And then press the delete key.
7. How do I view and download a preview?
By clicking the play button next to the Share button, you may see a preview of the video. The video can then be downloaded to your computer by selecting Download Video from the dropdown menu after hitting the Publish button.
Alternatively, you can share it directly from the app to other social media platforms. Apart from removing audio from videos, Animaker also includes other video editing tools that you’ll need to modify your videos for social media and your website.
Wrap Up
As seen in this instructional article, iMovie has countless amazing features as a video editor on Mac . Separating audio from a video is one of those interesting features on iMovie.
If a video has music, sounds, or voices that you’d like to separate from the video, following the above-listed steps is an easy way to do just that. One thing to always remember is to keep the app open while exporting.
And if iMovie can’t meet your need, don’t worry. Wondershare Filmora can be your better choice.
Liza Brown
Liza Brown is a writer and a lover of all things video.
Follow @Liza Brown
10 Free Online Audio to Text Converters
10+ Free Online Audio to Text Converters

Shanoon Cox
Mar 27, 2024• Proven solutions
An audio-to-text converter is a tool that can convert audio files to texts or even record any audio and produce the text of it simultaneously. Audio files are one of the most used methods of storing information. From online classes and long lectures to big business meetings and product information, audio is being shared a lot across the world.
But accessing information from a long audio file can be difficult and time-consuming, which is why there is a need to convert audio to text. Information in the form of text can easily be fully or partly accessed and edited whenever needed. And texts can also easily be shared with whomever you want.
So let’s have a look at some of the best audio-to-text converters that might be of use to you.
10+ Free Online Audio to Text Converters
There is number of audio text converters available in the online market that can help you while studying, researching, or even in your business. Some of these recorders can convert any audio file to texts while some others can record and convert to text at the same time. Here we will talk about the top 11 free applications that can be used to convert audio to text.
| 1 - Filmora | 2 - Audext | 3 - Sonix.ai |
|---|---|---|
| 4 - Virtualspeech.com | 5 - Speechnotes | 6 - SpeechTexter |
| 7 - Textfromtospeech.com | 8 - Dictation.io | 9 - Voice Note |
| 10 - Voice Notebook | 11 - NaturalReaders |
1. Wondershare Filmora
Filmora’s Speech To Text (STT) function allows you to transcript audio/voice to subtitles/text in one click. it can save your plenty of time on transcribing subtitles and boost your editing efficiency by applying speech-to-text.
What you need to do is download the software and subsribe for its plan.
Features
- Built-in function to transcribe subtitles and captions for your video
- High accuracy in generating text, allows you to edit text by yourself
- Supports up to 26 languages of transcription to engage more users all around the world
- Offers various tools for editing your videos and audio
2. Audext
Audext is a free online application that can help you to save a lot of time while transcribing any audio to text. The transcription to text is done with the use of an advanced AI and hence produces faster and more accurate results.
Audext is used by people from different sectors like education, marketing, media, consulting, healthcare, etc. for their work purposes.

Features
- An inbuilt editor for editing the text while transcribing
- Identifies the speaker easily
- Supports a variety of audio and video formats like MP3, WAV, MP4, etc.
- Offers an option of easy upload and export of files
Pricing
- Free
- Transcription costs for one hour are $12
- Or with the subscription $5
3. Sonix.ai
Sonix is a fast and accurate application that can be used to convert audio to text for any purpose. This application offers a 30-minute free transcription after which an affordable amount may be charged.
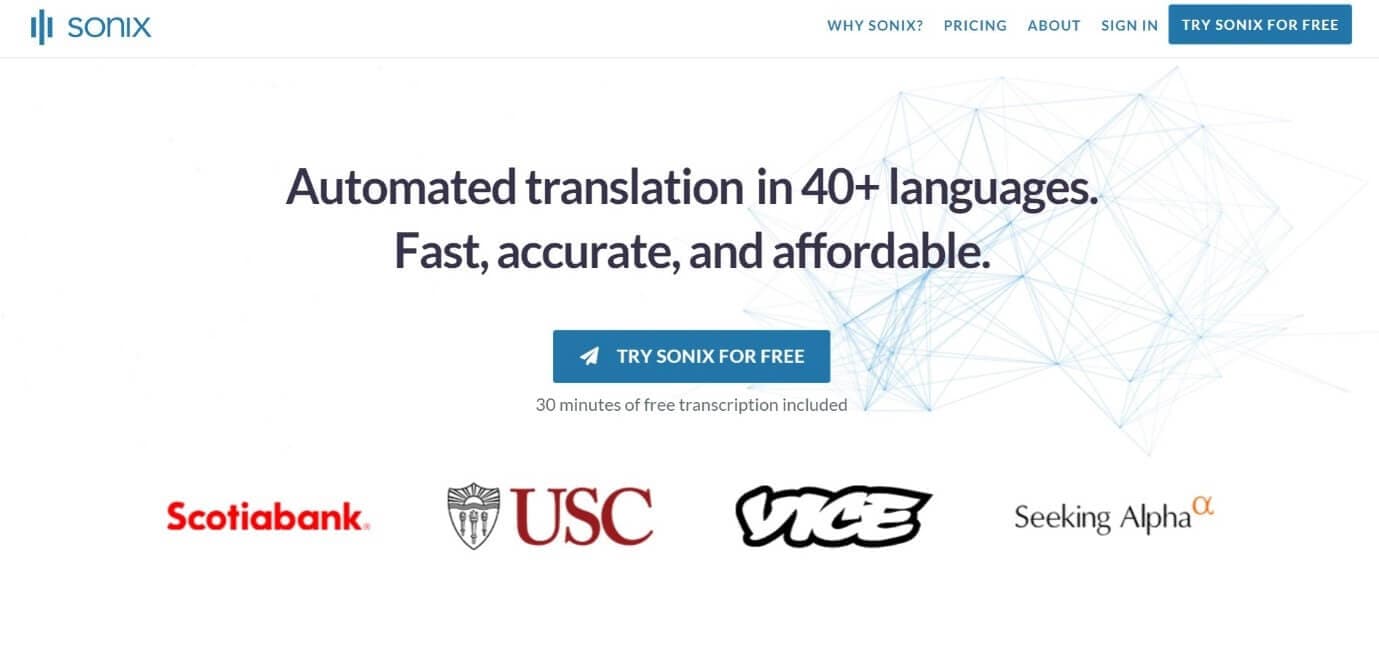
Features
- Automatic transcription of files and accessibility of these files from any device
- Advanced translation of these devices into 30 different languages
- Addition of subtitles into any video for easy understanding
- A Sonix media player that allows to share and publish files easily
Pricing
- Free
- Standard subscription - $10 per hour
- Premium subscription - $5 per hour, and an addition of $22 per month
4. Virtualspeech.com
Virtualspeech is an online tool that can transcribe audio to text free. It is a very simple application that allows fats conversion of audio files to texts. After conversion, the file will be emailed to the user from where it can be downloaded and saved.
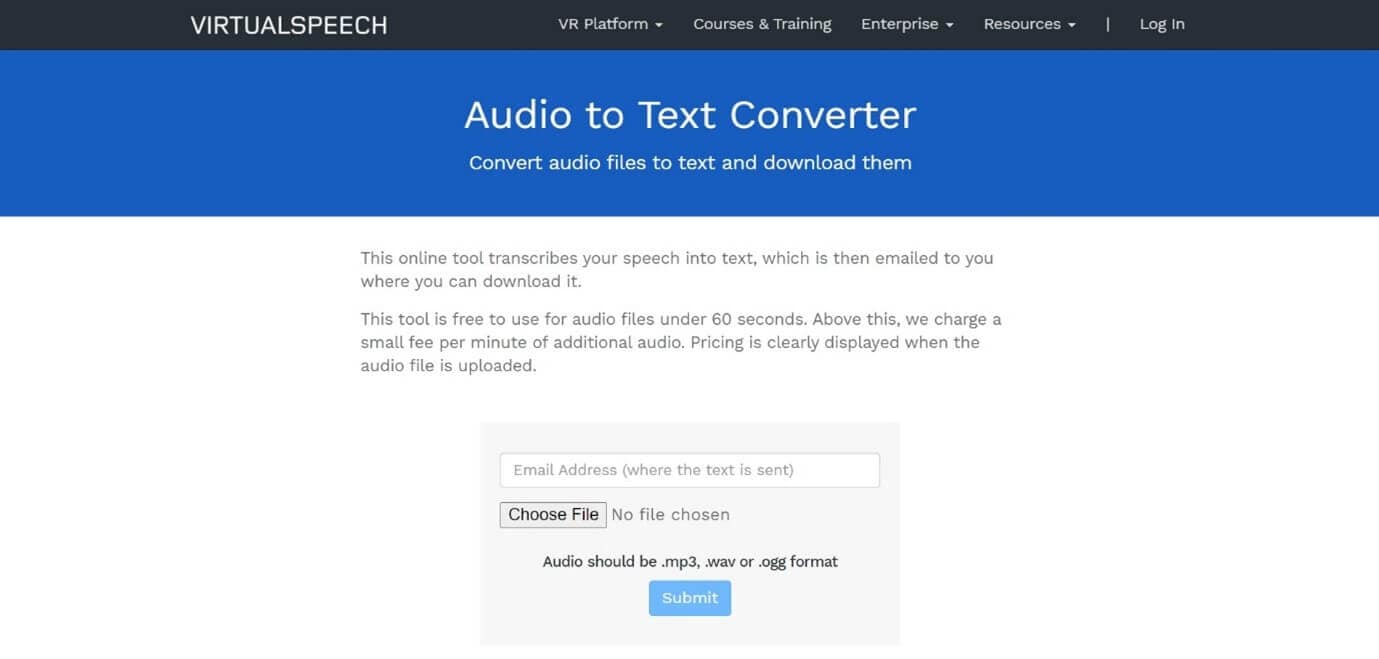
Features
- Free conversion of any audio files under 1 minute.
- Conversion of audio files of formats Mp3, Wav, or Ogg.
- Provides security as the no files are stored on the server and the site is secured with a b SSL
- Speech to text converter within the site
Pricing
- $0.50 per minute after the free minute

Filmora Audio to Text Converter
Filmora - Audio to Text Converter
• Enables you to convert video speech to text in one click
• Extremely accurate in video speech recognition
• Cross-platform supported - (Windows, Mac, iOS, Android)
Transcribe Audio to Text Free Transcribe Audio to Text Free Transcribe Audio to Text Free Learn More >
5. Speechnotes
Speechnotes is a powerful online notepad that can easily convert audio to text. This tool has implemented an efficient and clean design that makes conversion and editing very easy.
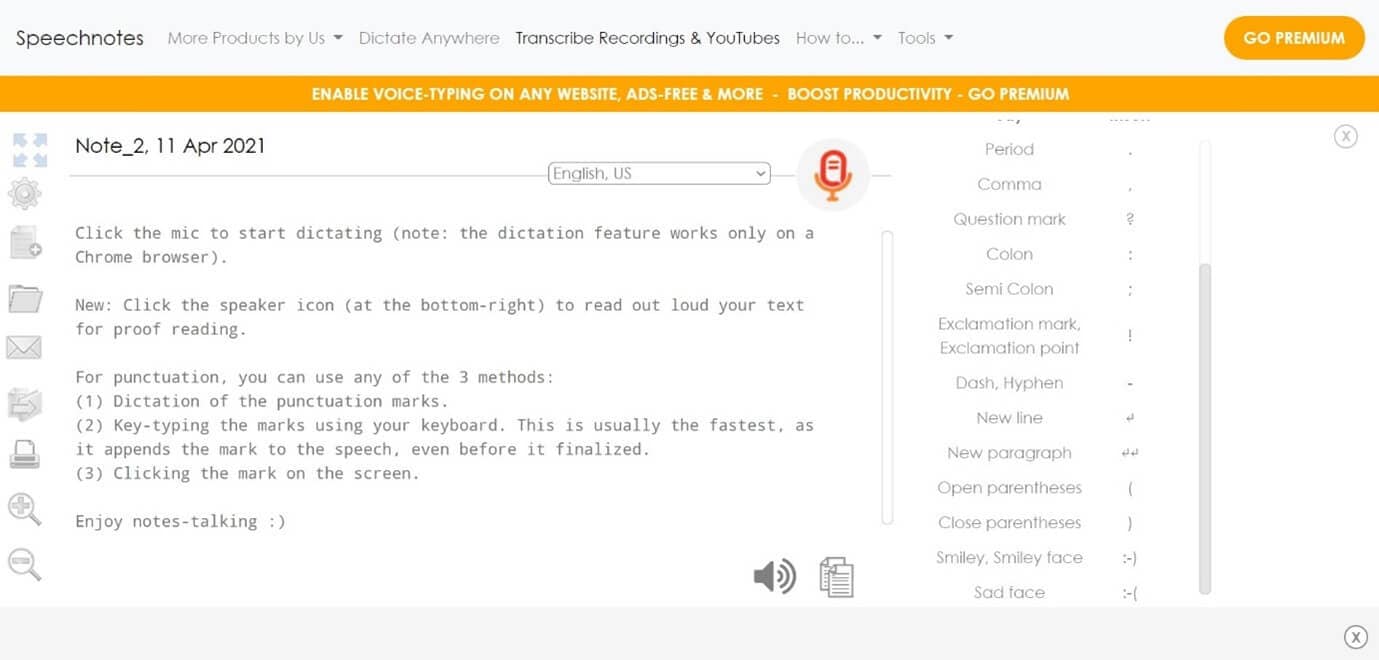
Features
- Best results with an advanced speech recognition technology
- Built-in tools that allow easy editing and correction of the converted text
- Fast working on any web browser and no installation apps required
- Autosave feature that ensures that your data is not lost
- Export to Google Drive option for easy accessibility from any device
Pricing
- Free
- Premium version with the addition of some extra features
6. SpeechTexter
SpeechTexter is a multilingual application that can help you transcribe any type of book, document, blog posts, etc. by using your audio. This tool has a custom dictionary that allows adding short commands for adding frequently used data like phone numbers, punctuation marks, addresses, etc.

Features
- Offers accuracy rate of 90 to 95% percent
- Can be used to increase your fluency in English
- Offers powerful real-time speech recognition
- Easy creation of emails, text notes, blog posts, etc.
- A custom dictionary that can be customized according to the individual use
- Supports more than 60 languages
- Available on both chrome browser and android
Pricing
- Free
7. Textfromtospeech.com
Textfromtospeech is a free online tool that allows you to easily convert audio to text without the need for registration downloading or installation. It has a very simple interface that can record and convert your speech into text with a single click.
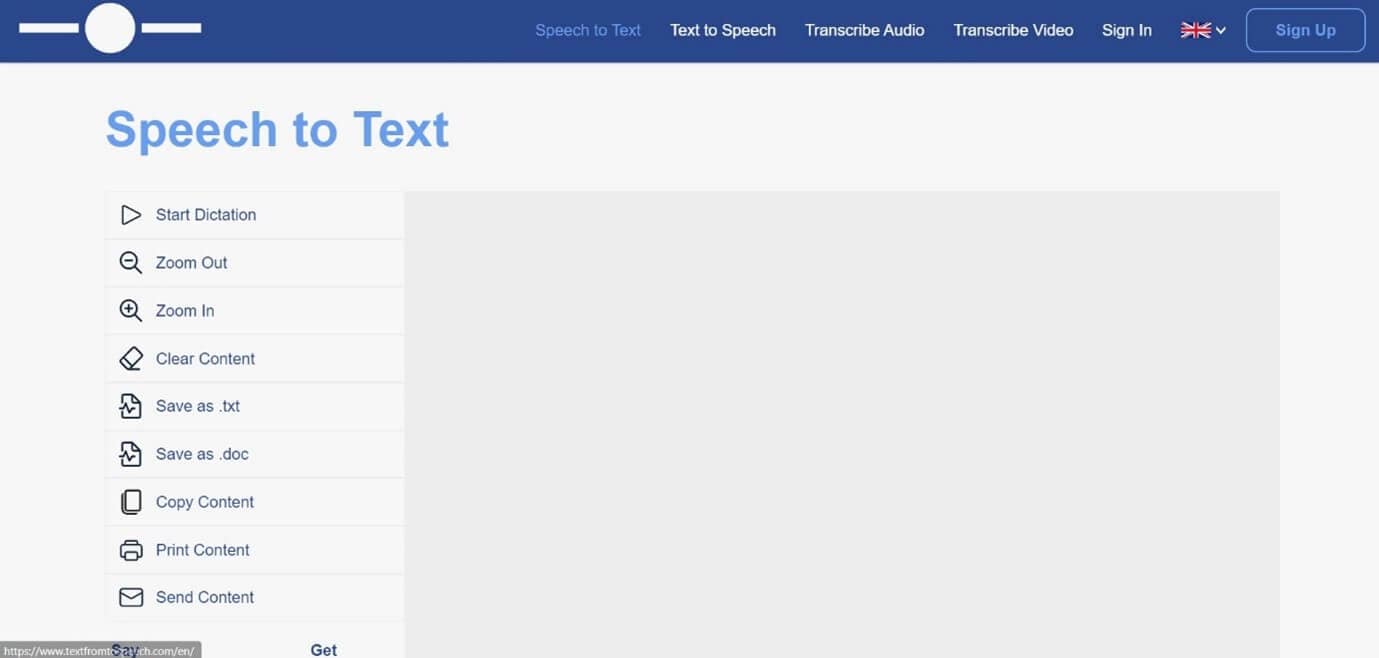
Features
- Free and online text recognition and transcription
- Supports many languages
- Pause and record option while converting large files
- Can use voice commands for insertion of symbols like “comma”, “full stop”, etc.
- Smart capitalization
- Easy saving, copying, and sharing of the dictated text
- Available on mobile devices, tablet, and computer
Pricing
- Free
![]()
A cross-platform for making videos anywhere for all creators

Why your video editing isn’t good enough? How about some creative inspo?
- 100 Million+ Users
- 150+ Countries and Regions
- 4 Million+ Social Media Followers
- 5 Million+ Stock Media for Use
* Secure Download

8. Dictation.io
Dictation is a free and simple tool that offers fast conversion of audio to text. Its interface is like that of a very simple notepad and allows the conversion of audio to text for a number of languages including English, Español, Français, Italiano, Português, and more.

Features
- Advanced speech recognition
- Easy editing within the notes
- Easy sharing to mail, tweets, etc.
- No storing of any data and hence offers the necessary security
Pricing
- Free
9. Voice Note
Voice Note is an online speech recognition tool that can automatically record and type anything including speech, interview, etc. This tool can convert any audio file into text format which can easily be opened in Microsoft Word.
Features
- No saving of data in any servers
- Customizable options for audio and text
- A number of languages to choose from while converting audio to text
- Easy copying and exporting options
- Direct Print option from the site
Price
- Free
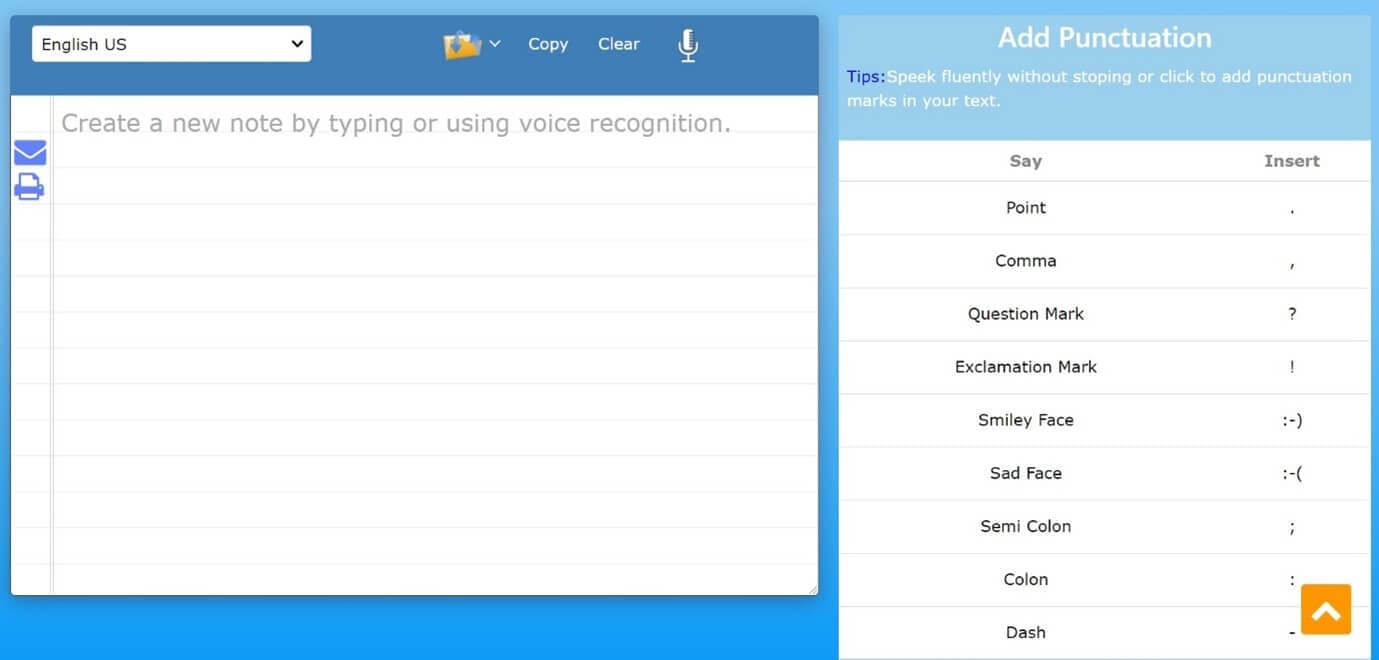
10. Voice Notebook
Voice Notebook is a speech recognition app that can also convert audio files to text. This application is compatible with a wide range of devices like Mac, Windows, Linux OS, Android, and iOS.
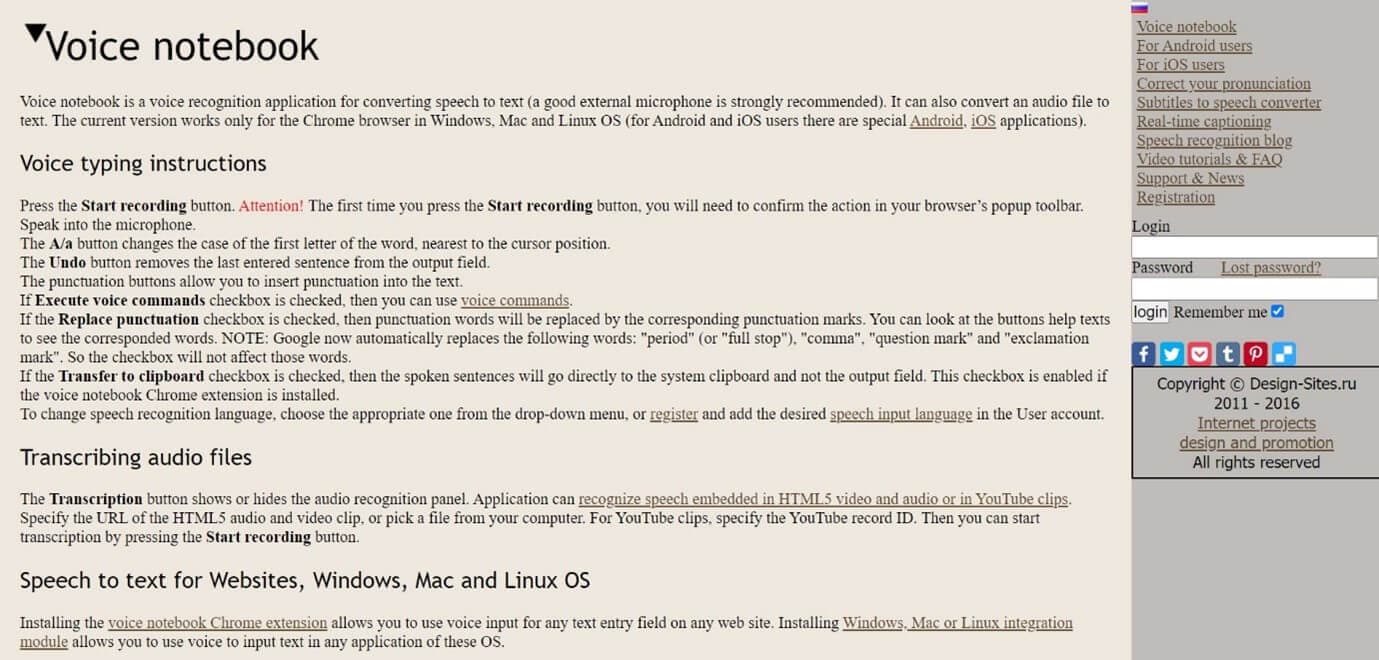
Features
- Voice commands are available when you transcribe audio to text
- Has the ability to recognize any speech embedded in YouTube clips or HTML5 audio or video
- Simple interface and easy editing of text
- An option to download into TXT format is available
Price
- Free
11. NaturalReaders
Natural Readers is a professional program that can convert any text into spoken words. This program offers a lot of features like adjusting the speed of audio, conversion into mp3, selection of voice, etc.
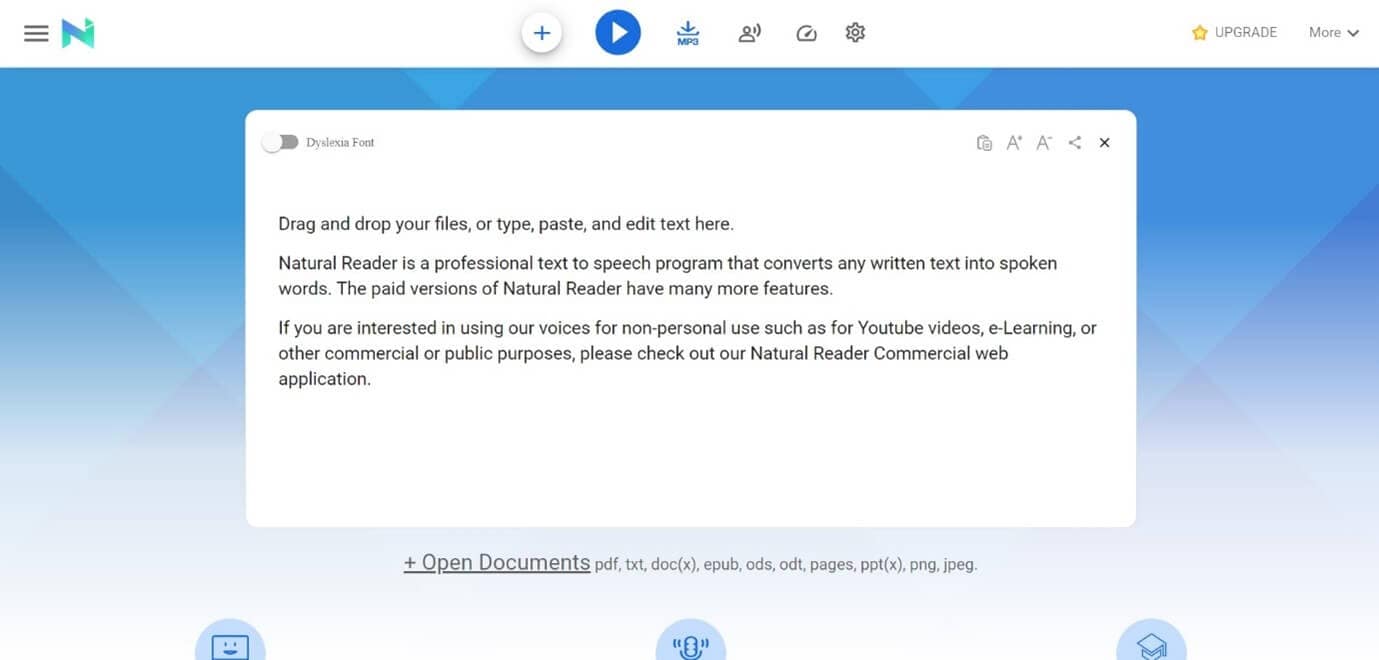
Features
- A font option available for dyslexic people
- Supports formats like pdf, txt, docs, epub, ods, ppt, png, jpeg
- App versions of this online tool are available both for android and apple devices
Pricing
- Free
- Premium plan - $9.99 per month, $59.88 per year
- Plus plan - $19.00 per month, $110.00 per year
Filmora Audio to Text Converter
Filmora - Audio to Text Converter
• Enables you to convert video speech to text in one click
• Extremely accurate in video speech recognition
• Cross-platform supported - (Windows, Mac, iOS, Android)
Transcribe Audio to Text Free Transcribe Audio to Text Free Transcribe Audio to Text Free Learn More >
Conclusion
We have listed above the top 11 tools that can be used to convert audio to text on any device using a browser. Converting audio to text allows you to easily access the required information, edit it, or even share it fully or partially with anyone you wish,
The applications we have listed are free and some of them might charge for the extra features they provide. So no matter what your profession is if you are looking for an app to convert audio to text or record and produce the text of the recordings, choose any one of the listed above applications.
We hope our suggestions help you reduce effort and save time. Please leave your valuable feedback in the comment box below, thank you.
Transform Long Videos into Short Ones Instantly
Turn long videos into viral clips. Effortlessly transform lengthy videos into engaging, shareable clips.

Shanoon Cox
Shanoon Cox is a writer and a lover of all things video.
Follow @Shanoon Cox
Shanoon Cox
Mar 27, 2024• Proven solutions
An audio-to-text converter is a tool that can convert audio files to texts or even record any audio and produce the text of it simultaneously. Audio files are one of the most used methods of storing information. From online classes and long lectures to big business meetings and product information, audio is being shared a lot across the world.
But accessing information from a long audio file can be difficult and time-consuming, which is why there is a need to convert audio to text. Information in the form of text can easily be fully or partly accessed and edited whenever needed. And texts can also easily be shared with whomever you want.
So let’s have a look at some of the best audio-to-text converters that might be of use to you.
10+ Free Online Audio to Text Converters
There is number of audio text converters available in the online market that can help you while studying, researching, or even in your business. Some of these recorders can convert any audio file to texts while some others can record and convert to text at the same time. Here we will talk about the top 11 free applications that can be used to convert audio to text.
| 1 - Filmora | 2 - Audext | 3 - Sonix.ai |
|---|---|---|
| 4 - Virtualspeech.com | 5 - Speechnotes | 6 - SpeechTexter |
| 7 - Textfromtospeech.com | 8 - Dictation.io | 9 - Voice Note |
| 10 - Voice Notebook | 11 - NaturalReaders |
1. Wondershare Filmora
Filmora’s Speech To Text (STT) function allows you to transcript audio/voice to subtitles/text in one click. it can save your plenty of time on transcribing subtitles and boost your editing efficiency by applying speech-to-text.
What you need to do is download the software and subsribe for its plan.
Features
- Built-in function to transcribe subtitles and captions for your video
- High accuracy in generating text, allows you to edit text by yourself
- Supports up to 26 languages of transcription to engage more users all around the world
- Offers various tools for editing your videos and audio
2. Audext
Audext is a free online application that can help you to save a lot of time while transcribing any audio to text. The transcription to text is done with the use of an advanced AI and hence produces faster and more accurate results.
Audext is used by people from different sectors like education, marketing, media, consulting, healthcare, etc. for their work purposes.
Features
- An inbuilt editor for editing the text while transcribing
- Identifies the speaker easily
- Supports a variety of audio and video formats like MP3, WAV, MP4, etc.
- Offers an option of easy upload and export of files
Pricing
- Free
- Transcription costs for one hour are $12
- Or with the subscription $5
3. Sonix.ai
Sonix is a fast and accurate application that can be used to convert audio to text for any purpose. This application offers a 30-minute free transcription after which an affordable amount may be charged.
Features
- Automatic transcription of files and accessibility of these files from any device
- Advanced translation of these devices into 30 different languages
- Addition of subtitles into any video for easy understanding
- A Sonix media player that allows to share and publish files easily
Pricing
- Free
- Standard subscription - $10 per hour
- Premium subscription - $5 per hour, and an addition of $22 per month
4. Virtualspeech.com
Virtualspeech is an online tool that can transcribe audio to text free. It is a very simple application that allows fats conversion of audio files to texts. After conversion, the file will be emailed to the user from where it can be downloaded and saved.
Features
- Free conversion of any audio files under 1 minute.
- Conversion of audio files of formats Mp3, Wav, or Ogg.
- Provides security as the no files are stored on the server and the site is secured with a b SSL
- Speech to text converter within the site
Pricing
- $0.50 per minute after the free minute
Filmora Audio to Text Converter
Filmora - Audio to Text Converter
• Enables you to convert video speech to text in one click
• Extremely accurate in video speech recognition
• Cross-platform supported - (Windows, Mac, iOS, Android)
Transcribe Audio to Text Free Transcribe Audio to Text Free Transcribe Audio to Text Free Learn More >
5. Speechnotes
Speechnotes is a powerful online notepad that can easily convert audio to text. This tool has implemented an efficient and clean design that makes conversion and editing very easy.
Features
- Best results with an advanced speech recognition technology
- Built-in tools that allow easy editing and correction of the converted text
- Fast working on any web browser and no installation apps required
- Autosave feature that ensures that your data is not lost
- Export to Google Drive option for easy accessibility from any device
Pricing
- Free
- Premium version with the addition of some extra features
6. SpeechTexter
SpeechTexter is a multilingual application that can help you transcribe any type of book, document, blog posts, etc. by using your audio. This tool has a custom dictionary that allows adding short commands for adding frequently used data like phone numbers, punctuation marks, addresses, etc.
Features
- Offers accuracy rate of 90 to 95% percent
- Can be used to increase your fluency in English
- Offers powerful real-time speech recognition
- Easy creation of emails, text notes, blog posts, etc.
- A custom dictionary that can be customized according to the individual use
- Supports more than 60 languages
- Available on both chrome browser and android
Pricing
- Free
7. Textfromtospeech.com
Textfromtospeech is a free online tool that allows you to easily convert audio to text without the need for registration downloading or installation. It has a very simple interface that can record and convert your speech into text with a single click.
Features
- Free and online text recognition and transcription
- Supports many languages
- Pause and record option while converting large files
- Can use voice commands for insertion of symbols like “comma”, “full stop”, etc.
- Smart capitalization
- Easy saving, copying, and sharing of the dictated text
- Available on mobile devices, tablet, and computer
Pricing
- Free
![]()
A cross-platform for making videos anywhere for all creators
Why your video editing isn’t good enough? How about some creative inspo?
- 100 Million+ Users
- 150+ Countries and Regions
- 4 Million+ Social Media Followers
- 5 Million+ Stock Media for Use
* Secure Download
8. Dictation.io
Dictation is a free and simple tool that offers fast conversion of audio to text. Its interface is like that of a very simple notepad and allows the conversion of audio to text for a number of languages including English, Español, Français, Italiano, Português, and more.
Features
- Advanced speech recognition
- Easy editing within the notes
- Easy sharing to mail, tweets, etc.
- No storing of any data and hence offers the necessary security
Pricing
- Free
9. Voice Note
Voice Note is an online speech recognition tool that can automatically record and type anything including speech, interview, etc. This tool can convert any audio file into text format which can easily be opened in Microsoft Word.
Features
- No saving of data in any servers
- Customizable options for audio and text
- A number of languages to choose from while converting audio to text
- Easy copying and exporting options
- Direct Print option from the site
Price
- Free
10. Voice Notebook
Voice Notebook is a speech recognition app that can also convert audio files to text. This application is compatible with a wide range of devices like Mac, Windows, Linux OS, Android, and iOS.
Features
- Voice commands are available when you transcribe audio to text
- Has the ability to recognize any speech embedded in YouTube clips or HTML5 audio or video
- Simple interface and easy editing of text
- An option to download into TXT format is available
Price
- Free
11. NaturalReaders
Natural Readers is a professional program that can convert any text into spoken words. This program offers a lot of features like adjusting the speed of audio, conversion into mp3, selection of voice, etc.
Features
- A font option available for dyslexic people
- Supports formats like pdf, txt, docs, epub, ods, ppt, png, jpeg
- App versions of this online tool are available both for android and apple devices
Pricing
- Free
- Premium plan - $9.99 per month, $59.88 per year
- Plus plan - $19.00 per month, $110.00 per year
Filmora Audio to Text Converter
Filmora - Audio to Text Converter
• Enables you to convert video speech to text in one click
• Extremely accurate in video speech recognition
• Cross-platform supported - (Windows, Mac, iOS, Android)
Transcribe Audio to Text Free Transcribe Audio to Text Free Transcribe Audio to Text Free Learn More >
Conclusion
We have listed above the top 11 tools that can be used to convert audio to text on any device using a browser. Converting audio to text allows you to easily access the required information, edit it, or even share it fully or partially with anyone you wish,
The applications we have listed are free and some of them might charge for the extra features they provide. So no matter what your profession is if you are looking for an app to convert audio to text or record and produce the text of the recordings, choose any one of the listed above applications.
We hope our suggestions help you reduce effort and save time. Please leave your valuable feedback in the comment box below, thank you.
Transform Long Videos into Short Ones Instantly
Turn long videos into viral clips. Effortlessly transform lengthy videos into engaging, shareable clips.
Shanoon Cox
Shanoon Cox is a writer and a lover of all things video.
Follow @Shanoon Cox
Vimeo Video Information [Aspect Ratio Included]
Video customization does not come automatically. There is something extraordinary you need to look around. One platform that most people are aware of is YouTube that offers video sharing services. But the world is not so small. There exists a new genre picking up pace with personalized effect. The talk is about Vimeo, the latest trending video streaming site, with a vast viewer base after YouTube.

It is a beautiful platform for those professional videographers, filmmakers, event organizers, graphic designers, or those who want to expand their business and gain a viewer base. While creating videos for the platform, there are some basic requirements such as Vimeo Aspect RatioorVimeo Thumbnail Dimensions. If all these terms look unknown to you, and you are eager to discover more with Vimeo Ratio, you have landed the right place. Here, you will get all the recipe ingredients required to prepare for a professional-looking, customized video through Vimeo.
In this article
04 How big of a File can upload to Vimeo
Part 1: What is Vimeo?
Vimeo is a video streaming and hosting services provider online platform that equips a user with a powerful video customization feature. This feature distinguishes it from other video streaming sites. Vimeo reflects the vision of its founder filmmakers, who furnish advanced video customization features for Audio and Video content. Vimeo renders services from “Freemium” the free users to that of Advance business partners.

Basic features it enabled in itself are:
- Users can customize and promote their videos
- HD audio and video quality
- Freemium account for free usage
- Supports 8K Video resolution
- The pricing plan ranges from $7 to $75
- Specific sites promotion option
- Customized screen end view
- Multiple options such as color, size, or different types of buttons
- For the same URL video replacement option
- Featuring Team collaboration
- Live Streaming
In addition, additional features and services get added up with each account up-gradation.
Part 2: Vimeo Video Requirement
If you are also interested in being a part of Vimeo’s community and geared up to share the video, you must be aware of Vimeo Video requirements and Vimeo dimensions. So that you can upload the video with ease on the site without facing any issue. Let’s look at some of the critical video ratios and other requirements.

- Frame Rate:
Keep the Video Frame Rate constant. Some common frame rates are: 60, 59.94, 50, 30, 29.97, 25, 24, and 23.98. While compressing, keep the frame rate below 60.
- Codecs:
Codecs represent video encoded format. Some of the most recommended codecs are , (), Apple ProRes (HQ) 422
- Color
Most of the color display is acceptable. But the recommended ones are:
- Color Matrix Coefficients/Primaries- [BT.709 (Rec.709), BT.2020, whereas Rec.2020 HLG for Dolby Vision]
- Bit Depth- 10 or more than 10 for better quality.
- Characteristics of Color Transfer- Multiple ranges for SDR. But HLG or PQ (SMPTE 2084) for HDR
- Bit Rate- Video file size, visual quality control by data rate/Bit-rate. Go with Variable Bit Rate. That might range in different parameters, or you can choose from 2 to 50 MBPS. Where for SD (2 to 5), 720P (5 to 10), 1080p (10 to 20), 2k (20 to 30), 4k (30 to 60), 8k (50 to 80).
- Scan Type- Progressive playback is advisable before uploading de-interlace the video.
- Resolution/Aspect Ratio
Though all shapes and sizes are available, the most preferable Vimeo Video Aspect Ratio and Proportions are:
| Format | Aspect Ratio | Resolution |
|---|---|---|
| HD (720P) | 16:9 | 1280X720 |
| HD (1080P) | 16:9 | 1920X1080 |
| SD | 16:9 | 640X360 |
| SD | 4:3 | 640X480 |
| 2K | 16:9 | 2560X1440 |
| UHD (4K) | 16:9 | 3840X2160 |
| UHD (DCI 4K) | 17:9 | 4096X2160 |
| Stereoscopic 360 4K | 2:1 | 4096X2048 |
| Monoscopic 3604K | 2:1 | 4096X2048 |
| UHD 8K | 17:9 | 8192X4320 |
Here, a question that might arise. OK, these are the requirements by Vimeo Video Ratio. But, how to set the Vimeo dimensions? For this purpose, one valuable suggestion is the Wondershare Filmora Video Editing tool.
Wondershare Filmora is a friendly and effective interface if looking to adjust the Vimeo Video size ratio or pre-setting the Vimeo Aspect Ratio to make it as per the norms of Vimeo. Then we can go with the efficient, quick, and easy-to-use way to edit the Vimeo Aspect ratio.
Versatile Video Editor - Wondershare Filmora
An easy yet powerful editor
Numerous effects to choose from
Detailed tutorials provided by the official channel
Steps are simple: land the home page of Wondershare Filmora, upload your video project, and select the desired video Ratiounder project settings.
Part 3: Size Limit of Vimeo File
Are you ready to create an exciting video and about to upload that into your Vimeo account? Then, there is a precious suggestion to you. Wait for a while, as some restrictions come under Vimeo dimensions uploading. And you must be aware of that. Let’s first understand about Size Limit of the Vimeo File. In terms of duration, there is no limit, but for file size following criteria is used:
As per Vimeo, the user can upload a file of any size. For instance, it can upload videos ranging from the most minor 30 seconds to a whopping 3-hour duration epics. The maximum limit is 25GB per video.
Part 4: How big of a File can upload to Vimeo
The following important question comes out, how big a file can you upload to Vimeo? Let’s scrap out this information for you:
- Basic account- 5GB total
- Vimeo Plus- Up to 250 GB in a year
- Vimeo Pro- 1TB in a Year
- Vimeo Business- 5 TB in total
- Vimeo Premium – 7 TB in total
So, by checking the above criteria, it becomes easy for you to create and upload your video as per the mentioned guidelines. So, let you be ready with your sizzling video following Vimeo ratio and size criteria.
Part 5: Vimeo Weekly Upload Limit
Now, it is crucial to understand. What could be the weekly upload limit to your Vimeo account? As accordingly, you will plan for the appropriate tab. Here are the details:
- Free Account- 500 MB/week
- Vimeo Plus Account- 5GB/week
- Vimeo Pro Account- 20GB/week
- Vimeo Business Account- No Weekly Limit
- Vimeo Premium Account- Unlimited Live Streaming
It looks like Vimeo has divided its size criteria into different frames, usage, daily basis, weekly basis, yearly basis, and maximum limit. So, if you, as a potential user, have all this valuable information to grow your business, hobby, or any peculiar interest, it will become a bonanza to your efforts. As exemplary efforts always show the way to success. I hope that till now, all your queries, concerns such as Vimeo Thumbnail dimensions, Vimeo Video Size ratio, duration, size limit gets filled up. So, without delay, rock on in the video world of Vimeo and let the world know your potential right away.
Conclusion:
Vimeo Video Size Ratio and other requirements to upload your video to the Vimeo site are covered here. Indeed, these will be going to be the milestone to start or progress your business with Vimeo. Vimeo is trending nowadays, especially among the users who prefer a customized look to their video and a solution to grow their business with proper after support. So, doing little pre-work in terms of Vimeo Video Dimensions will pave the way to start your journey. In addition, while adjusting Vimeo Aspect Ratio, Wondershare Filmora will act as the right approach with appropriate tools to change the Vimeo Aspect Ratio and other important editing options. All the best!
04 How big of a File can upload to Vimeo
Part 1: What is Vimeo?
Vimeo is a video streaming and hosting services provider online platform that equips a user with a powerful video customization feature. This feature distinguishes it from other video streaming sites. Vimeo reflects the vision of its founder filmmakers, who furnish advanced video customization features for Audio and Video content. Vimeo renders services from “Freemium” the free users to that of Advance business partners.
Basic features it enabled in itself are:
- Users can customize and promote their videos
- HD audio and video quality
- Freemium account for free usage
- Supports 8K Video resolution
- The pricing plan ranges from $7 to $75
- Specific sites promotion option
- Customized screen end view
- Multiple options such as color, size, or different types of buttons
- For the same URL video replacement option
- Featuring Team collaboration
- Live Streaming
In addition, additional features and services get added up with each account up-gradation.
Part 2: Vimeo Video Requirement
If you are also interested in being a part of Vimeo’s community and geared up to share the video, you must be aware of Vimeo Video requirements and Vimeo dimensions. So that you can upload the video with ease on the site without facing any issue. Let’s look at some of the critical video ratios and other requirements.
- Frame Rate:
Keep the Video Frame Rate constant. Some common frame rates are: 60, 59.94, 50, 30, 29.97, 25, 24, and 23.98. While compressing, keep the frame rate below 60.
- Codecs:
Codecs represent video encoded format. Some of the most recommended codecs are , (), Apple ProRes (HQ) 422
- Color
Most of the color display is acceptable. But the recommended ones are:
- Color Matrix Coefficients/Primaries- [BT.709 (Rec.709), BT.2020, whereas Rec.2020 HLG for Dolby Vision]
- Bit Depth- 10 or more than 10 for better quality.
- Characteristics of Color Transfer- Multiple ranges for SDR. But HLG or PQ (SMPTE 2084) for HDR
- Bit Rate- Video file size, visual quality control by data rate/Bit-rate. Go with Variable Bit Rate. That might range in different parameters, or you can choose from 2 to 50 MBPS. Where for SD (2 to 5), 720P (5 to 10), 1080p (10 to 20), 2k (20 to 30), 4k (30 to 60), 8k (50 to 80).
- Scan Type- Progressive playback is advisable before uploading de-interlace the video.
- Resolution/Aspect Ratio
Though all shapes and sizes are available, the most preferable Vimeo Video Aspect Ratio and Proportions are:
| Format | Aspect Ratio | Resolution |
|---|---|---|
| HD (720P) | 16:9 | 1280X720 |
| HD (1080P) | 16:9 | 1920X1080 |
| SD | 16:9 | 640X360 |
| SD | 4:3 | 640X480 |
| 2K | 16:9 | 2560X1440 |
| UHD (4K) | 16:9 | 3840X2160 |
| UHD (DCI 4K) | 17:9 | 4096X2160 |
| Stereoscopic 360 4K | 2:1 | 4096X2048 |
| Monoscopic 3604K | 2:1 | 4096X2048 |
| UHD 8K | 17:9 | 8192X4320 |
Here, a question that might arise. OK, these are the requirements by Vimeo Video Ratio. But, how to set the Vimeo dimensions? For this purpose, one valuable suggestion is the Wondershare Filmora Video Editing tool.
Wondershare Filmora is a friendly and effective interface if looking to adjust the Vimeo Video size ratio or pre-setting the Vimeo Aspect Ratio to make it as per the norms of Vimeo. Then we can go with the efficient, quick, and easy-to-use way to edit the Vimeo Aspect ratio.
Versatile Video Editor - Wondershare Filmora
An easy yet powerful editor
Numerous effects to choose from
Detailed tutorials provided by the official channel
Steps are simple: land the home page of Wondershare Filmora, upload your video project, and select the desired video Ratiounder project settings.
Part 3: Size Limit of Vimeo File
Are you ready to create an exciting video and about to upload that into your Vimeo account? Then, there is a precious suggestion to you. Wait for a while, as some restrictions come under Vimeo dimensions uploading. And you must be aware of that. Let’s first understand about Size Limit of the Vimeo File. In terms of duration, there is no limit, but for file size following criteria is used:
As per Vimeo, the user can upload a file of any size. For instance, it can upload videos ranging from the most minor 30 seconds to a whopping 3-hour duration epics. The maximum limit is 25GB per video.
Part 4: How big of a File can upload to Vimeo
The following important question comes out, how big a file can you upload to Vimeo? Let’s scrap out this information for you:
- Basic account- 5GB total
- Vimeo Plus- Up to 250 GB in a year
- Vimeo Pro- 1TB in a Year
- Vimeo Business- 5 TB in total
- Vimeo Premium – 7 TB in total
So, by checking the above criteria, it becomes easy for you to create and upload your video as per the mentioned guidelines. So, let you be ready with your sizzling video following Vimeo ratio and size criteria.
Part 5: Vimeo Weekly Upload Limit
Now, it is crucial to understand. What could be the weekly upload limit to your Vimeo account? As accordingly, you will plan for the appropriate tab. Here are the details:
- Free Account- 500 MB/week
- Vimeo Plus Account- 5GB/week
- Vimeo Pro Account- 20GB/week
- Vimeo Business Account- No Weekly Limit
- Vimeo Premium Account- Unlimited Live Streaming
It looks like Vimeo has divided its size criteria into different frames, usage, daily basis, weekly basis, yearly basis, and maximum limit. So, if you, as a potential user, have all this valuable information to grow your business, hobby, or any peculiar interest, it will become a bonanza to your efforts. As exemplary efforts always show the way to success. I hope that till now, all your queries, concerns such as Vimeo Thumbnail dimensions, Vimeo Video Size ratio, duration, size limit gets filled up. So, without delay, rock on in the video world of Vimeo and let the world know your potential right away.
Conclusion:
Vimeo Video Size Ratio and other requirements to upload your video to the Vimeo site are covered here. Indeed, these will be going to be the milestone to start or progress your business with Vimeo. Vimeo is trending nowadays, especially among the users who prefer a customized look to their video and a solution to grow their business with proper after support. So, doing little pre-work in terms of Vimeo Video Dimensions will pave the way to start your journey. In addition, while adjusting Vimeo Aspect Ratio, Wondershare Filmora will act as the right approach with appropriate tools to change the Vimeo Aspect Ratio and other important editing options. All the best!
Also read:
- Updated 2024 Approved Precision in Recording Cutting Down Ambient Noises Using Advanced Filters
- New Adjusting Audio Levels in Digital Recordings
- New 2024 Approved Acoustic Aesthetics Mastering Speed and Pitch Variations in Adobe Rush
- In 2024, Audio Adaptation Techniques From MP3 Files to Compatible MP4s in Modern Times
- New In 2024, The SFX Seekers Companion Navigating to 8 Exceptional Online Locations for Accessing Premium-Quality, No-Cost Audio Assets
- New Rhythm Without the Ruckus Zero-Cost, Digital Volume Reduction for Karaoke Maestros. For 2024
- New In 2024, The Updated Guide to Voiceovers in Filmmaking - From Recording to Editing
- New In 2024, Voice-Transformation Trends Leading Tools to Enhance Your Google Meet Presence
- In 2024, Best Voice Over Generators
- 10 Best Reaper Plugins You Need to Know for 2024
- Updated Methods for Designing Audio Gradual Reduction Effect for 2024
- How Can You Change Your Voice, In 2024
- 2024 Approved Leveraging Voiceovers in Microsoft PowerPoint A Detailed Walkthrough for Windows & Mac Operating Systems
- New 2024 Approved The Art of Acoustic Purification Guide to Removing Audio Distractions with Adobe Audition
- New Discover Chilling Screech Impact
- Updated In 2024, Essential Voice Transformation Gadgets and Software - How Do They Stack Up?
- Updated 2024 Approved Sourcing Authentic Glass Fracture Sounds for Filmmaking
- Updated From Words to Music Audio Conversion of Textual Content on Various Platforms for 2024
- New The Ultimate List of Windows Videography Tools to Oust Background Noise for 2024
- New In 2024, Elevating Your Viewing Experience 2023 Guide to Audio Volume Adjustment in Videos
- Updated 6 Top Voice Changer for Zoom to Make Your Voice Special and Funny for 2024
- In 2024, 15 Top Newsroom Ambiance Tracks Compilation
- 2024S Premier Selection The Top 8 Online Voice Capture Software for Free Use
- 2024 Approved The Art of Smooth Transitions Between Film Cuts
- New In 2024, Auditory Decline Trends in Adobe Rush Update 2023
- E-MP3 Modifier and Integrator Program for 2024
- Updated Prime 10 Selection Accessible, No-Cost Acoustic Adjustment Services for 2024
- Venturing Free Audio Amendments to Visual Projects
- In 2024, Mastering Linux Audio The Best Software and Techniques for Sound Capture
- Essential Knowledge for Compiling a Top-Notch Auditory Archive on YouTube
- Updated In 2024, Expert Virtual Audio Fusion and Cutting Program
- 2024 Approved A Comprehensive Review The Premier Audio Changers for Smartphones
- 2024 Approved Mastering Sound Integrating Music Into KineMaster
- In 2024, Guide to Removing Melodic Elements Focusing on Basslines for Media Projects
- New How to Mute TikTok Audio 3 Easy Ways to Follow for 2024
- New In 2024, Decoding the Perfect Audio Format A Comprehensive Advice Guide
- 2024 Approved Smooth Operator A Plugin-Free Guide to Skin Retouching in FCPX
- 14 Outstanding Photo Slideshow Makers with Soundtracks for 2024
- Gmail Not Working on Poco X6 7 Common Problems & Fixes | Dr.fone
- In 2024, 4 solution to get rid of pokemon fail to detect location On Poco X6 Pro | Dr.fone
- All Must-Knows to Use Fake GPS GO Location Spoofer On Poco C50 | Dr.fone
- Easy Guide to Realme C67 5G FRP Bypass With Best Methods
- In 2024, How to Migrate Android Data From Oppo K11x to New Android Phone? | Dr.fone
- In 2024, Planning to Use a Pokemon Go Joystick on Realme C33 2023? | Dr.fone
- Unlock android phone if you don't have Spark 10 Pro fingerprint
- Reasons why Pokémon GPS does not Work On Xiaomi Redmi Note 12 Pro 4G? | Dr.fone
- Top IMEI Unlokers for Your Lenovo Phone
- Top 7 Skype Hacker to Hack Any Skype Account On your Vivo T2 5G | Dr.fone
- How Can I Catch the Regional Pokémon without Traveling On Lava Blaze 2 Pro | Dr.fone
- 6 Things We Can Do To Save A Water Damaged iPhone 7 Plus | Stellar
- Updated 2024 Approved Voice Over Made Easy Final Cut Pro Tips and Tricks for Beginners
- Simple ways to get lost files back from Asus ROG Phone 7 Ultimate
- Disable screen lock on Infinix
- New 2024 Approved Mac Video Editing Software 10 Alternatives to Vegas Pro You Need to Know
- How To Recover iPhone 15 Plus Data From iCloud? | Dr.fone
- Latest way to get Shiny Meltan Box in Pokémon Go Mystery Box On Samsung Galaxy S23+ | Dr.fone
- In 2024, VN Video Editor for Mac Install Now or Discover Alternatives
- In 2024, List of Pokémon Go Joysticks On Xiaomi Redmi Note 12 Pro 4G | Dr.fone
- Title: Updated 2024 Approved Enhancing Project Focus Extracting Audio From Video in iMovie on Mac
- Author: Ella
- Created at : 2024-05-05 02:28:46
- Updated at : 2024-05-06 02:28:46
- Link: https://sound-optimizing.techidaily.com/updated-2024-approved-enhancing-project-focus-extracting-audio-from-video-in-imovie-on-mac/
- License: This work is licensed under CC BY-NC-SA 4.0.
