
:max_bytes(150000):strip_icc():format(webp)/GettyImages-184415451-9f59b82b64ac421cad0f28540a515b5f.jpg)
Updated Achieve Balanced Soundscape with Rapid Audio Regulation Strategies for 2024
“Achieve Balanced Soundscape with Rapid Audio Regulation Strategies”
Normalizing Audio in 3 Quick Ways-Audio Normalization

Richard Bennett
Mar 27, 2024• Proven solutions
To normalize audio is to apply a constant amount of gain to a recording to bring the amplitude to a target or norm. Or simply put, normalizing any audio file with a normalizer software searches the file for a peak volume to set a defined maximum and then brings up the rest of the audio to the same maximum level.
Audio normalization is a good practice to get your audio levels right for a better-balanced video, especially imperative for dialogue clips that stand out on YouTube and other platforms. However, out of many different reasons, getting the best audio results from old-fashioned AD/DA converters or matching a group of audios on the same volume levels are still the most common.
Nevertheless, it’s not always easy to find an efficient audio normalization tool and – most importantly – to master the process. But no worries because we have you covered. So, dive in to learn some of the best tools and how you can use them to create masterfully balanced soundtracks.
- Method 1: Normalize Audio Online
- Method 2: Normalize Audio with Wondershare Filmora’s Auto Normalization
- Method 3: Normalize Audio with Audacity
Method 1: Normalize Audio Online
Video2edit online video tool is a one-stop solution for all your audio and video editing needs. The versatile online tool offers a suite of editing features, from extracting audio to converting different formats to normalizing audio. With a drag and drop interface, it allows you to enhance the audio quality of your video and share it to YouTube, Facebook, or other social platforms.
Not to mention, it lets you convert your video files to various popular formats such as MP4, AVI, MOV, 3GP, and WEBM. One of the significant advantages of the tool is the convenience. Without any download or subscription fee hassles, you can normalize audio tracks in a few clicks using Video2edit.com. Here’s how you can use the free tool to get good-quality audio results.
Step 1: Launch the Video2edit Normalize audio tool
Begin by launching the online Video2edit.com on your browser. Then, on the main interface, select the Normalize audio tool from the variety of editing tools.

Step 2: Drop or upload your file
Now, drag and drop your video or audio file or tap the Choose file option to import the file from your local device.

Step 3: Normalize audio
From the Covert video to dropdown, choose the video format you want to convert your file to. Then, click on the Start button to start normalizing your file.

Step 4: Download the converted file
Once the conversion is completed, hit Download in front of the converted file to save it to your computer.

Method 2: Normalize Audio with Wondershare Filmora’s Auto Normalization
Yet another advanced audio normalization software is the Wondershare Filmora . Whether you are looking for basic editing tools or some advanced features, Filmora has it all. The powerful editor uses artificial intelligence editing that provides a smart way to improve your audio quality. The essence of this well-known software is the Auto Normalization feature that allows users to modify the volume of multiple recording clips to standard European audio programs at 23.0 LUFS – with just ONE CLICK.
And for the best part, the normalization process is pretty straightforward and lossless with Wondershare Filmora. Below is a quick step-by-step guide to using this intuitive audio enhancer tool.


Step 1: Download and install the Wondershare Filmora
To get started, download, and install the Wondershare Filmora on your PC. Then launch the program to enter the main interface.

Step 2: Import your audio/video file
From the main menu, go to Import media, then click on Import media files and select to upload your files in the media box. Once uploaded, drag and drop the media clips onto the timeline.

Step 3: Open the audio editing panel
Next, right-click on the audio or video clip on the timeline and then tap Adjust audio, or you can simply double-click it to enter the audio editing panel.

Step 4: Enable auto audio normalization
On the audio editing panel, scroll down and enable the Auto normalization feature. Wondershare Filmora will analyze and normalize the audio file automatically.

Step 5: Export the normalized file
After the normalization process is completed, preview your video or audio to check the auto normalization. If you are not satisfied with the output, hit Reset and try again. Finally, tap on the Export option, give your file a name, and again hit Export to save the high-quality output.

Method 3: Normalize Audio with Audacity
Audacity is a popular audio editor that works wonders for professional music producers. This free, open-source platform has taken audio editing to newer levels with a wide range of advanced features; there is a spectrogram view mode for visualizing and selecting frequencies. In addition, there is extensive support for various plug-ins.
Besides audio normalization, the creative platform can record, mix, add filters, and equalize multiple soundtracks. Moreover, when normalizing with Audacity, you don’t have to worry about losing audio quality, thanks to its 16-bit, 24-bit, and 32-bit support.
To take advantage of this excellent audio normalizer, just follow these quick steps and set your audio tone.
Step 1: Open Audacity on your computer
First, download the Audacity software on your computer, and then open the program.

Step 2: Import your audio files
Go to the File tab on the top menu bar and tap on Open. Then select audio files you want to normalize to import, or simply drag and drop the files on the main screen.

Step 3: Customize audio normalization settings
Now, select the added audio clip and go to Effect on the top menu bar. From the dropdown, choose Normalize and type your desired volume level into the dB.

Step 4: Normalize audio
After editing the normalization settings, click the OK button to start normalizing.

Step 5: Save the audio file
Once finished, select Export under the File tab, and choose how you want to save the file.

FAQs about Normalizing Audio
Here we sorted out some frequently asked questions about audio normalization, which can help you learn more about audio normalization.
1. What dB should I normalize audio to?
Well, that entirely depends on your audio use, and there is no exact number for normalizing an audio clip. However, for safety, the trick is to stay from the maximum volume level of 0 dB. For overall mix levels, most video editors recommend normalizing audio between -10 dB to -20 dB. Likewise, in the case of a dialogue clip, the recommended audio levels are -12 dB to -15 dB. Still some other suggestions are
- Music: -18 dB to -22 dB
- Soundeffects: -10 dB to -20 dB
2. What is the difference between audio normalization and compression?
Audio normalization only and purely changes the volume of a sound by applying a constant amount of gain with a goal to make the loudest peak reach 0 Db. And while normalizing also matches multiple audios to the same volume, it still does not affect the sound dynamics, unlike compression.
On the flip side, audio compression chops off the audio peaks in your recording to get a fuller, louder sound without reaching the clipping limit. In compression, you are changing a proportion of the audio over time in varying amounts.
3. Will the audio normalization process affect the sound quality?
Fortunately, no. Audio normalization, when appropriately done with the help of efficient audio editors, never affects the audio quality. When normalizing an audio clip, the digital bit having the highest level below 0 dB is identified, and all the other bits of the audio are amplified to the same level. This translates to no change in the relative difference between every bit, while the noise level also does not change. So, yes, the only thing affected is the output level and not the quality of the track.
Summing up
Audio normalization is an emerging trend as a good idea to manage high-quality audio levels. This feature can indeed benefit the final steps of mastering music production. However, you need to be careful when deciding where and when to normalize audio or avoid it for better results.
So, are you ready to level up your audio game? The above-mentioned audio editing tools are top-notch normalizers that will do the work for you. Also, don’t forget to try Wondershare Filmora’s distinctive auto normalization feature to produce studio-quality audio.
Richard Bennett
Richard Bennett is a writer and a lover of all things video.
Follow @Richard Bennett
Richard Bennett
Mar 27, 2024• Proven solutions
To normalize audio is to apply a constant amount of gain to a recording to bring the amplitude to a target or norm. Or simply put, normalizing any audio file with a normalizer software searches the file for a peak volume to set a defined maximum and then brings up the rest of the audio to the same maximum level.
Audio normalization is a good practice to get your audio levels right for a better-balanced video, especially imperative for dialogue clips that stand out on YouTube and other platforms. However, out of many different reasons, getting the best audio results from old-fashioned AD/DA converters or matching a group of audios on the same volume levels are still the most common.
Nevertheless, it’s not always easy to find an efficient audio normalization tool and – most importantly – to master the process. But no worries because we have you covered. So, dive in to learn some of the best tools and how you can use them to create masterfully balanced soundtracks.
- Method 1: Normalize Audio Online
- Method 2: Normalize Audio with Wondershare Filmora’s Auto Normalization
- Method 3: Normalize Audio with Audacity
Method 1: Normalize Audio Online
Video2edit online video tool is a one-stop solution for all your audio and video editing needs. The versatile online tool offers a suite of editing features, from extracting audio to converting different formats to normalizing audio. With a drag and drop interface, it allows you to enhance the audio quality of your video and share it to YouTube, Facebook, or other social platforms.
Not to mention, it lets you convert your video files to various popular formats such as MP4, AVI, MOV, 3GP, and WEBM. One of the significant advantages of the tool is the convenience. Without any download or subscription fee hassles, you can normalize audio tracks in a few clicks using Video2edit.com. Here’s how you can use the free tool to get good-quality audio results.
Step 1: Launch the Video2edit Normalize audio tool
Begin by launching the online Video2edit.com on your browser. Then, on the main interface, select the Normalize audio tool from the variety of editing tools.
Step 2: Drop or upload your file
Now, drag and drop your video or audio file or tap the Choose file option to import the file from your local device.
Step 3: Normalize audio
From the Covert video to dropdown, choose the video format you want to convert your file to. Then, click on the Start button to start normalizing your file.
Step 4: Download the converted file
Once the conversion is completed, hit Download in front of the converted file to save it to your computer.
Method 2: Normalize Audio with Wondershare Filmora’s Auto Normalization
Yet another advanced audio normalization software is the Wondershare Filmora . Whether you are looking for basic editing tools or some advanced features, Filmora has it all. The powerful editor uses artificial intelligence editing that provides a smart way to improve your audio quality. The essence of this well-known software is the Auto Normalization feature that allows users to modify the volume of multiple recording clips to standard European audio programs at 23.0 LUFS – with just ONE CLICK.
And for the best part, the normalization process is pretty straightforward and lossless with Wondershare Filmora. Below is a quick step-by-step guide to using this intuitive audio enhancer tool.
Step 1: Download and install the Wondershare Filmora
To get started, download, and install the Wondershare Filmora on your PC. Then launch the program to enter the main interface.
Step 2: Import your audio/video file
From the main menu, go to Import media, then click on Import media files and select to upload your files in the media box. Once uploaded, drag and drop the media clips onto the timeline.
Step 3: Open the audio editing panel
Next, right-click on the audio or video clip on the timeline and then tap Adjust audio, or you can simply double-click it to enter the audio editing panel.
Step 4: Enable auto audio normalization
On the audio editing panel, scroll down and enable the Auto normalization feature. Wondershare Filmora will analyze and normalize the audio file automatically.
Step 5: Export the normalized file
After the normalization process is completed, preview your video or audio to check the auto normalization. If you are not satisfied with the output, hit Reset and try again. Finally, tap on the Export option, give your file a name, and again hit Export to save the high-quality output.
Method 3: Normalize Audio with Audacity
Audacity is a popular audio editor that works wonders for professional music producers. This free, open-source platform has taken audio editing to newer levels with a wide range of advanced features; there is a spectrogram view mode for visualizing and selecting frequencies. In addition, there is extensive support for various plug-ins.
Besides audio normalization, the creative platform can record, mix, add filters, and equalize multiple soundtracks. Moreover, when normalizing with Audacity, you don’t have to worry about losing audio quality, thanks to its 16-bit, 24-bit, and 32-bit support.
To take advantage of this excellent audio normalizer, just follow these quick steps and set your audio tone.
Step 1: Open Audacity on your computer
First, download the Audacity software on your computer, and then open the program.
Step 2: Import your audio files
Go to the File tab on the top menu bar and tap on Open. Then select audio files you want to normalize to import, or simply drag and drop the files on the main screen.
Step 3: Customize audio normalization settings
Now, select the added audio clip and go to Effect on the top menu bar. From the dropdown, choose Normalize and type your desired volume level into the dB.
Step 4: Normalize audio
After editing the normalization settings, click the OK button to start normalizing.
Step 5: Save the audio file
Once finished, select Export under the File tab, and choose how you want to save the file.
FAQs about Normalizing Audio
Here we sorted out some frequently asked questions about audio normalization, which can help you learn more about audio normalization.
1. What dB should I normalize audio to?
Well, that entirely depends on your audio use, and there is no exact number for normalizing an audio clip. However, for safety, the trick is to stay from the maximum volume level of 0 dB. For overall mix levels, most video editors recommend normalizing audio between -10 dB to -20 dB. Likewise, in the case of a dialogue clip, the recommended audio levels are -12 dB to -15 dB. Still some other suggestions are
- Music: -18 dB to -22 dB
- Soundeffects: -10 dB to -20 dB
2. What is the difference between audio normalization and compression?
Audio normalization only and purely changes the volume of a sound by applying a constant amount of gain with a goal to make the loudest peak reach 0 Db. And while normalizing also matches multiple audios to the same volume, it still does not affect the sound dynamics, unlike compression.
On the flip side, audio compression chops off the audio peaks in your recording to get a fuller, louder sound without reaching the clipping limit. In compression, you are changing a proportion of the audio over time in varying amounts.
3. Will the audio normalization process affect the sound quality?
Fortunately, no. Audio normalization, when appropriately done with the help of efficient audio editors, never affects the audio quality. When normalizing an audio clip, the digital bit having the highest level below 0 dB is identified, and all the other bits of the audio are amplified to the same level. This translates to no change in the relative difference between every bit, while the noise level also does not change. So, yes, the only thing affected is the output level and not the quality of the track.
Summing up
Audio normalization is an emerging trend as a good idea to manage high-quality audio levels. This feature can indeed benefit the final steps of mastering music production. However, you need to be careful when deciding where and when to normalize audio or avoid it for better results.
So, are you ready to level up your audio game? The above-mentioned audio editing tools are top-notch normalizers that will do the work for you. Also, don’t forget to try Wondershare Filmora’s distinctive auto normalization feature to produce studio-quality audio.
Richard Bennett
Richard Bennett is a writer and a lover of all things video.
Follow @Richard Bennett
The Complete Archive: Exploring the Most Compelling Cartoon Noise Files (New Arrivals)
8 Best Cartoon Sound Effects You Can Download

Benjamin Arango
Mar 27, 2024• Proven solutions
The sound plays a significant role in the videos. Without the right sound effects, your videos become dull. It doesn’t create an impact to grab the attention of the viewers. Especially when it comes to attracting the attention of kids while they watch cartoons.
Are you working on a cartoon video for kids or some animated action cartoons? Use the cartoon sound effects to add more intensity and emotions to the videos. Every time creating a new sound effect for your cartoon video becomes difficult.
If you are on a strict budget, producing new content becomes almost impossible. In such situations, free cartoon sound effects are the best way to enhance your cartoon videos.
In this article, you will learn eight best cartoon sound effects that you can download and make your videos perfect.
8 Best Cartoon Sound Effects Resources
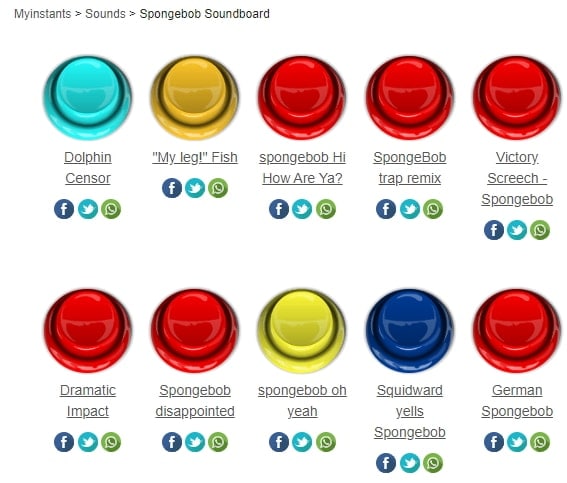
1. Spongebob Sound Effects
MyInstant’s Spongebob soundboard offers a range of cartoon sound effects that can be easily downloaded just by clicking on the Download mp3 sound effect button. You can listen to over 120 classic cartoon sound effects and download it for free. You can also copy the embed link and paste it to your website.
2. Hanna Barbera Sound Effects
From Sounddogs, Hanna Barbera sound effects library, you can find over 2200 cartoon sound effects that are divided into 4 CDs. It has almost all the legendary classic cartoon sound effects from the cartoon shows like Yogi Bear, Huckleberry Hound, the Flintstones, The Jetsons, Quick Draw McGraw, and all the rest of the gang.
You can download the mp3 cartoon sound effects completely free by clicking on the Download ID number mentioned at the right end of each link.
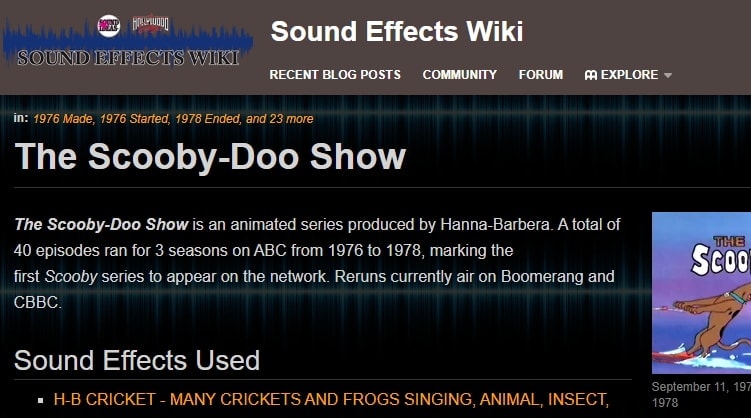
3. Scooby Doo Running Sound
Fandom’s Scooby Doo running sound effects offers all the ideas used in 40 episodes of Scooby Doo throughout the three seasons on ABC. It is over 37000 pages wiki that you can click and browse through the pages to find the right sound effect and download it for free.
4. Tom and Jerry Sound Effects
Pond5 offers 13 Tom and Jerry sound effects that you can listen by scrolling the cursor over the boxes and download the free preview of cartoon sound effects by clicking on Download Preview.
If you want to download the entire cartoon sound effect, you need to register, log in, and pay for it. There are filters like price, collections, duration, etc. to make your selection more precise.
5. Free SFX
In FreeSFX website, you can find a range of comical cartoon sound effects that includes classic effects like descend, boink, impact, pop, musical, running, rip and snap, bounce spring, slide whistle, squelch and splat, horn and loads more.
You need to log in to the website to download free cartoon sound effects.

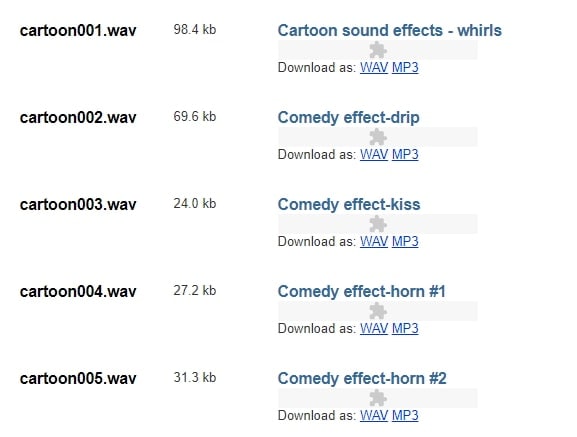
6.GRSites
With over 1980 cartoon sound effects, the GRSites is one of the best free sites for downloading both mp3 and WAV files. You can browse from a range of categories to find the best cartoon sound effects for your videos.
7. Cartoon Running Sound Effect
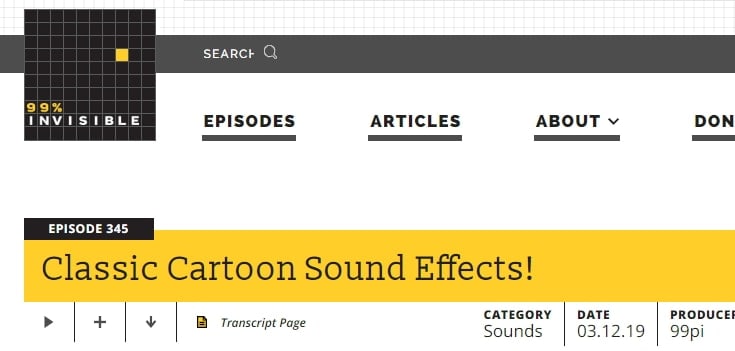
If you are looking for cartoon running sound effect, turn to Episode 345 in 99PercentInvisible. You can download the complete transcript page of around 30 minutes to use it in your video. Use the cartoon running sound effect produced by 99pi to enhance your video.
8. Big Fish Audio
The Big Fish Audio’s cartoon sound FX includes 23 free classic cartoon sound effects. The filters include a range of sound FX types, styles, format, brand, etc.
You can click on the cartoon sound effect and listen to it or add it to your playlist. But, if you wish to download the free cartoon sound effects, you need to register and pay to use the sound effect.

You may also like: How to Extract Audio from Videos on Win/Mac/Phone >>
Conclusion
Make your cartoon videos perfect with the fantastic free cartoon sound effects available for download completely free. With the range of free cartoon sound effects, you don’t need to worry about creating new sounds or expenses. You need to download the free sounds and beautifully enhance it with your creativity. There are several other sites for downloading free cartoon sound effects, but here you can check out some of the trusted ones to use.
Benjamin Arango
Benjamin Arango is a writer and a lover of all things video.
Follow @Benjamin Arango
Benjamin Arango
Mar 27, 2024• Proven solutions
The sound plays a significant role in the videos. Without the right sound effects, your videos become dull. It doesn’t create an impact to grab the attention of the viewers. Especially when it comes to attracting the attention of kids while they watch cartoons.
Are you working on a cartoon video for kids or some animated action cartoons? Use the cartoon sound effects to add more intensity and emotions to the videos. Every time creating a new sound effect for your cartoon video becomes difficult.
If you are on a strict budget, producing new content becomes almost impossible. In such situations, free cartoon sound effects are the best way to enhance your cartoon videos.
In this article, you will learn eight best cartoon sound effects that you can download and make your videos perfect.
8 Best Cartoon Sound Effects Resources
1. Spongebob Sound Effects
MyInstant’s Spongebob soundboard offers a range of cartoon sound effects that can be easily downloaded just by clicking on the Download mp3 sound effect button. You can listen to over 120 classic cartoon sound effects and download it for free. You can also copy the embed link and paste it to your website.
2. Hanna Barbera Sound Effects
From Sounddogs, Hanna Barbera sound effects library, you can find over 2200 cartoon sound effects that are divided into 4 CDs. It has almost all the legendary classic cartoon sound effects from the cartoon shows like Yogi Bear, Huckleberry Hound, the Flintstones, The Jetsons, Quick Draw McGraw, and all the rest of the gang.
You can download the mp3 cartoon sound effects completely free by clicking on the Download ID number mentioned at the right end of each link.
3. Scooby Doo Running Sound
Fandom’s Scooby Doo running sound effects offers all the ideas used in 40 episodes of Scooby Doo throughout the three seasons on ABC. It is over 37000 pages wiki that you can click and browse through the pages to find the right sound effect and download it for free.
4. Tom and Jerry Sound Effects
Pond5 offers 13 Tom and Jerry sound effects that you can listen by scrolling the cursor over the boxes and download the free preview of cartoon sound effects by clicking on Download Preview.
If you want to download the entire cartoon sound effect, you need to register, log in, and pay for it. There are filters like price, collections, duration, etc. to make your selection more precise.
5. Free SFX
In FreeSFX website, you can find a range of comical cartoon sound effects that includes classic effects like descend, boink, impact, pop, musical, running, rip and snap, bounce spring, slide whistle, squelch and splat, horn and loads more.
You need to log in to the website to download free cartoon sound effects.
6.GRSites
With over 1980 cartoon sound effects, the GRSites is one of the best free sites for downloading both mp3 and WAV files. You can browse from a range of categories to find the best cartoon sound effects for your videos.
7. Cartoon Running Sound Effect
If you are looking for cartoon running sound effect, turn to Episode 345 in 99PercentInvisible. You can download the complete transcript page of around 30 minutes to use it in your video. Use the cartoon running sound effect produced by 99pi to enhance your video.
8. Big Fish Audio
The Big Fish Audio’s cartoon sound FX includes 23 free classic cartoon sound effects. The filters include a range of sound FX types, styles, format, brand, etc.
You can click on the cartoon sound effect and listen to it or add it to your playlist. But, if you wish to download the free cartoon sound effects, you need to register and pay to use the sound effect.
You may also like: How to Extract Audio from Videos on Win/Mac/Phone >>
Conclusion
Make your cartoon videos perfect with the fantastic free cartoon sound effects available for download completely free. With the range of free cartoon sound effects, you don’t need to worry about creating new sounds or expenses. You need to download the free sounds and beautifully enhance it with your creativity. There are several other sites for downloading free cartoon sound effects, but here you can check out some of the trusted ones to use.
Benjamin Arango
Benjamin Arango is a writer and a lover of all things video.
Follow @Benjamin Arango
Achieving High-Quality Frequency Modulation in Audacity
You may raise or lower the pitch of a pre-recorded song. Likewise, you may apply the pitch-changing effect in real-time sound recording. Change in pitch affects your noise in certain ways. For instance, it can help you sound younger. Similarly, it can convert the male voice into a female voice. Another notable use of the pitch-changing technique is that you can produce sounds like cartoons. So, changing pitch can add a unique touch to your voice. You can also change pitch when recording in Audacity. The following article covers details about the Audacity change pitch feature. Let’s get started.
In this article
01 What is pitch, and how does it work?
02 How to Change Pitch in Audacity?
Part 1: What is pitch, and how does it work?
Not all sounds are the same. Some vary in terms of amplitude, which makes them loud or quiet. In contrast, others vary in terms of pitch, which makes them high or low. Pitch is used to differentiate between the acute and flat notes in a sound wave. High-pitched sounds are likely to be shrilling, whereas the lower-pitched will be bassy. Pitch depends upon the frequency of the sound waves producing them. In short, notes at a higher frequency are high-pitched.
On the contrary, notes at lower frequencies are low-pitched. Changing a pitch of noise from low to high or vice versa is an art. Thus, sound recording and editing applications like Audacity come with the in-built effect that enables you to change the pitch of a sound.
Part 2: How to Change Pitch in Audacity?
Sound editing is becoming increasingly popular in music and other relevant industries. Several applications offer sound editing tools to serve the needs of the people. Pitch-changing is one of the common tools that people look for in sound editors.
Audacity is one of the notable software that allows users to change the pitch of the voice. It comes with an Audacity pitch shift mechanism to facilitate users. So, if you are editing sound in Audacity, changing the pitch is just a matter of a few clicks. Are you still wondering how you can apply the Audacity change pitch technique when editing? Here’s how you can do it in simple steps.
Step 1: Select the audio portion
Launch Audacity and add sound recordings you want to edit. Click on the timeline and drag to select the portion of the sound.
Note: Only the portion whose pitch you want to change.

Step 2: Open Effect menu
Click on the Effect tab at the top right of the screen next to Generate. Select Pitch Change from the drop-down menu.
Note: You can also make other changes, such as Change Speed and Change Tempo option will let you alter the speed of the sound. So, the pitch can also be altered using this process.

Step 3: Adjust pitch
Drag the slider to alter the pitch of the sound and press the OK button to apply changes.
Note: To increase pitch, slide towards the right. Similarly, slide towards the left to a lower pitch. In addition, the pitch can also be changed by configuring From and To parameters.

Bonus Section: How to Adjust Sound Louder in Audacity?
Volume in an audio file may or may not be ideal for use. Sometimes, the sound is too loud or low. Audacity can help you in such a situation. So, if you are editing sound recordings in Audacity, you can also fix the volume of the sound. The good thing to note is that you can adjust the sound in both directions, which implies you can easily amplify or reduce the volume in these open-source applications. Are you interested in knowing about the volume adjustment process in Audacity? If yes, we have summarized the process in simple steps. Let’s take a look.
Step 1: Add an audio file
Launch the software and click on File. Select Open and select the desired audio.
Note: It is not recommended to change the volume through the playback volume knob at the top right corner of the screen, as this will only increase the volume in your device. However, the actual volume of the audio will remain unchanged.

Step 2: Increase/Decrease audio gain
Change the gain of the audio at the left-hand side of the screen. Move the slider to adjust the volume to the desired level.

Note: Alternatively, you may also increase or increase the volume through the amplification process. To use this method, select the audio portion, access Effect, and tap Amplify. Tick allow clipping box and move the slider to set the volume of the sound.
Conclusion
There are high chances of audio sound not being in the required pitch or volume. Plus, you may also need to change the sound characteristics of an audio file for specific use. So, if this is the case, the Audacity change pitch technique is all you need to learn. Thus, we have summarized the process of changing pitch and volume in a step-by-step guide in this article. Hopefully, all your concerns will have been addressed.
02 How to Change Pitch in Audacity?
Part 1: What is pitch, and how does it work?
Not all sounds are the same. Some vary in terms of amplitude, which makes them loud or quiet. In contrast, others vary in terms of pitch, which makes them high or low. Pitch is used to differentiate between the acute and flat notes in a sound wave. High-pitched sounds are likely to be shrilling, whereas the lower-pitched will be bassy. Pitch depends upon the frequency of the sound waves producing them. In short, notes at a higher frequency are high-pitched.
On the contrary, notes at lower frequencies are low-pitched. Changing a pitch of noise from low to high or vice versa is an art. Thus, sound recording and editing applications like Audacity come with the in-built effect that enables you to change the pitch of a sound.
Part 2: How to Change Pitch in Audacity?
Sound editing is becoming increasingly popular in music and other relevant industries. Several applications offer sound editing tools to serve the needs of the people. Pitch-changing is one of the common tools that people look for in sound editors.
Audacity is one of the notable software that allows users to change the pitch of the voice. It comes with an Audacity pitch shift mechanism to facilitate users. So, if you are editing sound in Audacity, changing the pitch is just a matter of a few clicks. Are you still wondering how you can apply the Audacity change pitch technique when editing? Here’s how you can do it in simple steps.
Step 1: Select the audio portion
Launch Audacity and add sound recordings you want to edit. Click on the timeline and drag to select the portion of the sound.
Note: Only the portion whose pitch you want to change.
Step 2: Open Effect menu
Click on the Effect tab at the top right of the screen next to Generate. Select Pitch Change from the drop-down menu.
Note: You can also make other changes, such as Change Speed and Change Tempo option will let you alter the speed of the sound. So, the pitch can also be altered using this process.
Step 3: Adjust pitch
Drag the slider to alter the pitch of the sound and press the OK button to apply changes.
Note: To increase pitch, slide towards the right. Similarly, slide towards the left to a lower pitch. In addition, the pitch can also be changed by configuring From and To parameters.
Bonus Section: How to Adjust Sound Louder in Audacity?
Volume in an audio file may or may not be ideal for use. Sometimes, the sound is too loud or low. Audacity can help you in such a situation. So, if you are editing sound recordings in Audacity, you can also fix the volume of the sound. The good thing to note is that you can adjust the sound in both directions, which implies you can easily amplify or reduce the volume in these open-source applications. Are you interested in knowing about the volume adjustment process in Audacity? If yes, we have summarized the process in simple steps. Let’s take a look.
Step 1: Add an audio file
Launch the software and click on File. Select Open and select the desired audio.
Note: It is not recommended to change the volume through the playback volume knob at the top right corner of the screen, as this will only increase the volume in your device. However, the actual volume of the audio will remain unchanged.
Step 2: Increase/Decrease audio gain
Change the gain of the audio at the left-hand side of the screen. Move the slider to adjust the volume to the desired level.
Note: Alternatively, you may also increase or increase the volume through the amplification process. To use this method, select the audio portion, access Effect, and tap Amplify. Tick allow clipping box and move the slider to set the volume of the sound.
Conclusion
There are high chances of audio sound not being in the required pitch or volume. Plus, you may also need to change the sound characteristics of an audio file for specific use. So, if this is the case, the Audacity change pitch technique is all you need to learn. Thus, we have summarized the process of changing pitch and volume in a step-by-step guide in this article. Hopefully, all your concerns will have been addressed.
Also read:
- New Reimagining Audio in Virtual Spaces The 5 Most Groundbreaking Vocal Modification Apps for Google Meet
- Updated 2024 Approved Voice Memos Made Simple Your Comprehensive Guide to High-Quality Audio Recordings on Windows 10
- New Complementing Your Visual Storytelling with Cost-Free Melodies Techniques for PC/Mobile Devices for 2024
- 2024 Approved Learn How to Mute Video Audio on Windows 10 Naturally and Economically
- Updated Essential Techniques for Capturing Sound via iPhone for 2024
- The Art of Dividing Sounds From Videos in iMovie for Mac Enthusiasts for 2024
- 2024 Approved Precision in Perception Eliminating Background Buzz with Audacitys Tools
- How Can You Change Your Voice, In 2024
- Updated Contemporary Techniques for Crafting Effective Audio Echoes
- Updated In 2024, The Essential List 6 High-Performance Voice Alteration Apps
- New In 2024, Preferred Websites to Securely Acquire Lofi Artwork and Soundtracks
- New 2024 Approved Exploring the Best 9 Voice Technology Innovations That Promise a Perfect Day
- Enhancing Your Virtual Presence Top Skype Voice Modification Apps
- Updated In 2024, The Art of Audio Accommodation Stabilizing Volume Levels in Video Production
- New Exploring the Top 10 Windows Speech to Text Technology Choices
- Updated 2024 Approved A Beginners Handbook to Professional Music Video Editing
- Eliminating Echoes and Interference AI Strategies for Pristine Sound Quality for 2024
- Updated Enhancing Vocal Expression An Intuitive Method for Audacity Users
- Updated Audio Separation Strategies Isolating Sound From Video Clips
- New 2024 Approved Essential 5 Audio Blender Apps for Mac Users
- Updated 2024 Approved Mastering Audio Conversion with Audacity and Lame Codec
- Updated In 2024, Full Compendium of Podcast Directory Hubs
- In 2024, Essential Guide Affordable & User-Friendly Audio Noise Reduction Tools
- Locating Videogame SFX Archives Online
- New MelodyMorpher X Cutting-Edge Voice Transformation & Mastering Software
- Navigating Gaming Voice Changes Expert Advice on Best Practices
- Updated 2024 Approved Exploring the Finest Free, Web-Integrated Digital Audio Workstations
- Updated Basic Tongue Articulation Adjustments A Comprehensive Guide to Utilities, Policies, and Replacements
- Enhancing Your Gaming Experience Incorporating Audio with KineMaster
- Updated 2024 Approved A Curated Selection of Websites for Obtaining Quality Whoosh Sound Experience
- Updated In 2024, Mastering Sound Silence in iMovie A Comprehensive Guide
- Updated In 2024, Harmony Helpers The Premier Sync Edit Software for Video Rhythms, 2023 Release
- 2024 Approved Discover the Best Sound Normalizers for Windows PCs
- Seeking Out Reputable Sources for Free, Unlicensed Avian Music Files for 2024
- In 2024, A Comprehensive Overview of Changing Speech and Music Levels in Files
- 2024 Approved Macs Vanguard in Audio Editing The Ultimate Compilation of the Best 4 Music Apps
- Updated 2024 Approved Innovations in Capturing High-Fidelity Broadcast Sound
- New 2024 Approved A Symphony of Signals Top 5 Groundbreaking Audio/Video Mixing Devices Set
- Updated The Sound Engineers Toolkit In-Depth Strategies for Effective MP3 Manipulation
- Updated In 2024, The Digital Sound Tuner Scaling Volume, Speed & Tonality Remotely
- New 2024 Approved Discover the Online Havens for High-Fidelity Recordings of Ornithological Sounds
- Updated In 2024, Chic Ambiance Soundtrack for Online Video Creations
- New In 2024, Cinematic Soundscapes Techniques for Retrieving Audio From Videos
- If You Are a Fan of Electronic, Noise and Other Experimental Genres of Music that Emerged in the Early and Mid-1990s, Then You Probably Already Know What Glitch Art Is. If You Would Like to Create Gli for 2024
- Updated In 2024, Make Unforgettable Video Invites with These Mobile Apps
- How to Transfer Text Messages from Poco X5 Pro to New Phone | Dr.fone
- Updated 2024 Approved Easy Tutorial How to Record and Send Talking Emoji for iPhone
- In 2024, Hassle-Free Ways to Remove FRP Lock from Xiaomi Redmi 12 5G Phones with/without a PC
- New 2024 Approved Mac Users Rejoice Download Splice Video Editor Today
- In 2024, 3 Ways to Erase iPhone 15 Plus When Its Locked Within Seconds | Dr.fone
- A Quick Guide to Poco F5 Pro 5G FRP Bypass Instantly
- Android Safe Mode - How to Turn off Safe Mode on Xiaomi 14 Pro? | Dr.fone
- In 2024, iPhone 15 Pro Max iCloud Activation Lock Bypass
- New In 2024, What Are AI Tools?
- Full Guide to Hard Reset Your Honor 90 GT | Dr.fone
- How to Fix Videos Not Playing on Xiaomi Redmi Note 13 Pro 5G?
- Disabled iPhone SE How to Unlock a Disabled iPhone SE?
- Pattern Locks Are Unsafe Secure Your Samsung Galaxy S24 Ultra Phone Now with These Tips
- Maximize Your Reach Ideal Aspect Ratios for Instagram Videos for 2024
- Updated In 2024, The Power of Vertical How to Resize Your Videos for Maximum Impact on Social Media
- My Videos Arent Playing on Lava Blaze Curve 5G – What Can I Do? | Dr.fone
- How To Bypass iCloud Activation Lock On iPod and iPhone 8 The Right Way
- Updated Beyond Quik Exploring the Best PC Video Editing Software for GoPro Users for 2024
- How to Fix Life360 Shows Wrong Location On Vivo Y27 5G? | Dr.fone
- Best Ways to Bypass iCloud Activation Lock from iPhone 15/iPad/iPod
- Resize Video in Minutes A Step-by-Step Guide for 2024
- New 2024 Approved How to Make a Gaming Montage - Guide & Tips
- In 2024, How Do I Stop Someone From Tracking My Apple iPhone 15 Pro? | Dr.fone
- Updated Say Cheese! 16 Best Apps to Convert Your Photos Into Cartoons for 2024
- New In 2024, Things You Need to Know About Color Grading in Photography
- How To Do Motorola Edge 2023 Screen Sharing | Dr.fone
- Title: Updated Achieve Balanced Soundscape with Rapid Audio Regulation Strategies for 2024
- Author: Ella
- Created at : 2024-05-19 06:26:47
- Updated at : 2024-05-20 06:26:47
- Link: https://sound-optimizing.techidaily.com/updated-achieve-balanced-soundscape-with-rapid-audio-regulation-strategies-for-2024/
- License: This work is licensed under CC BY-NC-SA 4.0.
