
:max_bytes(150000):strip_icc():format(webp)/AE-lock-572ece975f9b58c34c0a2492.jpg)
Updated In 2024, VoiceCapture 101 Leading Software for Accurate Vocal Tracking
“VoiceCapture 101: Leading Software for Accurate Vocal Tracking “
Top 10 Audio Recording Software to Capture Your Voice Easily

Shanoon Cox
Mar 27, 2024• Proven solutions
Whether professional or for amateur purposes, the audio recording software programs are very important. These programs allow manipulating the audio so that it matches the need for a specific project.
The best audio recording software has a variety of tools embedded to polish the audio recorded, in which this article we are going to review the best of them for you.
What is Audio Recording Software?
As the name suggests, the audio recording software is used to record audio using a unique technology. This allows the users to capture their own or the voice they want and transfer it wherever they want. The software also adds effects to the voice and makes it professional to use wherever the user wants to.
What Does a Sound Recorder Use for?
There are several uses of audio recording software program. Some are listed as under:
- In the music field, this software is of great use. It can be used for multitrack recording. The mixing of the sound is then done using the same or different tools.
- The audio recorded can be edited with ease. This includes enhancing and adding effects to it with perfection.
- With microphone use, the recording software can be integrated to make sure that the voice of the user is also recorded if required.
- Some audio recording software programs also come with screen recording, and therefore, these foster multitasking.
List of Top 10 Audio Recording Software Programs
The audio recording software for PC that would make your life easy is mentioned as under.
1.Wondershare DemoCreator
This is by far the best and the most used software program when it comes to audio recording. It is highly reliable and comes with a GUI. The user interface is easy to understand, and so are the functionalities.
With the best and the most advanced controls recording audio has never been this easy. It also acts as Mac audio recording software, and therefore it is highly recommended for all platforms. The frequent updates make this program even easier to use.
Features
- The interface of the program is very easy to use and stress-free.
- The high definition audio can be recorded with ease.
- The program supports 50+ formats to import audio, video, and other files to the system.
- There are highly advanced options for professional audio recording.
- The program can record endless video and audio as far as there is space on your disk.
Pros
- It is one of the programs that support professional audio editing.
- The program is very easy to use as it has a graphical interface.
Cons
- The program is flash software-based, which can slow down the system.
- It does not offer highly advanced audio editing at all.
Supported Platforms
The program can be used with both Windows and Mac.
Go ahead to download and have a try now!
2.WavePad
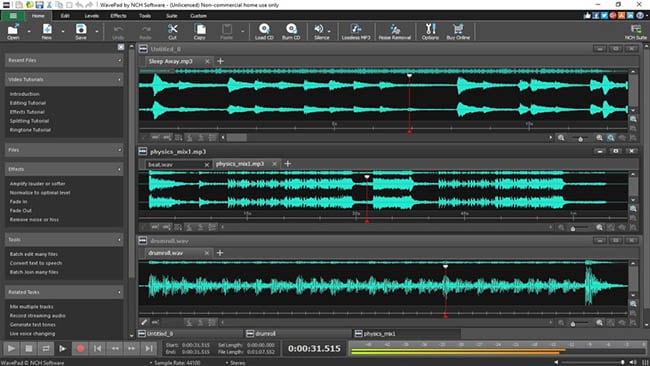
It is one of the best and most used programs to make sure that the audio is recorded with perfection. This program is compatible with most of the audio formats, and therefore it is highly recommended. The overall rating of the program is high as it is used by professionals and, therefore, highly rated as well.
Features
- It has several audio enhancing capabilities, which include amplification and effect addition.
- The audio can be edited, trimmed, and cropped with this program.
- The professional-quality sound recording is used by this program to enhance the capabilities.
Pros
- The best part of this program is its quality of end product that is very high.
- It is a wave editor that gives the users more control over the end product.
Cons
- The mp3 editor of this program does not offer top quality work.
- The program cannot work with multiple files efficiently.
Supported Platforms
It can be installed over Mac, Windows, Android, and iOS.
3.Ocenaudio

As a cross-platform program, this one has a lot to offer. The interface is a bit technical, but overall the use of the program is easy once the hands-on is done. The program is also highly intuitive and allows the users to overcome the day to day audio recording and editing tasks.
Features
- The Ocen Framework is also integrated with this platform to enhance its capabilities.
- The program also records screen if required by the users.
- It is one of the programs that have been rated on other high-end platforms.
Pros
- The program uses auto trim and voice recording controls.
- The sound spectral analysis of the program is highly advanced.
Cons
- The program cannot directly load the file from a CD.
- The program cannot be opened in multiple screens, so the work rate is slow.
Supported Platforms
It is compatible with Mac, Windows, and Linux.
4.Adobe Audition

It can be rightfully regarded as one of the best and the most advanced programs. Backed by years of Adobe experience, it is a program that will get the user a step forward. It is highly recommended to all those users that are looking for a professional level of audio recording.
Features
- It includes multitrack, wave editing, and audio restoration tools to give the best results.
- The essential sound panel has been integrated with the program to get the best oomph effect to the audio.
- The music clips can be integrated within the audio recording to make it sound professional.
Pros
- The platform can be used to create awesome podcasts.
- The audio break can be repaired with perfection.
Cons
- It is expensive, so all the users cannot afford it at all.
- The interface is high tech in nature and requires time to learn.
Supported Platforms
It is supported by Windows and Mac.
5.Audacity

It is free software that is used to record audio professionally. This high-performance program makes sure that the audio which is recorded is also shared with different platforms. The built-in panel is upgraded, and therefore it is highly advance.
Features
- It is ad-free and therefore provides hassle-free work.
- The audio editing and recording have never been as easy as it is with audacity.
- Multitrack editing is also possible with this program.
Pros
- The VST plugin support is provided by the program.
- It is a portable program that can be used for pitch correction.
Cons
- The noise reduction tool of this program needs an upgrade.
- The record to tape feature is currently unavailable.
Supported Platforms
It is supported by Mac, Linux, Windows, and BSD.
6.Wavosaur

It is one of the free programs that can be regarded as better than many paid ones. It is all because the qualities of the program are matchless. The processing of files is done with WAV and Mp3 files filter, which makes the process very much easier.
Features
- The program has multiple document interfaces for multiple file handling.
- The editing features such as cut, copy, paste, and edit can be performed in a single window.
- The waveform representation of the program is accurate and highly advanced.
Pros
- The program offers bit depth convert, pitch shift, and DC offset removal.
- The VST effects can be added to the entire batch of sound files.
Cons
- The audio routing and the multichannel support of the program are not efficient.
- The software sampler extraction is a bit slow when it comes to this program.
Supported Platforms
The program can only be installed on Windows.
7.MixPad
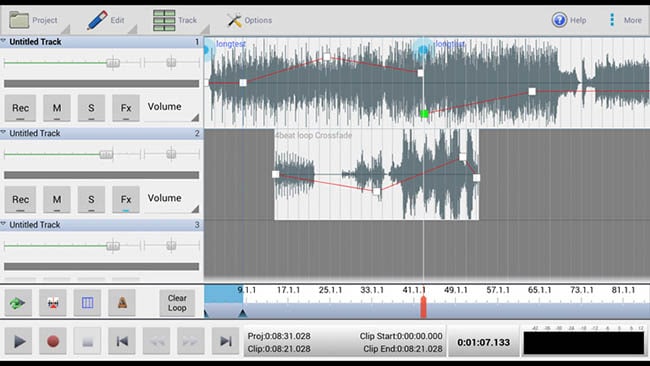
The audio processing and mixing have been made very easy with this platform. The program has an interface that is sleek in design and allows the processing of the audio info with care. The program also supports cloud storage, which means that the entire user’s hard work remains safe and secures all the time.
Features
- The program can mix the unlimited number of tracks all at the same time.
- Depending upon the requirement, the multiple or a single track can be processed at the same time.
- The program supports almost every sound format, so any type of sound can be imported with perfection.
Pros
- The audio effects such as EQ, compression, and reverb can be added with perfection.
- The latency rate is very low, and the program also offers ASIO support for accurate processing.
Cons
- The program only offers the export of the sound that is up to 32 bits.
- The sample rates of up to 96 kHz are only supported, which is less than most of the other mixers.
Supported Platforms
The program can be installed on Mac, Windows, Android, iPad, and Kindle Fire.
8.Sound Forge

If a user wants to completely control the audio editing process, then this software is for them. It is highly advanced and makes sure that the work that is done is highly précised. From Red Book CD creation to sound design and mixing, this program provides the users with complete control and authority over the process.
Features
- The multichannel WAV recording and processing is now possible with the new version of the program.
- The VST plugin support is provided by this program with perfection.
- The VST effects can be chained in a virtual rack.
Pros
- The simple digitization and restoration of the audio have been made simple by this program.
- The one-click solutions allow the users to process the audio tracks easily.
Cons
- The program only offers 32 bits of power, which is very low.
- The multiple VST GUI is not supported by this program.
Supported Platforms
The Sound Forge can be installed on Mac and Windows.
9.Spek

The best part of the software is that it is free and allows the users to overcome the problems which the other audio recorders present. The interface is easy to learn, and therefore the overall usage is easy. The lossless quality is something for which the software is known for. It also supports the FFMPEG library.
Features
- The signal processing is ultra-fast as it uses several threads to process audio.
- The drag and drop support of the program is highly efficient, and the program supports common audio formats.
- The program can be accessed in 19 different languages.
Pros
- The spectral density rulers allow the auto fitting of time.
- The spectral density range of the program is also adjustable.
Cons
- The codec names are, and the audio signal parameters cannot be seen.
- The program is licensed under GPLv3, which is now obsolete.
Supported Platforms
The program is compatible with Windows, Linux, and Mac.
10.Audio Highjack

The program, as the name suggests, makes it possible for the users to completely delve deep into the process of audio editing. The interface, as well as the controls, is very easy to understand and use. For novice users, this program is highly recommended as it makes audio editing a fun-filled activity.
Features
- It provides detailed statistics and min, the max value per channel.
- The processed audio can be listened in real-time to get an idea about the end product.
- The waveform generator and frequency impulse train are embedded within the program.
Pros
- The lame encoder support has been embedded within the recorder to export mp3 files.
- The editor’s look is skin able, which can be changed as per the user choice.
Cons
- The processing options are less as compared to the other recorders.
- The audio files cannot be exported as text, so the program cannot be used with PSpice.
Supported Platforms
The program is only available for Mac.
A Roundup of the Best Audio Recording Software Programs
| No. | Tools | Rating | Supported Formats | Price | Processing Power |
|---|---|---|---|---|---|
| 1 | DemoCreator | 4.5 | .mp3, .m4a, .wav, .wma, .ogg, .flac, .aif, .aiff | $29.99 | 64-bit |
| 2 | WavePad | 4.4 | vox, gsm, WMA, real audio, au, aif, FLAC, and Ogg | $69.95 | 64-bit |
| 3 | Ocenaudio | 4.0 | vox, gsm, WMA, wav, .wma, .ogg, and .flac | Free | 32-bit |
| 4 | Adobe Audition | 4.5 | AIF, AIFF, AIFC | $74.99 | 64-bit |
| 5 | Audacity | 3.9 | mp3, wav, AIFF, au, and ogg | Free | 32-bit |
| 6 | Wavosaur | 3.5 | VST plugins, ASIO driver, multichannel wav files, real-time effect processing. | Free | 32-bit |
| 7 | MixPad | 3.2 | wav, mp3, vox, and gsm | $129 | 32-bit |
| 8 | Sound Forge | 4.0 | SWF, RealMedia 9, WMA, AVI , AIFF, AIF, and SND | Free | 32-bit |
| 9 | Spek | 4.4 | vox, gsm, WMA, Wav, WMA, real audio, au, aif, FLAC, and Ogg | Free | 64-bit |
| 10 | Audio Highjack | 4.2 | .mp3, .m4a, .wav, .wma, aif, FLAC, and Ogg | Free | 64-bit |
Conclusion
With the overall specs and ratings by the users, the Wondershare DemoCreator is the best software that should be used for audio recording.
The program is highly compatible with major operating systems, and therefore it is highly recommended. The overall mechanism is easy, and the program also supports multiple formats.
It is highly technical and is constantly upgraded to make sure that it remains in line with modern technologies. It is a one-stop-shop for all the audio recording needs of the users and therefore highly viable.
With this program, the audio that has been worked on can be shared on most popular social media platforms like YouTube and Facebook.


Shanoon Cox
Shanoon Cox is a writer and a lover of all things video.
Follow @Shanoon Cox
Shanoon Cox
Mar 27, 2024• Proven solutions
Whether professional or for amateur purposes, the audio recording software programs are very important. These programs allow manipulating the audio so that it matches the need for a specific project.
The best audio recording software has a variety of tools embedded to polish the audio recorded, in which this article we are going to review the best of them for you.
What is Audio Recording Software?
As the name suggests, the audio recording software is used to record audio using a unique technology. This allows the users to capture their own or the voice they want and transfer it wherever they want. The software also adds effects to the voice and makes it professional to use wherever the user wants to.
What Does a Sound Recorder Use for?
There are several uses of audio recording software program. Some are listed as under:
- In the music field, this software is of great use. It can be used for multitrack recording. The mixing of the sound is then done using the same or different tools.
- The audio recorded can be edited with ease. This includes enhancing and adding effects to it with perfection.
- With microphone use, the recording software can be integrated to make sure that the voice of the user is also recorded if required.
- Some audio recording software programs also come with screen recording, and therefore, these foster multitasking.
List of Top 10 Audio Recording Software Programs
The audio recording software for PC that would make your life easy is mentioned as under.
1.Wondershare DemoCreator
This is by far the best and the most used software program when it comes to audio recording. It is highly reliable and comes with a GUI. The user interface is easy to understand, and so are the functionalities.
With the best and the most advanced controls recording audio has never been this easy. It also acts as Mac audio recording software, and therefore it is highly recommended for all platforms. The frequent updates make this program even easier to use.
Features
- The interface of the program is very easy to use and stress-free.
- The high definition audio can be recorded with ease.
- The program supports 50+ formats to import audio, video, and other files to the system.
- There are highly advanced options for professional audio recording.
- The program can record endless video and audio as far as there is space on your disk.
Pros
- It is one of the programs that support professional audio editing.
- The program is very easy to use as it has a graphical interface.
Cons
- The program is flash software-based, which can slow down the system.
- It does not offer highly advanced audio editing at all.
Supported Platforms
The program can be used with both Windows and Mac.
Go ahead to download and have a try now!
2.WavePad
It is one of the best and most used programs to make sure that the audio is recorded with perfection. This program is compatible with most of the audio formats, and therefore it is highly recommended. The overall rating of the program is high as it is used by professionals and, therefore, highly rated as well.
Features
- It has several audio enhancing capabilities, which include amplification and effect addition.
- The audio can be edited, trimmed, and cropped with this program.
- The professional-quality sound recording is used by this program to enhance the capabilities.
Pros
- The best part of this program is its quality of end product that is very high.
- It is a wave editor that gives the users more control over the end product.
Cons
- The mp3 editor of this program does not offer top quality work.
- The program cannot work with multiple files efficiently.
Supported Platforms
It can be installed over Mac, Windows, Android, and iOS.
3.Ocenaudio
As a cross-platform program, this one has a lot to offer. The interface is a bit technical, but overall the use of the program is easy once the hands-on is done. The program is also highly intuitive and allows the users to overcome the day to day audio recording and editing tasks.
Features
- The Ocen Framework is also integrated with this platform to enhance its capabilities.
- The program also records screen if required by the users.
- It is one of the programs that have been rated on other high-end platforms.
Pros
- The program uses auto trim and voice recording controls.
- The sound spectral analysis of the program is highly advanced.
Cons
- The program cannot directly load the file from a CD.
- The program cannot be opened in multiple screens, so the work rate is slow.
Supported Platforms
It is compatible with Mac, Windows, and Linux.
4.Adobe Audition
It can be rightfully regarded as one of the best and the most advanced programs. Backed by years of Adobe experience, it is a program that will get the user a step forward. It is highly recommended to all those users that are looking for a professional level of audio recording.
Features
- It includes multitrack, wave editing, and audio restoration tools to give the best results.
- The essential sound panel has been integrated with the program to get the best oomph effect to the audio.
- The music clips can be integrated within the audio recording to make it sound professional.
Pros
- The platform can be used to create awesome podcasts.
- The audio break can be repaired with perfection.
Cons
- It is expensive, so all the users cannot afford it at all.
- The interface is high tech in nature and requires time to learn.
Supported Platforms
It is supported by Windows and Mac.
5.Audacity
It is free software that is used to record audio professionally. This high-performance program makes sure that the audio which is recorded is also shared with different platforms. The built-in panel is upgraded, and therefore it is highly advance.
Features
- It is ad-free and therefore provides hassle-free work.
- The audio editing and recording have never been as easy as it is with audacity.
- Multitrack editing is also possible with this program.
Pros
- The VST plugin support is provided by the program.
- It is a portable program that can be used for pitch correction.
Cons
- The noise reduction tool of this program needs an upgrade.
- The record to tape feature is currently unavailable.
Supported Platforms
It is supported by Mac, Linux, Windows, and BSD.
6.Wavosaur
It is one of the free programs that can be regarded as better than many paid ones. It is all because the qualities of the program are matchless. The processing of files is done with WAV and Mp3 files filter, which makes the process very much easier.
Features
- The program has multiple document interfaces for multiple file handling.
- The editing features such as cut, copy, paste, and edit can be performed in a single window.
- The waveform representation of the program is accurate and highly advanced.
Pros
- The program offers bit depth convert, pitch shift, and DC offset removal.
- The VST effects can be added to the entire batch of sound files.
Cons
- The audio routing and the multichannel support of the program are not efficient.
- The software sampler extraction is a bit slow when it comes to this program.
Supported Platforms
The program can only be installed on Windows.
7.MixPad
The audio processing and mixing have been made very easy with this platform. The program has an interface that is sleek in design and allows the processing of the audio info with care. The program also supports cloud storage, which means that the entire user’s hard work remains safe and secures all the time.
Features
- The program can mix the unlimited number of tracks all at the same time.
- Depending upon the requirement, the multiple or a single track can be processed at the same time.
- The program supports almost every sound format, so any type of sound can be imported with perfection.
Pros
- The audio effects such as EQ, compression, and reverb can be added with perfection.
- The latency rate is very low, and the program also offers ASIO support for accurate processing.
Cons
- The program only offers the export of the sound that is up to 32 bits.
- The sample rates of up to 96 kHz are only supported, which is less than most of the other mixers.
Supported Platforms
The program can be installed on Mac, Windows, Android, iPad, and Kindle Fire.
8.Sound Forge
If a user wants to completely control the audio editing process, then this software is for them. It is highly advanced and makes sure that the work that is done is highly précised. From Red Book CD creation to sound design and mixing, this program provides the users with complete control and authority over the process.
Features
- The multichannel WAV recording and processing is now possible with the new version of the program.
- The VST plugin support is provided by this program with perfection.
- The VST effects can be chained in a virtual rack.
Pros
- The simple digitization and restoration of the audio have been made simple by this program.
- The one-click solutions allow the users to process the audio tracks easily.
Cons
- The program only offers 32 bits of power, which is very low.
- The multiple VST GUI is not supported by this program.
Supported Platforms
The Sound Forge can be installed on Mac and Windows.
9.Spek
The best part of the software is that it is free and allows the users to overcome the problems which the other audio recorders present. The interface is easy to learn, and therefore the overall usage is easy. The lossless quality is something for which the software is known for. It also supports the FFMPEG library.
Features
- The signal processing is ultra-fast as it uses several threads to process audio.
- The drag and drop support of the program is highly efficient, and the program supports common audio formats.
- The program can be accessed in 19 different languages.
Pros
- The spectral density rulers allow the auto fitting of time.
- The spectral density range of the program is also adjustable.
Cons
- The codec names are, and the audio signal parameters cannot be seen.
- The program is licensed under GPLv3, which is now obsolete.
Supported Platforms
The program is compatible with Windows, Linux, and Mac.
10.Audio Highjack
The program, as the name suggests, makes it possible for the users to completely delve deep into the process of audio editing. The interface, as well as the controls, is very easy to understand and use. For novice users, this program is highly recommended as it makes audio editing a fun-filled activity.
Features
- It provides detailed statistics and min, the max value per channel.
- The processed audio can be listened in real-time to get an idea about the end product.
- The waveform generator and frequency impulse train are embedded within the program.
Pros
- The lame encoder support has been embedded within the recorder to export mp3 files.
- The editor’s look is skin able, which can be changed as per the user choice.
Cons
- The processing options are less as compared to the other recorders.
- The audio files cannot be exported as text, so the program cannot be used with PSpice.
Supported Platforms
The program is only available for Mac.
A Roundup of the Best Audio Recording Software Programs
| No. | Tools | Rating | Supported Formats | Price | Processing Power |
|---|---|---|---|---|---|
| 1 | DemoCreator | 4.5 | .mp3, .m4a, .wav, .wma, .ogg, .flac, .aif, .aiff | $29.99 | 64-bit |
| 2 | WavePad | 4.4 | vox, gsm, WMA, real audio, au, aif, FLAC, and Ogg | $69.95 | 64-bit |
| 3 | Ocenaudio | 4.0 | vox, gsm, WMA, wav, .wma, .ogg, and .flac | Free | 32-bit |
| 4 | Adobe Audition | 4.5 | AIF, AIFF, AIFC | $74.99 | 64-bit |
| 5 | Audacity | 3.9 | mp3, wav, AIFF, au, and ogg | Free | 32-bit |
| 6 | Wavosaur | 3.5 | VST plugins, ASIO driver, multichannel wav files, real-time effect processing. | Free | 32-bit |
| 7 | MixPad | 3.2 | wav, mp3, vox, and gsm | $129 | 32-bit |
| 8 | Sound Forge | 4.0 | SWF, RealMedia 9, WMA, AVI , AIFF, AIF, and SND | Free | 32-bit |
| 9 | Spek | 4.4 | vox, gsm, WMA, Wav, WMA, real audio, au, aif, FLAC, and Ogg | Free | 64-bit |
| 10 | Audio Highjack | 4.2 | .mp3, .m4a, .wav, .wma, aif, FLAC, and Ogg | Free | 64-bit |
Conclusion
With the overall specs and ratings by the users, the Wondershare DemoCreator is the best software that should be used for audio recording.
The program is highly compatible with major operating systems, and therefore it is highly recommended. The overall mechanism is easy, and the program also supports multiple formats.
It is highly technical and is constantly upgraded to make sure that it remains in line with modern technologies. It is a one-stop-shop for all the audio recording needs of the users and therefore highly viable.
With this program, the audio that has been worked on can be shared on most popular social media platforms like YouTube and Facebook.
Shanoon Cox
Shanoon Cox is a writer and a lover of all things video.
Follow @Shanoon Cox
Echoing Change: The Complete Process of Substituting Auditory Elements in Filmmaking
Video editing is inclusive of editing the audio track. You may be working on background scores, original soundtracks, and different kinds of sound effects. These tasks would need you to edit or replace audio in the video. You may have to mix other audio tracks to have one score. From sound engineering to finely editing every track being mixed, it is an ever expanding and exciting technical niche that will depend largely on a plethora of tools, so in this article, we will let you how to replace audio in video with 2 methods by using Filmora and Windows Movie Maker.
In this article
01 How to replace audio in video with Filmora
02 How to change audio in video with Windows Movie Maker
Part 1: How to replace audio in video with Filmora
The first method, let us explore how you can replace audio in video with Wondershare Filmora.
To begin with, get a free trial copy of Wondershare Filmora .
For Win 7 or later (64-bit)
For macOS 10.12 or later
Step 1. Import file
Open the application and click ‘ Import once you have downloaded and installed Wondershare Filmora. Please search for the relevant video you wish to edit and load it from the hard disk or the specific folder. You can select multiple videos using ‘ctrl’ and clicking on the chosen files.

Step 2. Drag and drop to the video Timeline
The videos selected will be displayed as thumbnails. Choose a video, hit and click without releasing the click and drag the chosen video to the Video Timeline.

Step 3. Remove the original sound of the video
Right-click on it, and you would see the option of “Audio detach.” Click on it, and the audio file will detach from the video file and get added to Music Timeline.
Press “Delete” on your keyboard, and you will get rid of it. You can save this video without the audio, and you would only have the visuals, unimpaired and unaffected in any way, without the sound.

Step 4. Add a new audio track
You can add a new audio track to the video by choosing royalty sound or music from the Filmora library or importing any audio you like.

Part 2: How to change audio in video with Windows Movie Maker
The second method, Apart from replacing audio by Filmora, you can also make it by Windows Movie Maker. Though it is discontinued to develop a new version, you can still use it in Windows 7. Below are the steps to replace audio in Windows Movie Maker .
Step 1: Import video
First, download and run it. Click Add videos and photos to import video.

Step 2: Turn off the original sound
Click Edit tab > Video volume to turn off the sound by draging the slider to the left.

Step 3: Add audio to video
Click Add music to import the targeted music to Windows Movie Maker. You can select Add music or Add music at the current point.

Step 4: Save project
Click the file icon in the top left corner to save the video. Choose Save movie to export the targeted file.

Wondershare Filmora allows you to replace easily and edit the audio in the video
Unfortunately, no application by default on your desktop or laptop, phone, or tablet would get this done. To replace audio in the video, you would need the help of state of the art software. Fortunately, you have Wondershare Filmora at your disposal.
With Wondershare Filmora, you can replace audio in the video, mute audio, detach the audio, and add audio. You can eliminate background noise, organic noise, sound effects, address the sync problem in a video file, and edit the audio in a video without any extensive training or expertise.
- It has a user-friendly interface which makes things simple even for amateurs.
- It supports all common video and audio formats, including WMV, MOV, FLV, MTS, MP4, etc.
- You can move audio, replace it or add new audio to the video without worrying about general loss, which is loss of quality.
- You can export the edited video with the new or edited audio to various devices, including the cloud and social media sites.
- Compatible with Windows (including Windows 8) & Mac OS X (10.6 and above).
For Win 7 or later (64-bit)
For macOS 10.12 or later
02 How to change audio in video with Windows Movie Maker
Part 1: How to replace audio in video with Filmora
The first method, let us explore how you can replace audio in video with Wondershare Filmora.
To begin with, get a free trial copy of Wondershare Filmora .
For Win 7 or later (64-bit)
For macOS 10.12 or later
Step 1. Import file
Open the application and click ‘ Import once you have downloaded and installed Wondershare Filmora. Please search for the relevant video you wish to edit and load it from the hard disk or the specific folder. You can select multiple videos using ‘ctrl’ and clicking on the chosen files.
Step 2. Drag and drop to the video Timeline
The videos selected will be displayed as thumbnails. Choose a video, hit and click without releasing the click and drag the chosen video to the Video Timeline.
Step 3. Remove the original sound of the video
Right-click on it, and you would see the option of “Audio detach.” Click on it, and the audio file will detach from the video file and get added to Music Timeline.
Press “Delete” on your keyboard, and you will get rid of it. You can save this video without the audio, and you would only have the visuals, unimpaired and unaffected in any way, without the sound.
Step 4. Add a new audio track
You can add a new audio track to the video by choosing royalty sound or music from the Filmora library or importing any audio you like.
Part 2: How to change audio in video with Windows Movie Maker
The second method, Apart from replacing audio by Filmora, you can also make it by Windows Movie Maker. Though it is discontinued to develop a new version, you can still use it in Windows 7. Below are the steps to replace audio in Windows Movie Maker .
Step 1: Import video
First, download and run it. Click Add videos and photos to import video.
Step 2: Turn off the original sound
Click Edit tab > Video volume to turn off the sound by draging the slider to the left.
Step 3: Add audio to video
Click Add music to import the targeted music to Windows Movie Maker. You can select Add music or Add music at the current point.
Step 4: Save project
Click the file icon in the top left corner to save the video. Choose Save movie to export the targeted file.
Wondershare Filmora allows you to replace easily and edit the audio in the video
Unfortunately, no application by default on your desktop or laptop, phone, or tablet would get this done. To replace audio in the video, you would need the help of state of the art software. Fortunately, you have Wondershare Filmora at your disposal.
With Wondershare Filmora, you can replace audio in the video, mute audio, detach the audio, and add audio. You can eliminate background noise, organic noise, sound effects, address the sync problem in a video file, and edit the audio in a video without any extensive training or expertise.
- It has a user-friendly interface which makes things simple even for amateurs.
- It supports all common video and audio formats, including WMV, MOV, FLV, MTS, MP4, etc.
- You can move audio, replace it or add new audio to the video without worrying about general loss, which is loss of quality.
- You can export the edited video with the new or edited audio to various devices, including the cloud and social media sites.
- Compatible with Windows (including Windows 8) & Mac OS X (10.6 and above).
For Win 7 or later (64-bit)
For macOS 10.12 or later
Creating a Diminuendo Effect in iMovie Audio Tracks
How to Fade Music and Audio in iMovie on Mac?
Shanoon Cox
Mar 27, 2024• Proven solutions
Fade-in and fade-out effects can help you smooth the video, music, and audio transitions, thus you can make a better movie. When editing videos in iMovie, people may have many video clips and transitions connected to the clips. The fade in and fade out effect seems more important than ever. This tutorial will show you how to fade music and audio in iMovie.
- Part 1: How to Fade Music and Audio in iMovie on Mac
- Part 2: An Easier Way to Fade Audio and Music on Mac
Apart from fading in/fading out the audio, we also want to introduce the video fade-in and fade-out effects, which will help your video to get more attention. Watch the tutorial below to get detailed information about how to fade in/fade out your videos easily.
Related : How to Fade-in and Fade-out Video Clips
After adding the fade-in and fade-out effects to your video, let’s check how to fade your music and audio in iMovie first, and then we will show you how to fade in/fade out your music and audio file in an easier way.
You may also like:
- iMovie for Windows: 10 Best iMovie Alternatives for You
- How to Add Audio to Your Videos
- How to Add Video Effects in iMovie
Part 1: How to Fade Music and Audio in iMovie on Mac
There are two ways available to fade music and audio with iMovie. One is using the fade handles, and the other is using the audio inspector. Before using iMovie audio fade-out effects, please import your video and audio files to iMovie and start a new project.
Method 1: Use Fade Handles to Add Fade in/Fade out Effect in iMovie
Firstly, let’s take a look at the video below to check how to fade audio in/out the audio in iMovie with fade handles.
Step 1. Enable Audio Waveform
When the project opens, check “Show Waveforms” at the bottom of the Project window.

Note: The Blue waveforms indicate the sound recorded within your video clips. Green and purple waveforms indicate sounds and music you’ve added to your project.
Step 2. Move Pointer to Apply Fade Effects
Move the pointer over a waveform, and drag the small gray fade handle at the left of the clip to adjust the fade audio in effect. Then drag the small fade handle at the right of the clip to adjust the fade-out effect.

Step 3. Playback to Check
Move the playhead to the beginning part of the clips with fade effects to check the fade-in and fade-out effects. If everything works OK, uncheck “Show Waveforms” to hide the waveforms.

Related: How to Remove Background Noise from Video
Method 2: Use the Audio Inspector to Apply Fade in/Fade Out Effect in iMovie
To fade audios in and out in iMovie with the audio inspector, you can follow these steps:
Step 1. Open Your iMovie Project and Select a Clip
Double-click the video clip, choose “Clip Adjustments” to open the Inspector, and then click the “Audio” tab.

If there are two audio tracks, and you want to set the fade in and fade out in iMovie for the background music, you can double-click the background music clip to open the audio inspector. This inspector is a little different. If you don’t know how to add background music to iMovie, you can refer to this post: add background music in iMovie .
Step 2. Set the Fade In and Fade Out Effect
In the window, you can manually set the fade-in and fade-out length by dragging the slider bar to the right or left.
If you do not choose “Manual”, that means you’d like iMovie to automatically set it for you. Usually, when you drag video clips to the Project, iMovie will set the fade-in and fade-out effect randomly by increasing the audio volume at the beginning of the clip and decrease the volume at the end of the clip.
If you manually adjust the effect, you can have a better effect.
Step 3. Save the Audio Fade In and Out Effect

After the settings, you can preview the effect in the viewing window to make sure all goes well, and you are much satisfied. Then click “Done” to save the audio fade-in and fade-out effects in iMovie.
Now, that’s done! I hope the above information does help you to set the fade effects to smooth your video and audio transitions.
Related: How to Get More iMovie Themes
Part 2: An Easier Way to Fade Audio and Music on Mac
Let watch the video below to check how to apply fade-in and fade-out effects in an easier way with Wondershare Filmora for Mac. And download it now to try it by yourself.
Download Mac Version ](https://tools.techidaily.com/wondershare/filmora/download/ )
If you want to quickly apply fade-in or fade-out effects, iMovie’s alternative for Mac - Wondershare Filmora can help you. It enables you to easily edit videos. After you’ve made your creation, it also allows you to directly upload the complete video file to YouTube and Vimeo for sharing. Check out the quick guide below to see how to add audio fade effects in Filmora.
Step 1. Import Your Video
Import the video clip you want to add audio in and out effect. To do this, click “File” > “Import Media” to import your local file to the user’s album. Or you can drag and drop these target files from the computer to this app’s album.
Step 2. Add the Audio Fade In/Out Effect to Your Video
Place the video onto the timeline. Double-click on it and then choose “Audio”. In the tab, you can drag the slider bar to the right or left to manually set the fade in and fade out the length.

Step 3. Save Your Video
Click the “Export” button to select one of the export methods. You can choose your desired format or mobile devices, burn it to DVD and upload it to YouTube and Vimeo.

That’s all about how to fade music and audio with iMovie and its alternative. If you want to learn more about how to edit video clips with Filmora, you can visit its YouTube channel to get more detailed information. Feel free to leave comments below if you need further assistance.
Shanoon Cox
Shanoon Cox is a writer and a lover of all things video.
Follow @Shanoon Cox
Shanoon Cox
Mar 27, 2024• Proven solutions
Fade-in and fade-out effects can help you smooth the video, music, and audio transitions, thus you can make a better movie. When editing videos in iMovie, people may have many video clips and transitions connected to the clips. The fade in and fade out effect seems more important than ever. This tutorial will show you how to fade music and audio in iMovie.
- Part 1: How to Fade Music and Audio in iMovie on Mac
- Part 2: An Easier Way to Fade Audio and Music on Mac
Apart from fading in/fading out the audio, we also want to introduce the video fade-in and fade-out effects, which will help your video to get more attention. Watch the tutorial below to get detailed information about how to fade in/fade out your videos easily.
Related : How to Fade-in and Fade-out Video Clips
After adding the fade-in and fade-out effects to your video, let’s check how to fade your music and audio in iMovie first, and then we will show you how to fade in/fade out your music and audio file in an easier way.
You may also like:
- iMovie for Windows: 10 Best iMovie Alternatives for You
- How to Add Audio to Your Videos
- How to Add Video Effects in iMovie
Part 1: How to Fade Music and Audio in iMovie on Mac
There are two ways available to fade music and audio with iMovie. One is using the fade handles, and the other is using the audio inspector. Before using iMovie audio fade-out effects, please import your video and audio files to iMovie and start a new project.
Method 1: Use Fade Handles to Add Fade in/Fade out Effect in iMovie
Firstly, let’s take a look at the video below to check how to fade audio in/out the audio in iMovie with fade handles.
Step 1. Enable Audio Waveform
When the project opens, check “Show Waveforms” at the bottom of the Project window.
Note: The Blue waveforms indicate the sound recorded within your video clips. Green and purple waveforms indicate sounds and music you’ve added to your project.
Step 2. Move Pointer to Apply Fade Effects
Move the pointer over a waveform, and drag the small gray fade handle at the left of the clip to adjust the fade audio in effect. Then drag the small fade handle at the right of the clip to adjust the fade-out effect.
Step 3. Playback to Check
Move the playhead to the beginning part of the clips with fade effects to check the fade-in and fade-out effects. If everything works OK, uncheck “Show Waveforms” to hide the waveforms.
Related: How to Remove Background Noise from Video
Method 2: Use the Audio Inspector to Apply Fade in/Fade Out Effect in iMovie
To fade audios in and out in iMovie with the audio inspector, you can follow these steps:
Step 1. Open Your iMovie Project and Select a Clip
Double-click the video clip, choose “Clip Adjustments” to open the Inspector, and then click the “Audio” tab.
If there are two audio tracks, and you want to set the fade in and fade out in iMovie for the background music, you can double-click the background music clip to open the audio inspector. This inspector is a little different. If you don’t know how to add background music to iMovie, you can refer to this post: add background music in iMovie .
Step 2. Set the Fade In and Fade Out Effect
In the window, you can manually set the fade-in and fade-out length by dragging the slider bar to the right or left.
If you do not choose “Manual”, that means you’d like iMovie to automatically set it for you. Usually, when you drag video clips to the Project, iMovie will set the fade-in and fade-out effect randomly by increasing the audio volume at the beginning of the clip and decrease the volume at the end of the clip.
If you manually adjust the effect, you can have a better effect.
Step 3. Save the Audio Fade In and Out Effect
After the settings, you can preview the effect in the viewing window to make sure all goes well, and you are much satisfied. Then click “Done” to save the audio fade-in and fade-out effects in iMovie.
Now, that’s done! I hope the above information does help you to set the fade effects to smooth your video and audio transitions.
Related: How to Get More iMovie Themes
Part 2: An Easier Way to Fade Audio and Music on Mac
Let watch the video below to check how to apply fade-in and fade-out effects in an easier way with Wondershare Filmora for Mac. And download it now to try it by yourself.
Download Mac Version ](https://tools.techidaily.com/wondershare/filmora/download/ )
If you want to quickly apply fade-in or fade-out effects, iMovie’s alternative for Mac - Wondershare Filmora can help you. It enables you to easily edit videos. After you’ve made your creation, it also allows you to directly upload the complete video file to YouTube and Vimeo for sharing. Check out the quick guide below to see how to add audio fade effects in Filmora.
Step 1. Import Your Video
Import the video clip you want to add audio in and out effect. To do this, click “File” > “Import Media” to import your local file to the user’s album. Or you can drag and drop these target files from the computer to this app’s album.
Step 2. Add the Audio Fade In/Out Effect to Your Video
Place the video onto the timeline. Double-click on it and then choose “Audio”. In the tab, you can drag the slider bar to the right or left to manually set the fade in and fade out the length.
Step 3. Save Your Video
Click the “Export” button to select one of the export methods. You can choose your desired format or mobile devices, burn it to DVD and upload it to YouTube and Vimeo.
That’s all about how to fade music and audio with iMovie and its alternative. If you want to learn more about how to edit video clips with Filmora, you can visit its YouTube channel to get more detailed information. Feel free to leave comments below if you need further assistance.
Shanoon Cox
Shanoon Cox is a writer and a lover of all things video.
Follow @Shanoon Cox
Also read:
- New 2024 Approved Unleash the Power of Your Vocal Projection Filmora Tips and Tricks
- New In 2024, 10 Vocal Frequency Filters Transforming Home Studio Music-Making
- New In 2024, Unparalleled Audio File Reader Free, Top Quality MP3 Creation From Professional MPA Soundtracks
- Updated Seeking the Ideal Audio Sample of a Brushing Motion for 2024
- Updated 2024 Approved Enhancing PC Sound Quality with Audacity Modern Techniques and Setup
- In 2024, Vocaroo Voice Recorder Guideline and Alternatives
- Updated Premier List of Speech Conversion Utilities Optimized for Windows, Updated for 2024
- 2024 Approved Ancient Aria Top-Tier Music Picks for Wedding Video Production
- In 2024, Excellent 11 Digital Audio Manipulation Apps on Android
- Full Spectrum Insight Into Nero AudioWaveEditor
- Cutting Out Digital Clutter A Guide for Silencing Unwanted Audio for 2024
- New 2024 Approved Decoding the Perfect Audio Format A Comprehensive Advice Guide
- Updated 2024 Approved The Editors Playlist Top Tips for Crafting Memorable MVs
- Amplify Your Voice Basic Changes on Audacity Made Simple
- Updated Aural Affordability The Complete Manual on FREE Audio Download Methods for 2024
- 2024 Approved A Guide to Copyright-Free Tracks Perfect for Videographic Artistry
- Updated In 2024, 7 Tips to Record Audio on Chromebook in an Easy Way
- In 2024, The Sound Detectives Handbook Extracting Silence From Video Files in iOS/OS X Systems
- New Sound Engineering Excellence A Comprehensive Approach to Dialing Down Unwanted Audio Disturbances for 2024
- Updated How to Fade In and Fade Out Audio in Adobe After Effects Effortlessly for 2024
- Updated Locating Chuckles The Guide to Comedy Audio Tones
- New Unearth Handclap Auditory Illustration for 2024
- Audio on Demand Pairing Your AirPods With Your Computer for Optimal Sound Experience in the Digital Age
- New In 2024, Explore the Best 8 DAW Platforms for Seamless Recording, Mixing, and Mastering Experience
- In 2024, The Best Sound Equalizer Settings
- New In 2024, Unleash the Power of Your Voice In-Depth Tutorial for Voice Change Using Audacity
- Updated In 2024, Decoding Omegle A Deep Dive Into Online Gaming Platforms with Safety Focus
- New 2024 Approved Transforming Music Production in Logic Pro X with These Essential Plugin Tools (Free/Paid)
- Updated In 2024, Crafting a Silent AVI Film A Hands-On Approach (AVI 2023)
- New In 2024, Top 8 Digital Audio Workstations (DAWs) for Mac and PC
- How to Reset Gmail Password on Vivo Y100 5G Devices
- How to Simulate GPS Movement in AR games On Vivo X100? | Dr.fone
- Updated Combine WMV Videos for Free Top 5 Tools for 2024
- How and Where to Find a Shiny Stone Pokémon For Itel P55? | Dr.fone
- Selected Overdub Voice with AI Virbo At Its Finest for 2024
- In 2024, Remove Device Supervision From your Apple iPhone XR
- New 2024 Approved MPEG Video Splitting Made Easy Top 5 Free Tools Compared
- Updated Best Free 4K Video Converters Expert Picks for 2024
- New The Ultimate List of Free Video Editors for Starters
- In 2024, How to Unlock ZTE Nubia Flip 5G Pattern Lock if Forgotten? 6 Ways
- In 2024, How to Transfer Data After Switching From Xiaomi Redmi Note 13 5G to Latest Samsung | Dr.fone
- How to Quickly Fix Bluetooth Not Working on Oppo A78 | Dr.fone
- Updated Mastering Pixel Calculations A Simple and Effective Method
- 2024 Approved Top Stop Motion Animation Tools for Mobile Devices
- How to Unlock SIM Card on Nokia G22 online without jailbreak
- In 2024, Which Pokémon can Evolve with a Moon Stone For Vivo Y78 5G? | Dr.fone
- 2024 Approved No Download? No Problem! The Best Speech to Text Apps for Mac You Need to Try
- In 2024, How Can I Catch the Regional Pokémon without Traveling On Xiaomi Redmi Note 12 Pro+ 5G | Dr.fone
- In 2024, Is GSM Flasher ADB Legit? Full Review To Bypass Your Xiaomi Redmi K70EFRP Lock
- How to Unlock iPhone 14 Plus with IMEI Code?
- In 2024, How To Remove Screen Lock PIN On Infinix Smart 7 HD Like A Pro 5 Easy Ways
- How to recover old call logs from your OnePlus Ace 2 Pro?
- Put and play MKV movies on Motorola Edge 40 Neo
- Updated Amazon Prime Video Display Secrets Unlock the Full Screen Potential for 2024
- Title: Updated In 2024, VoiceCapture 101 Leading Software for Accurate Vocal Tracking
- Author: Ella
- Created at : 2024-05-05 02:43:57
- Updated at : 2024-05-06 02:43:57
- Link: https://sound-optimizing.techidaily.com/updated-in-2024-voicecapture-101-leading-software-for-accurate-vocal-tracking/
- License: This work is licensed under CC BY-NC-SA 4.0.
